#SPILL! error in Excel occurs when Excel cannot populate multiple cells with the formula’s calculated results to the sheet. This error is usually reported on Office 365, Office Online, or Office 2021 versions as these support dynamic arrays. A formula working perfectly in earlier Office versions (Office 2019 or below, can be called pre-dynamic Excel) may also show #spill error in Office 365 or Office 2021 versions due to the support of dynamic arrays.

#Spill Error in Excel
Spill in Excel
The term spilling or spill in Excel is the behavior when an array formula that has multiple values as a result , outputs or “ spills ” these results into neighboring (horizontal or vertical) cells, just not limited to the cell where the formula is present.
This spill behavior is automatic and native in newer versions of Excel and even a simple formula (without any functions) can spill results to the neighboring cells. Some users may want to disable the spill functionality but the bad news is it is not possible, but a user can stop multiple results that cause the spill (discussed later).
Spill Range in Excel
The term spill range in Excel refers to the range of the result values returned by the formula that spills onto an Excel sheet. The concept can be made clear by the picture below:

Spill Range in Excel
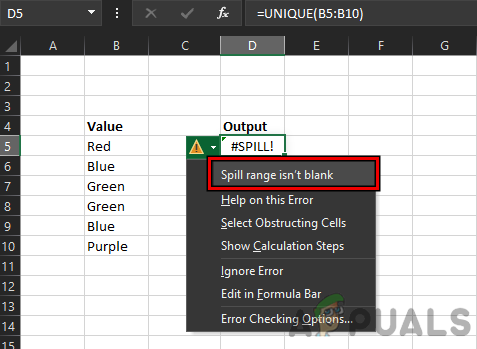
In this picture, there are two columns with data. Column B is the source data with different color names, whereas, cell D5 only holds the unique formula i.e., UNIQUE(B5:B10) but the formula’s result is shown from cell D5 to D8 . Here, D5 to D8 is the Spill Range . If a user selects a single cell in the range, then a blue border will be shown around the whole spill range .
#SPILL! Error in Excel
A user may encounter the #spill error in Excel if the dynamic arrays functionality fails to paste the calculated results in the Spill Range. To clear the concept:
- Launch Excel and create a new workbook .
- Now, fill up column B with different color names like Red, Blue, Green, Green, Blue, and Purple.
- Then, in cell D7 , enter X , and afterward, enter the following formula in cell D5 : =UNIQUE(B5:B10) #Spill Error in Excel
- Now a user will notice a #spill error in the formula cell (here, D5) because the cell D7 of the spill range is already filled with the value X.
- Then delete X from the D7 and the formula cell will be clear of the #spill error.
Check and Identify the Reason for the #Spill Error in Excel
In the above example, things look quite simple, but that is not always the case. But thanks to the nature of dynamic range functionality, every #spill error shows the reason causing the error . To better understand the concept:
- Repeat steps 1 to 3 of the above example and when the user is shown, a #spill error, click in the formula cell (here, D5).
- Now click on the warning triangle sign (shown on the side of the formula cell) and the user will notice the reason for the #spill error. Here, it will be shown as the Spill Range isn’t Blank . Identify the Cause of the Spill Error
Once the user identifies the cause of the reason, he may follow the section about the cause of the Spill error to clear the error.
1. Spill Range isn’t Blank
If a user is shown that the #spill error is occurring due to Spill Range isn’t blank, then this is the most basic reason to cause a #spill error in Excel.
#Spill Error Due to Spill Range isn’t Blank
The #spill error due to Spill Range isn’t Blank can be cleared by the following two methods:
1.1 Delete the Non-empty Cells in the Spill Range
- Click in the formula cell (that is showing #spill error) to show the blue border around the Spill Range.
- Then delete all the non-empty cells from the range or move them to other cells. Click in the Formula Cell to Highlight the Spill Range and Delete the non-empty Cells in the Spill Range
1.2 Use Select Obstructing Cells
If a range covers a lot of cells and it is a problem to find each non-empty cell in it, then
- Click in the formula cell and click on the warning triangle sign .
- Now click on Select Obstructing Cells and then delete the contents of the problematic cells or move the contents to other cells. Keep in mind if multiple cells are blocking the Spill Range, then all the obstructing cells will be selected when Select Obstructing Cells is selected. Click on Select Obstructing Cells
Keep in mind that there can be some cases, where a cell may contain an invisible character (like a space in a cell) and due to this Excel might mark it as a non-empty cell but the user may find it difficult to find the problematic character, so, look for those cells as well. To clear a cell with an invisible character (use Select Obstructing Cells to find out the problematic cells), a user may select the cell, click on Clear (in Editing section) on the Home tab of Excel, and then click on Clear All.

Clear a Cell With an Invisible Character in Excel
2. Spill Range has a Merged Cells
A user may encounter the #spill error in Excel if the Spill Range contains merged cells. Here, unmerging the merged cells in the Spill Range may clear the #spill error.
- Click on the formula cell to highlight the Spill Range .
- Now try to find merged cells and once found, unmerge the cells to clear the #spill error. #Spill Error due to Spill Range Has Merged Cell
- If merged cells cannot be found, click on the formula cell and then click on the warning triangle sign (as discussed earlier). Unmerge Cells in the Spill Range
- Now click on Select Obstructing Cells and then, unmerge the problematic cell and that may clear the #spill Excel error.
3. Spill Range in Table
The spill Range does not support the table and if the Spill Range is occurring in a table, then it may throw # a spill error. Here, a user has three options, first, use another formula (discussed at the end of the article), and second move the formula outside the table , or convert the Table to a range . To convert the table to a range:
- Except for the first cell that holds the formula, delete all other repetitions of the #spill error in the column or row (if multiple #spill errors are shown). Delete Repeated #Spill Error in an Excel Table
- Now right-click on the formula cell (or any other cell in the table) and hover over Table . Convert the Excel Table to Range
- Then click on Convert to Range and afterward, confirm to convert the table to a range. Confirm to Convert the Excel Table to Range
- Now Excel will convert the table to a range and that may clear the #spill error.
Some users may not be convenient to convert a table to a range, for those users, they may look into the TEXTJOIN or INDEX functions to clear the #spill error in a table.
4. Spill Range is Unknown
Excel may show #spill error with the cause of Spill Range is Unknown if the formula contains a volatile function . Volatile functions are those functions whose output is recalculated with every change of the sheet. If an array formula is using a volatile function, then with every output into the spill range, the sheet will be recalculated and this will trigger a non-ending cycle of recalculations , thus resulting in Spill Range is unknown. One such example is the formula below:
=SEQUENCE(RANDBETWEEN(1,100))
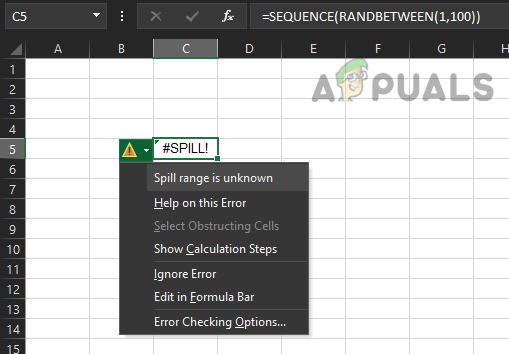
#Spill Error Due to Spill Range is Unknown
The following is the list of the volatile functions of Excel:
- CELL() (depends on arguments)
- INDIRECT()
- INFO() (depends on arguments)
- NOW()
- OFFSET()
- RAND()
- RANDBETWEEN()
- TODAY()
In the case any of the volatile functions are used in the formula, then the user may change the formula to clear the #spill error or use implicit intersection (discussed later).
5. Spill Error Out of Memory
If a user is using a complex and nested formula that is referring to large data , then that may cause a #spill error as Excel runs out of memory before populating the results in the form of a Spill Range. Here, the user may amend the formula to make it less complex and refer to a smaller chunk of data.
6. Spill Error due to Unrecognized/Fall Back
Computing is a complex process and due to this complexity, there may arise cases where Excel fails to determine the reason for # the spill error. In this case, Excel may show the spill error due to unrecognized/fall back and a user may amend the formula to remove the #spill error.
7. Spill Range Too Big
A user may see a spill error in Excel due to Spill Range Too Big if the Spill Range is going beyond the worksheet’s columns or rows, for example, if the following formula is entered in Excel (except the first row), it will trigger #spill error due to Spill Range Too Big.
=A:A+1

#Spill Error Due to Spill Range is Too Big
If the above formula is entered in any row (except the first one), then it will go beyond the last row of the sheet as the sheet holds 1,048,576 rows (Excel rows limit), whereas, the formula will try to paste to 1,048,576 rows but as it is starting from row 2 (or below), so, the sheet will require at least 1,048,577 rows (which is not there) to past the results, so, Spill Range Too Big error.
Another example could be the following formula:
=SEQUENCE(1,17000)
This will also throw a #spill error as Excel has a total of 16,384 columns , so, it is not possible to post the result to 17000 columns, and hence the #spill error due to Spill Range being too big.
To solve #spill error due to Range too big, the user may reference a range (not the whole column or row), copy the formula to other cells after applying it to a single cell , or perform implicit intersection by using @ operator.
7.1 Use Ranges to Clear the Spill Error Due to Spill Range Too Big
In place of using whole Excel columns or rows, a user may prefer the required ranges to clear the spill error due to the spill range being too big. For example, a user may encounter a #spill error for the following formula :
=B:B*10%

Spill Range Too Big Error Due to a Whole Column Formula
As the above formula uses a whole column, so, it may trigger the #spill error. Here, using a range like the following formula may clear the #spill error:
=B1:B1000*10%
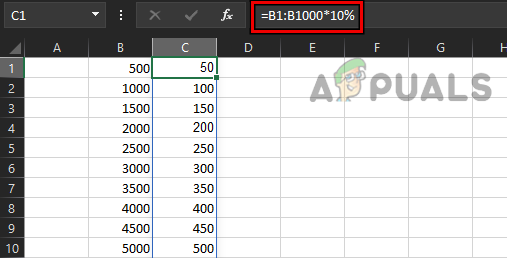
Use Ranges Instead of Whole Columns to Clear the Spill Error
7.2 Copy The Formula to Other Cells After Applying It to A Single Cell
Despite applying the Spill formula to a single cell that is triggering #spill error due to the spill range being too big, a user may copy the formula to other cells after applying it to the single cell may solve the problem.
For example, the following formula will trigger a #spill error on Excel:
=B:B*10%
But to clear the #spill error , the user may enter the following formula in the formula cell:
=B1*10%
And copy (or drag) the formula to all the relevant cells.

Apply the Formula to a Single Cell and Copy it to Other Cells
7.3 Use the Implicit Intersection
With the user implicit intersection operation, a user may stop the spilling of results to the neighboring cells and limit the current result only to the formula cell . It is the same functionality where the formula did not spill the results in the pre-dynamic Excel (Office 2019 or earlier). Another advantage of using implicit intersection is that it can be used in a table as well but with a structured reference. A user should only use this implicit intersection (with @ sign) only when there is no other way possible . To better understand the concept:
- Create a new sheet in Excel and enter the following formula: =B:B*10%
- This will trigger a #spill error . Now, add @ just before B in the formula, as under: =@B:B*10%
- Now the current result will be only shown in the formula cell without any #spill error. Use Implicit Intersection to Stop Spilling of Results to Other Cells
To use the implicit intersection in an Excel table, it will be better to use the formula with a structured reference like the below:
=[@Sales]*10%
How to Fix “Printer is in an error state” Issue?
The error “ WinRAR Error: Next Volume Is Required ” usually appears when you’re extracting a multi-part RAR archive and WinRAR can’t find (or can’t correctly identify) the next file in the sequence . This often happens when a volume is missing , stored in a different folder , or renamed in a way that breaks the archive’s expected order .

In this guide, we’ll go over the most reliable fixes confirmed by affected users, along with what each method is doing behind the scenes so you can choose the right one for your situation.
Important: To extract multi-volume archives, you should always start extraction from the first file in the set. This is usually file.part1.rar , or (in older sets) the main .rar file that comes before .r01 , .r02 , and so on.
1. Download and Place the Missing RAR File
WinRAR needs all parts of a multi-volume archive to complete extraction. This error usually appears when one of the volumes in a set like .part2.rar , .r01 , .r02 , .001 , and similar naming formats is missing . Downloading the missing volume and placing it in the same folder as the other parts allows WinRAR to continue extracting normally .
- Look at the error message or review the list of archive parts in the folder.
- Identify which volume is missing (for example, part2.rar , .r02 , .001 , etc.).
- Go back to the website or source where you downloaded the archive.
- Locate and download the exact missing file using the same naming format as the others.
- Make sure the new file name matches the pattern of the rest. Example: If you have file.part1.rar and file.part3.rar , the missing one must be file.part2.rar .
- Move the downloaded missing volume into the same folder as the other archive parts.
- Confirm that all parts are in a single folder before extracting.
- Right-click the first file in the series (usually part1 or the main .rar file) and select Extract Here or Extract to Folder .
- WinRAR should now detect all volumes and continue extraction normally .
2. Manually Browse & Select the Next Volume
Use this method only if the next volume already exists , but WinRAR is failing to detect it automatically. This can happen due to incorrect naming , the file being in a different location , or a temporary file access issue. Manually browsing helps WinRAR locate the correct volume and resume extraction without interruption .
- Right-click the first file in the series (usually .rar or part1.rar ) and select Extract Here or Extract to Folder .
- When WinRAR cannot find the next volume, it will show the “ Next Volume Is Required ” message.
- A small window will appear, allowing you to manually select the next volume .
- Use the file explorer window to locate the folder where the other archive parts are saved.
- Select the next part based on the naming order (example: select file.part2.rar after file.part1.rar ).
- Make sure the selected file matches the naming format of the archive (no extra characters like (1) and no mismatched numbering).
- WinRAR will resume extraction using the selected volume .
- If additional volumes are missing or stored separately, WinRAR may prompt you again. Repeat the same process until extraction completes.
3. Rename the RAR files in Order
WinRAR relies on a proper naming sequence (such as file.part1.rar , file.part2.rar , file.part3.rar ) to extract multi-volume archives. If a file is named incorrectly, contains extra characters, or is out of order, WinRAR may fail to locate the next volume and show this error. Renaming the files correctly helps WinRAR follow the sequence and extract the archive without interruptions .
Note: Renaming only changes the file name , not the file contents. The goal is to restore the correct sequence so WinRAR can detect the next volume.
- Go to the folder where all the RAR files are saved.
- Make sure all parts of the archive are present and stored in the same folder .
- Check how the parts are currently named . Common patterns include:
file.part1.rar, file.part2.rar, file.part3.rar
file.rar, file.r01, file.r02, file.r03
- Look for files that don’t match the expected numbering pattern (for example, file.part01.rar , file.part1(1).rar , or unrelated names).
- Rename each file so it follows the same order without extra characters or mismatched numbering. Example:
Incorrect: file.part1.rar, file.part3.rar, file.part2(1).rar
Correct: file.part1.rar, file.part2.rar, file.part3.rar
- Make sure the text before the number is exactly the same for all files.
- Only the last part number should change.
- Right-click the first file in the series (usually part1.rar or the main .rar file) and select Extract Here .
- WinRAR should now recognize the sequence and continue extraction normally .
If you still get the same prompt: the archive set is likely incomplete (a part was never downloaded or was removed), or one of the volumes is corrupt and must be re-downloaded from the original source.
