Some Windows users have been reaching us with questions after checking their Task Manager and noticing that there’s one process called officec2rclient.exe that’s constantly running and taking up a considerable amount of system resources. In some severe cases, affected users are reporting that this process ends up taking more than 50% of their CPU resources, which ends up slowing their system down considerably. Because of this suspicious behavior, some Windows users are wondering whether this service is indeed genuine or is some type of security threat.
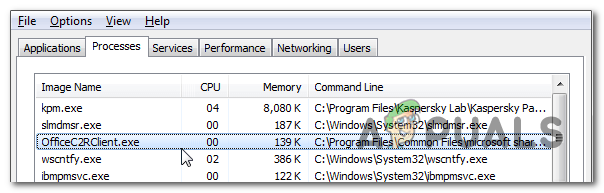
Example of officec2rclient.exe usage inside Task Manager
What is officec2rclient.exe?
If we’re talking about the genuine officec2rclient.exe file, it’s a legitimate software component that belongs to Microsoft Office 365 ProPlus and is signed by Microsoft Corporation.
The default installation location is “ C:\Program Files\Common Files\Microsoft Shared\ClickToRun “, but users can easily choose to install it in a custom location during the initial installation.
Keep in mind that this process will not be executed if the parent Office app doesn’t have the Update Now feature enabled. In case you’re wondering OfficeC2RClient stands for Microsoft Office Click-[to]-Run Client .
Although it’s perfectly normal to see usage spikes of the officec2rclient.exe process in instances where the patent application is being updated, it certainly not default behavior to see it occupy lots of CPU and RAM resources at any given moment.
Is officec2rclient.exe safe?
If we’re talking about the genuine officec2rclient.exe, it certainly doesn’t pose any security threat since it’s a software component signed by Microsoft Corp. But before you dismiss this type of treat, keep in mind that nowadays most successful malware manages to avoid detection by posing as trusted processes.
Since officec2rclient.exe is a perfect target for these types of malware executables, we encourage you to perform a series of investigations that will help you determine if the process that you’re looking at is genuine or not.
First things first, you should start investigating the parent application. Keep in mind that unless you’re actively using a Microsoft365 subscription, there’s no reason why you should see the officec2rclient.exe inside your Task Manager. If you do see it despite not having a Microsoft365 subscription membership, the chances of dealing with malware are high.
If the first investigation wasn’t that eye-opening, you should concentrate on the location of the officec2rclient.exe via Task Manager. To do this, press Ctrl + Shift + Enter to open up a Task Manager window.
Once you manage to get inside Task Manager, select the processes tab from the horizontal menu, then scroll down to the list of Background processes and locate officec2rclient.exe. After you manage to locate it, right-click on it and choose Open File Location from the newly appeared context menu.
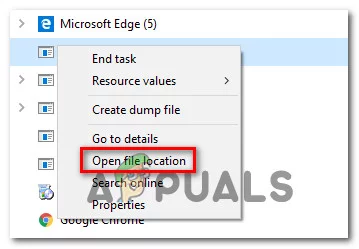
Opening the file location of koab1err.exe
If the revealed location is different than “ C:\Program Files\Common Files\Microsoft Shared\ClickToRun ” and you didn’t install the suite in a custom location, the chances of dealing with suspicious files are high.
If you’re suspecting that you might be dealing with a virus, you should upload the officec2rclient.exe file to a virus signature database to verify if the file is indeed malicious or not. If you’re looking for an easy and efficient way to do this, we recommend VirusTotal. To do this, access this link ( here ) and wait for the analysis to complete.
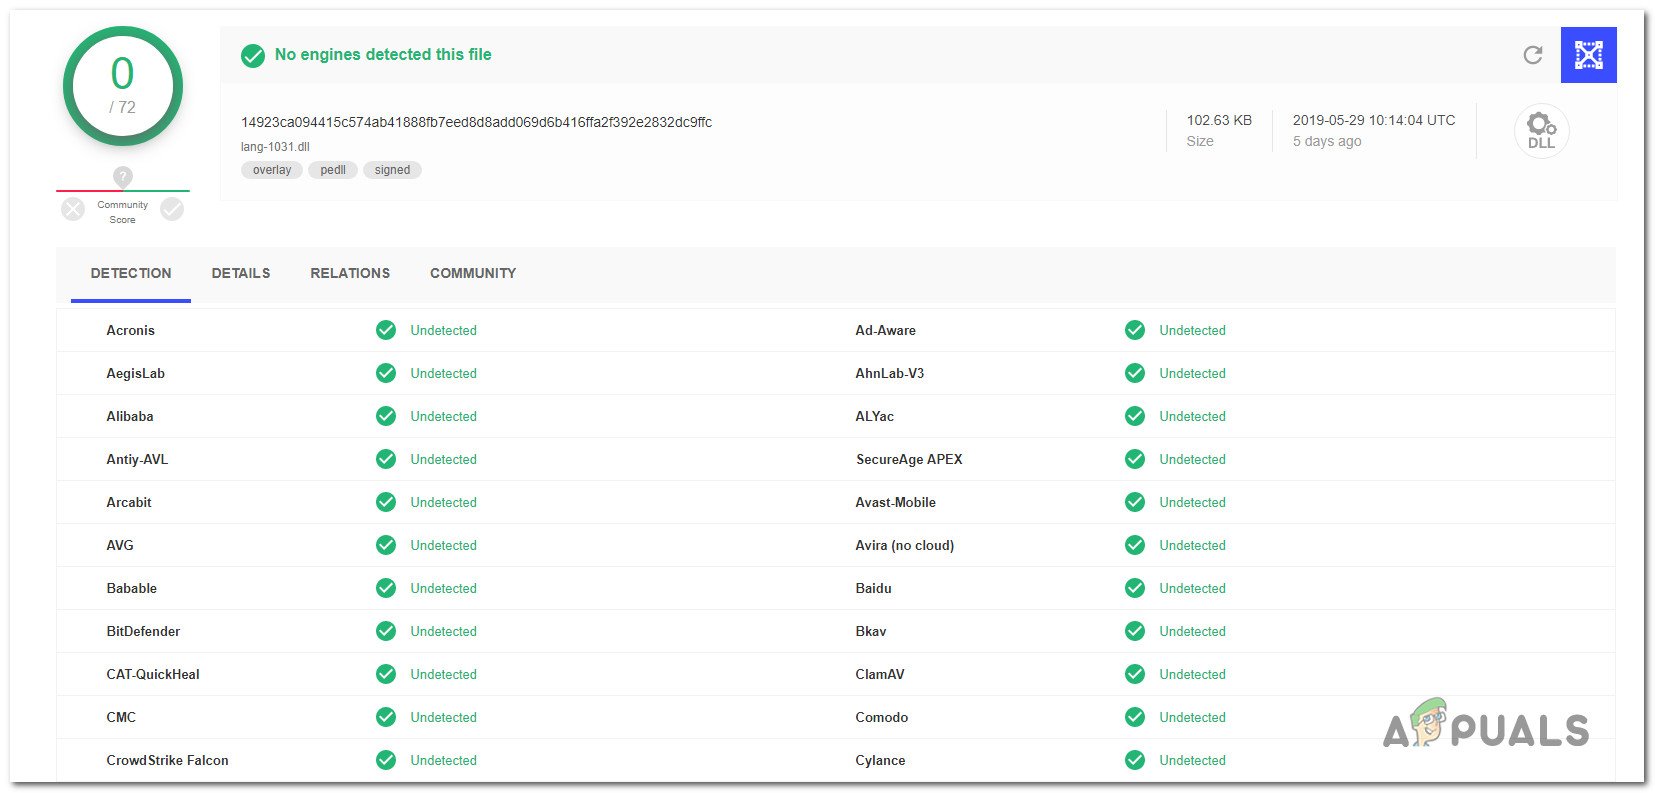
No Threats detected with VirusTotal
Note: If the analysis has revealed that the officec2rclient.exe file is genuine, skip the next section and move directly to the ‘Should I Remove officec2rclient.exe?’ section.
However, if the VirusTotal analysis has revealed some inconsistencies, continue with the next section below for some step-by-step instructions on dealing with the virus infection.
Dealing with the security threat
If the investigations you performed above have revealed that the officec2rclient.exe process is located in a suspicious location and VirusTotal labeled it as a security suite, ti’s mandatory that you deploy a security scanner capable of identifying the virus infection and dealing with it swiftly.
Keep in mind that if this scenario is true (and you’re indeed dealing with a malware that’s using cloaking to avoid detection), not all security suites will be able to detect and eliminate the threat. Since not all security suite will be able to detect and quarantine malware of this kind, you will either need to use a premium scanner or you’ll need to deploy a quality free antimalware scan.
If you already pay a premium subscription for an AV product, you can initiate a scan with that, but if you’re trying to avoid spending money for a security scanner, we recommend a deep scan with Malwarebytes. This operation will allow you to remove the majority of malware products that are avoiding detection by posing as processes with enhanced privileges.
If you’re unsure of how to initiate a deep scan with Malwarebytes, follow this step-by-step article ( here ).
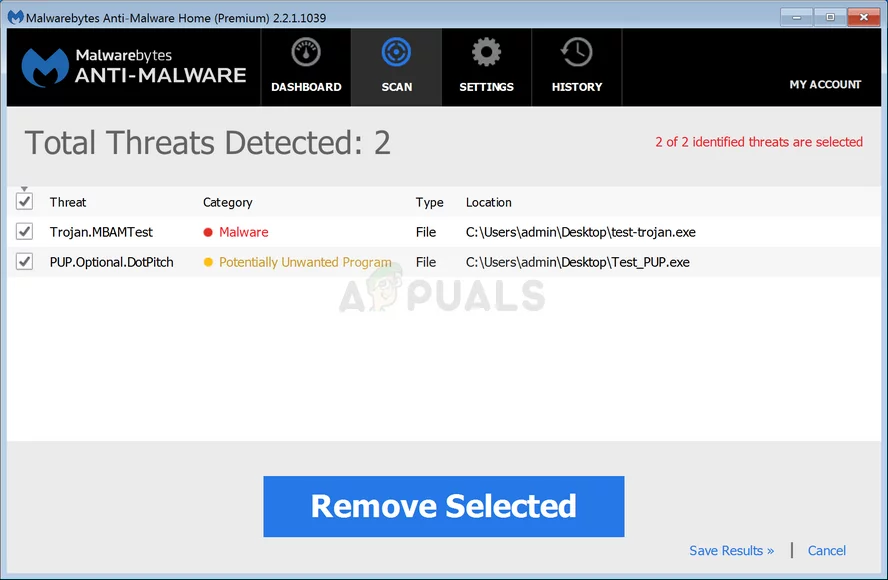
Scan completed screen in Malwarebytes
In case the scan managed to identify and quarantine infected items, restart your computer, then move down to the next section below and see if the officec2rclient.exe process is still appearing with high resource consumption.
Should I Remove officec2rclient.exe?
In case the previous investigations didn’t reveal and security threat or you already used a security scanner to take care of it, you can conclude that the officec2rclient executable is genuine. Once you got this far, pop up a Task Manager window ( Ctrl + Shift + Esc ) and see if the resource usage of the officec2rclient.exe is still high.
If it’s still considerably consuming a lot of system resources even tough no Office application is being updated, you have two ways forward:
You can either try to repair the parent application (Office 365) of officec2rclient.exe in the hopes that it will fix the high resource usage or you can uninstall the parent application altogether.
Of course, uninstalling the suite is not applicable unless you don’t use any Microsoft Office product and can do without Word, Office, Excel and the likes (or you have a different 3rd party equivalent).
If you’re are determined to do something about the high resource usage of officec2rclient.exe, move down to the final section below.
How to Repair officec2rclient.exe’s High Usage
If you performed all the verifications above to confirm that the officec2rclient.exe process is genuine but you still haven’t managed to bring the resource usage down, we’ll provide you with a couple of mitigation strategies.
Several affected users have confirmed that they were able to successfully limit the CPU consumption of the officec2rclient.exe after they repaired the entire Office installation. This operation will be effective in instances where the problem is occurring due to some kind of corrupted Microsoft Office component.
The first logical step of fixing this issue is to try and repair the Office installation. If that doesn’t work, uninstalling the suite will stop the high-resource usage, but you will also lose all access to your Microsoft Office apps.
Here’s a quick guide on repairing the Office 365 installation to limit the resource usage of officec2rclient.exe:
- Press Windows key + R to open up a Run dialog box. Next, type ‘appwiz.cpl’ and press Enter to open up the Programs and Features window. Type appwiz.cpl and Press Enter to Open Installed Programs List
- Once you find yourself inside the Programs and Features window, scroll down through the list of installed applications and locate your Office365 installation. Once you see it, right-click on it and select Change from the newly appeared context menu.
- Wait until the initial investigation is complete, then select Quick Repair from the next menu and click on Repair to kickstart the process. Repairing the Office Installation
- Click Repair once again to confirm your intention, then wait patiently until the process is completed.
- After the repair process is complete, restart your computer and wait for the next startup to complete. Once the startup sequence is complete, open the Task Manager again and see if the resource consumption went down.
How to Fix “Printer is in an error state” Issue?
The error “ WinRAR Error: Next Volume Is Required ” usually appears when you’re extracting a multi-part RAR archive and WinRAR can’t find (or can’t correctly identify) the next file in the sequence . This often happens when a volume is missing , stored in a different folder , or renamed in a way that breaks the archive’s expected order .

In this guide, we’ll go over the most reliable fixes confirmed by affected users, along with what each method is doing behind the scenes so you can choose the right one for your situation.
Important: To extract multi-volume archives, you should always start extraction from the first file in the set. This is usually file.part1.rar , or (in older sets) the main .rar file that comes before .r01 , .r02 , and so on.
1. Download and Place the Missing RAR File
WinRAR needs all parts of a multi-volume archive to complete extraction. This error usually appears when one of the volumes in a set like .part2.rar , .r01 , .r02 , .001 , and similar naming formats is missing . Downloading the missing volume and placing it in the same folder as the other parts allows WinRAR to continue extracting normally .
- Look at the error message or review the list of archive parts in the folder.
- Identify which volume is missing (for example, part2.rar , .r02 , .001 , etc.).
- Go back to the website or source where you downloaded the archive.
- Locate and download the exact missing file using the same naming format as the others.
- Make sure the new file name matches the pattern of the rest. Example: If you have file.part1.rar and file.part3.rar , the missing one must be file.part2.rar .
- Move the downloaded missing volume into the same folder as the other archive parts.
- Confirm that all parts are in a single folder before extracting.
- Right-click the first file in the series (usually part1 or the main .rar file) and select Extract Here or Extract to Folder .
- WinRAR should now detect all volumes and continue extraction normally .
2. Manually Browse & Select the Next Volume
Use this method only if the next volume already exists , but WinRAR is failing to detect it automatically. This can happen due to incorrect naming , the file being in a different location , or a temporary file access issue. Manually browsing helps WinRAR locate the correct volume and resume extraction without interruption .
- Right-click the first file in the series (usually .rar or part1.rar ) and select Extract Here or Extract to Folder .
- When WinRAR cannot find the next volume, it will show the “ Next Volume Is Required ” message.
- A small window will appear, allowing you to manually select the next volume .
- Use the file explorer window to locate the folder where the other archive parts are saved.
- Select the next part based on the naming order (example: select file.part2.rar after file.part1.rar ).
- Make sure the selected file matches the naming format of the archive (no extra characters like (1) and no mismatched numbering).
- WinRAR will resume extraction using the selected volume .
- If additional volumes are missing or stored separately, WinRAR may prompt you again. Repeat the same process until extraction completes.
3. Rename the RAR files in Order
WinRAR relies on a proper naming sequence (such as file.part1.rar , file.part2.rar , file.part3.rar ) to extract multi-volume archives. If a file is named incorrectly, contains extra characters, or is out of order, WinRAR may fail to locate the next volume and show this error. Renaming the files correctly helps WinRAR follow the sequence and extract the archive without interruptions .
Note: Renaming only changes the file name , not the file contents. The goal is to restore the correct sequence so WinRAR can detect the next volume.
- Go to the folder where all the RAR files are saved.
- Make sure all parts of the archive are present and stored in the same folder .
- Check how the parts are currently named . Common patterns include:
file.part1.rar, file.part2.rar, file.part3.rar
file.rar, file.r01, file.r02, file.r03
- Look for files that don’t match the expected numbering pattern (for example, file.part01.rar , file.part1(1).rar , or unrelated names).
- Rename each file so it follows the same order without extra characters or mismatched numbering. Example:
Incorrect: file.part1.rar, file.part3.rar, file.part2(1).rar
Correct: file.part1.rar, file.part2.rar, file.part3.rar
- Make sure the text before the number is exactly the same for all files.
- Only the last part number should change.
- Right-click the first file in the series (usually part1.rar or the main .rar file) and select Extract Here .
- WinRAR should now recognize the sequence and continue extraction normally .
If you still get the same prompt: the archive set is likely incomplete (a part was never downloaded or was removed), or one of the volumes is corrupt and must be re-downloaded from the original source.
