- CCXProcess is a background process that is used by Adobe Creative Cloud applications. It is responsible for providing a range of features, such as templates, filters, and tutorials. CCXProcess is a safe process and it is not a virus or malware.
- To Disable on Windows: Open Task Manager > End CCXProcess Task > Go to ‘Startup’ tab > Right-click CCXProcess > Press ‘Disable’
- To Disable on Mac: Open Activity Monitor > Force Quit CCXProcess > Open System Preferences and go to Users & Groups > In the Login Items tab > Uncheck CCXProcess > Restart your Mac.
- If you rarely use Adobe programs, you can safely disable CCXProcess on startup without affecting your computer. It will automatically start running when you launch an Adobe program.
If you use any program that is part of the Adobe Creative Cloud suite , you must have noticed the CCXProcess running in the background the minute you boot up your system.

This startup process is often misinterpreted as malicious spyware or a virus, leading users to want to get rid of it. If this sounds like your current situation, you have landed on the right page.
Below, we will cover CCXProcess in detail, from what it is to all the different ways you may disable the service. So, let’s get going!
What is CCXProcess? What is its purpose?
The CCXProcess is a background service of the Adobe Creative Cloud that launches at startup. Its primary function is to create a single workspace for numerous projects you create using different Adobe programs.
It also focuses on ensuring the efficient performance of all Adobe software by managing features such as automatic updates , user interface elements, syncing, etc., and providing templates, filters, and even tutorials to the users.
However, all these functions cause the service to consume slightly more resources than usual. This issue is more common in weaker PCs, where the service struggles to smoothly synchronize the activities of several Adobe programs running simultaneously.
For better efficiency, the service creates multiple instances of cscript.exe and conhost.exe processes. This usually occurs when your antivirus program conflicts with the service and prevents its smooth operation.
Should You Disable CCXProcess on Startup?
It depends. If it is using an excessive amount of CPU or resources, then you can simply disable it to free up resources . This is because, whenever you open Adobe programs, the service starts up again and everything runs and functions smoothly as intended.
It’s best to disable CCXProcess on startup if you don’t heavily rely on Adobe programs for daily use. This won’t harm your computer in any way, as the service will automatically start running again right when you launch any of the Adobe Creative Cloud applications.
If the process isn’t using many resources, then you can keep it enabled, as disabling it might slow down the start-up process of Adobe programs. This is because if the CCXProcess is disabled, Adobe programs will forcefully open it again, causing a delay in the startup speed of Adobe programs.
Ultimately, the decision of whether or not to disable CCXProcess is up to you. Consider your own computer’s specifications and how often you use Adobe Creative Cloud applications before making a decision.
Is CCXProcess a virus?
If you have any of the Adobe programs installed on your computer , then the CCXProcess.exe should be a genuine file. It is typically located in the following directory and ranges from 144 to 680 bytes in size:
C:\Program Files (x86)\Adobe\Adobe Creative Cloud Experience
However, many viruses and malware tend to hide behind the names of legitimate files or processes. Some of these common malicious programs include Trojans and crypto-miners. Hence, you should be extra careful with such services running on your PC, especially if you’re not part of the Adobe Creative Cloud.
For your safety, watch out for these red signals as potential CCXProcess virus threats:
- You have CCXProcess.exe running on your computer even though you don’t have any Adobe software installed.
- Go to the file location of the CCXProcess.exe service and run a malware scan if the destination has nothing to do with the Adobe directory.
- If the heavy CPU usage started occurring after the recent installation of a torrent or crack, etc.
- Your system has slowed down ever since the process started appearing on startup services.
How to Disable the CCXProcess on Startup?
The steps to do so may differ for Windows and Mac systems, and also for the method you choose. Let’s take a look at all the possible ways to perform this task.
Methods to Disable the CCXProcess in Windows
Let’s start with disabling this process on Windows then we can move to MacOS.
There are three methods to disable CCXProcess:
- Disable CCXProcess Auto-Start From Task Manager
- Disable From Adobe Creative Cloud Settings
- Disable Startup Entry from Windows Registry
- Uninstall the Adobe App
1. Disable CCXProcess Auto-Start From Task Manager
The most straightforward way to disable running programs, startup apps, background services, and analyze CPU performance, among other tasks, is through the Task Manager . Follow the steps below to disable CCXProcess using it:
- Press Ctrl + Shift + Esc keys from your keyboard to launch the Task Manager . Alternatively, you may right-click on the taskbar and choose Task Manager .

- Then, switch to the Startup apps tab.
- Choose CCXProcess and click Disable .

- Restart your PC to effectively apply the changes and ensure the service doesn’t launch at startup.
2. Disable From Adobe Creative Cloud
You can also directly disable the entire Creative Cloud app from launching on startup by adjusting the preferences within its settings. Here’s how:
- To begin, launch the Adobe Creative Cloud app on your desktop.
- If prompted, sign in and accept the license agreement.
- At the top right corner, click on Settings .
- Go to Preferences > General tab.
- Under the Settings section, toggle off Launch Creative Cloud at login .
- Click on Done to apply the changes.

3. Disable From Windows Registry
You may also perform this task by modifying Windows Registry. However, you’ll need to be extra careful when following this method as any mistake may corrupt your entire system. It’s also recommended to backup your Registry before following this method.
Afterward, use the instructions below to disable CCXProcess:
- Press the Win key + R to launch the Run dialog box.
- Type regedit in the given field and hit Enter .
- When it launches, navigate to: HKEY_LOCAL_MACHINE > SOFTWARE > Policies > Adobe
- Now, right-click on Adobe to view its context menu. Hover your cursor over New and select Key .

- Rename the key to CCXNew and select it. On the right pane, right-click and choose New and click on DWORD (32-bit) value .
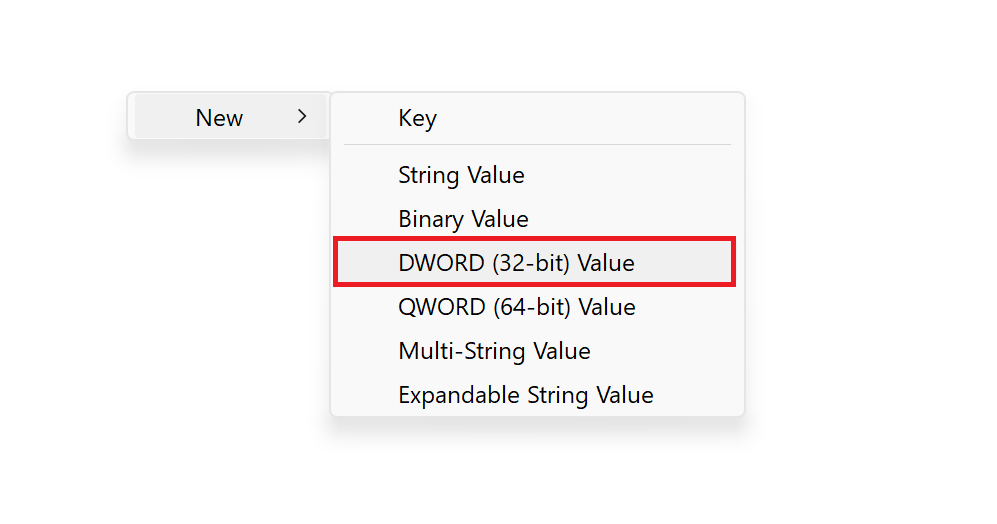
- Then, rename it to Disabled .
- Lastly, double-click on Disabled and set the Value data to 0 . Click OK to save these changes.
4. Uninstall the Adobe app
If you no longer need the Adobe application, you can uninstall it to get rid of the CCXProcess once and for all. Follow the steps below to do so:
- Press the Win key + S on your keyboard.
- Type control panel and hit Enter to launch it.
- Set View by: Category and click on the Uninstall a program link under Programs .

- Select the Adobe app from the list and click Uninstall/Change .

- Confirm your action and follow on-screen instructions to finish uninstalling the program.
Steps to Disable the CCXProcess on MacOS
Now let’s disable this process on MacOS, this process is fairly straightforward. Follow these steps:
Mac users need to first kill the CCXProcess from Activity Monitor and then disable the service from launching at startup via System Preferences. Here’s how:
- First, launch Finder on your Mac .
- Then, go to the Applications tab.
- On the right side, choose Utilities and launch Activity Monitor .
- Search for CCXProcess from the search bar at the top-right corner. Click on it and hit the x icon to end the service.

- Confirm your action by choosing Quit .
- Now, go to System Preferences from the Apple menu .
- From there, go to Users & Groups .

- Next, go to the Login Items tab.
- Unlock the padlock located at the bottom left corner.
- Then, choose CCXProcess and click the – icon to remove it.
- Restart your Mac to apply the changes.
Yes, it is safe to disable CCXProcess from startup, as it does not have a negative impact on your computer. Disabling this process does not cause any harm, as long as you’re not using Adobe CC, since it is considered only a minor background process of that software.
Yes, Adobe background processes are critical, as they perform tasks that aid in the smooth functioning of Adobe apps. Even if you are not using any Adobe apps, these processes are considered crucial and continue to work in the background.
CCXProcess is responsible for providing some of the features of Adobe Creative Cloud applications, such as templates, filters, and tutorials. If you disable CCXProcess, you may not be able to access these features.
How to Fix “Printer is in an error state” Issue?
The error “ WinRAR Error: Next Volume Is Required ” usually appears when you’re extracting a multi-part RAR archive and WinRAR can’t find (or can’t correctly identify) the next file in the sequence . This often happens when a volume is missing , stored in a different folder , or renamed in a way that breaks the archive’s expected order .

In this guide, we’ll go over the most reliable fixes confirmed by affected users, along with what each method is doing behind the scenes so you can choose the right one for your situation.
Important: To extract multi-volume archives, you should always start extraction from the first file in the set. This is usually file.part1.rar , or (in older sets) the main .rar file that comes before .r01 , .r02 , and so on.
1. Download and Place the Missing RAR File
WinRAR needs all parts of a multi-volume archive to complete extraction. This error usually appears when one of the volumes in a set like .part2.rar , .r01 , .r02 , .001 , and similar naming formats is missing . Downloading the missing volume and placing it in the same folder as the other parts allows WinRAR to continue extracting normally .
- Look at the error message or review the list of archive parts in the folder.
- Identify which volume is missing (for example, part2.rar , .r02 , .001 , etc.).
- Go back to the website or source where you downloaded the archive.
- Locate and download the exact missing file using the same naming format as the others.
- Make sure the new file name matches the pattern of the rest. Example: If you have file.part1.rar and file.part3.rar , the missing one must be file.part2.rar .
- Move the downloaded missing volume into the same folder as the other archive parts.
- Confirm that all parts are in a single folder before extracting.
- Right-click the first file in the series (usually part1 or the main .rar file) and select Extract Here or Extract to Folder .
- WinRAR should now detect all volumes and continue extraction normally .
2. Manually Browse & Select the Next Volume
Use this method only if the next volume already exists , but WinRAR is failing to detect it automatically. This can happen due to incorrect naming , the file being in a different location , or a temporary file access issue. Manually browsing helps WinRAR locate the correct volume and resume extraction without interruption .
- Right-click the first file in the series (usually .rar or part1.rar ) and select Extract Here or Extract to Folder .
- When WinRAR cannot find the next volume, it will show the “ Next Volume Is Required ” message.
- A small window will appear, allowing you to manually select the next volume .
- Use the file explorer window to locate the folder where the other archive parts are saved.
- Select the next part based on the naming order (example: select file.part2.rar after file.part1.rar ).
- Make sure the selected file matches the naming format of the archive (no extra characters like (1) and no mismatched numbering).
- WinRAR will resume extraction using the selected volume .
- If additional volumes are missing or stored separately, WinRAR may prompt you again. Repeat the same process until extraction completes.
3. Rename the RAR files in Order
WinRAR relies on a proper naming sequence (such as file.part1.rar , file.part2.rar , file.part3.rar ) to extract multi-volume archives. If a file is named incorrectly, contains extra characters, or is out of order, WinRAR may fail to locate the next volume and show this error. Renaming the files correctly helps WinRAR follow the sequence and extract the archive without interruptions .
Note: Renaming only changes the file name , not the file contents. The goal is to restore the correct sequence so WinRAR can detect the next volume.
- Go to the folder where all the RAR files are saved.
- Make sure all parts of the archive are present and stored in the same folder .
- Check how the parts are currently named . Common patterns include:
file.part1.rar, file.part2.rar, file.part3.rar
file.rar, file.r01, file.r02, file.r03
- Look for files that don’t match the expected numbering pattern (for example, file.part01.rar , file.part1(1).rar , or unrelated names).
- Rename each file so it follows the same order without extra characters or mismatched numbering. Example:
Incorrect: file.part1.rar, file.part3.rar, file.part2(1).rar
Correct: file.part1.rar, file.part2.rar, file.part3.rar
- Make sure the text before the number is exactly the same for all files.
- Only the last part number should change.
- Right-click the first file in the series (usually part1.rar or the main .rar file) and select Extract Here .
- WinRAR should now recognize the sequence and continue extraction normally .
If you still get the same prompt: the archive set is likely incomplete (a part was never downloaded or was removed), or one of the volumes is corrupt and must be re-downloaded from the original source.
