Cheat Engine is one of the leading tools for the Windows OS used by gamers to edit different game values as per their requirements to overcome different game restrictions (or just for fun). It scans the memory and uses its debugger function to perform its operation (i.e., cheating in games).

How to Use Cheat Engine
Being one of the best tools in its niche, it does not have one of the best user interfaces for a newbie and requires a certain level of expertise to operate it. So, we have compiled a beginner’s guide to make things easier for a newbie and teach them how to use cheat engine properly.
But before proceeding, keep in mind that not every game value can be edited by Cheat Engine, especially, most of the server-side or online games (which process the user data on their side, not at the user machine) values for these kinds of games cannot be edited using the Cheat Engine.
Warning : Proceed at your own risk as some games or platforms (like Steam) may ban your account for trying unethical techniques to manipulate the game modules and using Cheat Engine. The methods discussed here, are for educational purposes only.
1. Download and Install Cheat Engine
Although you may find many online resources to download Cheat Engine, it is always best to download the latest version of Cheat Engine (currently version 7.2) from the official Cheat Engine website .

Download Cheat Engine from the Official Website
Once you have downloaded the Cheat Engine, double-click on it to launch it and follow the prompts to complete the process. Make sure to decline any browser toolbar like Mcafee toolbar or any other type of adware.

Decline Installation of PUP While Installing Cheat Engine
Also, it will be a good idea to install it on the system drive at its suggested default location. Once installed, launch the Cheat Engine (click Yes, if UAC prompt is received). If asked to, skip any dialogue box that asks for the community server, etc.
2. User Interface Know-How
On the top of the Cheat Engine window, you have the following five menus :
- File
- Edit
- Table
- D3D
- Help
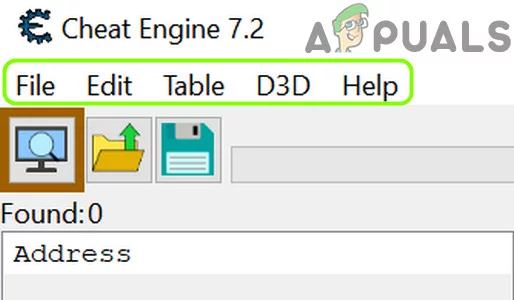
Menus of Cheat Engine
Under the menus, you have a shortcut toolbar , which has the following three icons:
- Process Explorer
- Open Cheat Tables
- Save the Current Data
Icons on the Shortcut Toolbar of Cheat Engine
3. Basic Workflow of Cheat Engine
Firstly, the user clicks the Process Explorer (to open the running processes on the system ) and there are three tabs shown to the user, namely:
- Applications
- Processes
- Windows

Process List Showing the Applications, Processes, Windows Tabs
You may use any of the tabs of the Process Explorer to find out the game’s process. Finding out the related process is a bit trickier as you can see in the image below:

Select HD Player Process in Process List of Process Explorer
As you can see in the picture above, BlueStacks has plenty of processes, and to find the related one you may have to use hit and trial method (or check the community forums for the process found by other gamers). Once a process is selected, click Open and the following type of window may be shown:
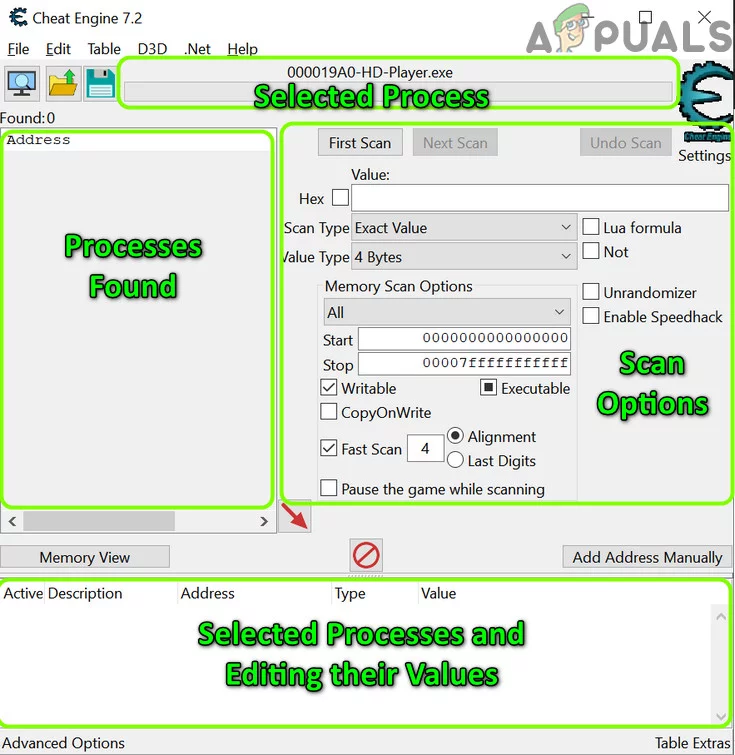
The Window After Selecting a Process in Cheat Engine
As you can see, we can roughly divide this window into 4 parts:
- Selected Process
- Scan Options
- Processes Found (these processes will only be shown after scanning the operations of the selected process).
- Selected Processes and Editing Their Values (you can edit the values of the found processes in this section).
4. Use Cheat Engine on BlueStacks [Step by Step]
Enough of the basic discussion, let us dive into the ocean of game modification. As a use case, we will discuss the process for the BlueStacks Android emulator and the same process can be used to edit the values in the other games (Windows or emulator based).

Using Cheat Engine on BlueStacks [Step by Step]
5. Use the HD-Player Process to Edit the Game Values
You can use the process tab of the Cheat Engine to find the game value of the game in BlueStacks and then edit accordingly.
- Launch Cheat Engine and open the BlueStacks emulator.
- Now, in the Cheat Engine, click on the Process Explorer icon and head to the Processes tab. Open Process Explorer of Cheat Engine
- Then, select the process that ends on HD-Player.exe (e.g., 00003294-HD-Player.exe) and click Open . Open Process of HD-Player exe in the Cheat Engine
- Now, in BlueStacks, start the game (e.g., Subway Surfer) and collect some coins (e.g., 3).
- Then pause the game and head to the Cheat Engine window. Collect Coins in Subway Surfer and Pause the Game
- Now, enter the number of coins collected in the Value box (e.g., 3) and set the Scan Type to Exact Value . Set the Value to 3 and Click on the First Scan Button in Cheat Engine
- Then set the Value Type to 4 Bytes and click on the First Scan button.
- Now, in BlueStacks, collect some more coins (e.g., total coins are 14) and pause the game .
- Then, enter 14 in Value and click on the Next Scan button. Collect Some More Coins in Subway Surfer and Pause the Game
- Now check if there are few processes shown in the left pane, if not, repeat the above steps till few processes are shown in the left pane. Enter the Value of Coins in Cheat Engine and Click on the Next Scan Button
- Then double-click the first process and set its value to 8000 . Set the Value of First Found Process to 8000 in Cheat Engine
- Now play the game and check if the number of coins has increased.
- If not, then pause the game, and in the Cheat Engine, set the value of one of the other found processes to 8000. Set the Value of Other Found Processes to 8000
- Now play the game and check if the number of coins has increased as per your requirement. Set the Value of Other Found Processes to 8000
- If not, repeat the same for other found processes (one by one) in Cheat Engine till the required process is found. Once found, you can increase the coins as per your requirements.
You may follow the same procedure to edit the values of the other game parameters (like Points, etc.). The same technique can be used to edit the game parameters of other games .
6. Use the Physical Memory Process to Edit the Game Values
If the above method did not do the trick, then try the method below which uses the Physical Memory process to find the game values (but this method may take a long time to scan and slow down your PC):
- Open the Settings of the Cheat Engine application and in the left pane, head to the Debugger Options tab. Open Settings of the Cheat Engine
- Now, select Use VEH Debugger and open the Extra tab. Enable Use VEH Debugger in Cheat Engine
- Then checkmark the option of “ Read/Write Process Memory ” and click OK . Enable Read/Write Process Memory in Cheat Engine
- Now, launch the game in BlueStacks and collect some coins .
- Then follow steps 5 to 14 of the HD Player method (discussed above) and hopefully, you can edit the game value as per your requirements.
Keep in mind that in the physical memory process, the first scan may take a longer time to complete but subsequent scans may take a lesser time to complete. If the Cheat Engine application or system crashes during the scan process, then you may try the following steps:
- Firstly, disable the Read/Write Process Memory option in the Extra tab (step 3) of Cheat Engine and head to the Scan Settings tab.
- Now enable the MEM_Mapped in the Scan Settings and try again the above method. Enable MEM_Mapped in the Scan Settings of Cheat Engine
For more advanced options to edit the game values, you may have to root the Android version of BlueStacks and install the CE Server on BlueStacks (but that discussion is not in the scope of this article) or you may try Cheat Engine with another Android emulator.
Now, as you have some basic idea of how the Cheat Engine works , it will be a good time to go through the internal Cheat Engine Tutorial in the Help menu.

Open Cheat Engine Tutorial in the Help Menu
Once you have completed the tutorial, you may try to change the values in another game (e.g., Plants Vs Zombies). For more advanced games, you can use the values/process traced by other gamers (or import tables), shared into the community forums . Also, now would be a good time to use the CE Community server to import the game values, processes, or tables and enhance your game skills. That is enough for the basic Cheat Engine guide, so, keep enjoying the game and have fun!
How to Fix “Printer is in an error state” Issue?
The error “ WinRAR Error: Next Volume Is Required ” usually appears when you’re extracting a multi-part RAR archive and WinRAR can’t find (or can’t correctly identify) the next file in the sequence . This often happens when a volume is missing , stored in a different folder , or renamed in a way that breaks the archive’s expected order .

In this guide, we’ll go over the most reliable fixes confirmed by affected users, along with what each method is doing behind the scenes so you can choose the right one for your situation.
Important: To extract multi-volume archives, you should always start extraction from the first file in the set. This is usually file.part1.rar , or (in older sets) the main .rar file that comes before .r01 , .r02 , and so on.
1. Download and Place the Missing RAR File
WinRAR needs all parts of a multi-volume archive to complete extraction. This error usually appears when one of the volumes in a set like .part2.rar , .r01 , .r02 , .001 , and similar naming formats is missing . Downloading the missing volume and placing it in the same folder as the other parts allows WinRAR to continue extracting normally .
- Look at the error message or review the list of archive parts in the folder.
- Identify which volume is missing (for example, part2.rar , .r02 , .001 , etc.).
- Go back to the website or source where you downloaded the archive.
- Locate and download the exact missing file using the same naming format as the others.
- Make sure the new file name matches the pattern of the rest. Example: If you have file.part1.rar and file.part3.rar , the missing one must be file.part2.rar .
- Move the downloaded missing volume into the same folder as the other archive parts.
- Confirm that all parts are in a single folder before extracting.
- Right-click the first file in the series (usually part1 or the main .rar file) and select Extract Here or Extract to Folder .
- WinRAR should now detect all volumes and continue extraction normally .
2. Manually Browse & Select the Next Volume
Use this method only if the next volume already exists , but WinRAR is failing to detect it automatically. This can happen due to incorrect naming , the file being in a different location , or a temporary file access issue. Manually browsing helps WinRAR locate the correct volume and resume extraction without interruption .
- Right-click the first file in the series (usually .rar or part1.rar ) and select Extract Here or Extract to Folder .
- When WinRAR cannot find the next volume, it will show the “ Next Volume Is Required ” message.
- A small window will appear, allowing you to manually select the next volume .
- Use the file explorer window to locate the folder where the other archive parts are saved.
- Select the next part based on the naming order (example: select file.part2.rar after file.part1.rar ).
- Make sure the selected file matches the naming format of the archive (no extra characters like (1) and no mismatched numbering).
- WinRAR will resume extraction using the selected volume .
- If additional volumes are missing or stored separately, WinRAR may prompt you again. Repeat the same process until extraction completes.
3. Rename the RAR files in Order
WinRAR relies on a proper naming sequence (such as file.part1.rar , file.part2.rar , file.part3.rar ) to extract multi-volume archives. If a file is named incorrectly, contains extra characters, or is out of order, WinRAR may fail to locate the next volume and show this error. Renaming the files correctly helps WinRAR follow the sequence and extract the archive without interruptions .
Note: Renaming only changes the file name , not the file contents. The goal is to restore the correct sequence so WinRAR can detect the next volume.
- Go to the folder where all the RAR files are saved.
- Make sure all parts of the archive are present and stored in the same folder .
- Check how the parts are currently named . Common patterns include:
file.part1.rar, file.part2.rar, file.part3.rar
file.rar, file.r01, file.r02, file.r03
- Look for files that don’t match the expected numbering pattern (for example, file.part01.rar , file.part1(1).rar , or unrelated names).
- Rename each file so it follows the same order without extra characters or mismatched numbering. Example:
Incorrect: file.part1.rar, file.part3.rar, file.part2(1).rar
Correct: file.part1.rar, file.part2.rar, file.part3.rar
- Make sure the text before the number is exactly the same for all files.
- Only the last part number should change.
- Right-click the first file in the series (usually part1.rar or the main .rar file) and select Extract Here .
- WinRAR should now recognize the sequence and continue extraction normally .
If you still get the same prompt: the archive set is likely incomplete (a part was never downloaded or was removed), or one of the volumes is corrupt and must be re-downloaded from the original source.
