So you are looking for an easy way to view who has permissions to a file, folder or network share? This could be because some user is accessing some files that they have no right to or another user, your boss most likely, has problems accessing data that they need. Or maybe you have been requested by compliance auditors to produce a report highlighting all the privileged users in your network.
How do you go about that? Well, there is the hard way and the easy way. The hard way is individually going through all the users and groups in your network and recording their permissions. But for me, that is just a waste of time. And you risk making a lot of mistakes.
So why not opt for the easy way and use a dedicated permission analyzer tool. With this tool, you don’t need to be connected to the corresponding server and share. Instead, just key in the folder’s UNC path and the name of the group or user on the tool’s UI and it will give you their effective NTFS and share permissions.
The Active directory also has built-in security settings you can use but it has one limitation. It only determines the effective permissions and disregard share permissions.
In this post we will be highlighting the five best permission analyzers not based on their popularity but what they can do for you. Check out their features and you should be able to find one that’s the best fit.
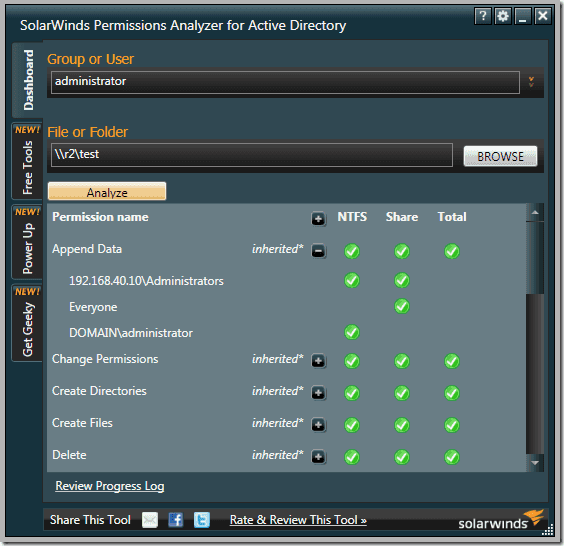
1. SolarWinds Permissions Analyzer for Active Directory
SolarWinds have been making life easy for System admins for the past 10 years thanks to their excellent free and premium networking tools. And while the premium tools offer the best functionality, the free tools also boast of really competitive and useful features.
Like the permission analyzer. This is a great tool to not only determine the effective NTFS permissions but also the share permissions for a network share and for a specific user or group.
SolarWinds Permission Analyzer
The software is relatively easy to use and with just a few mouse clicks you are able to determine the permission rights that a particular user has.
It may not be the best tool for reporting but it gives in-depth visibility into your user and group permissions. You can easily determine how a certain user has inherited their permission by looking at the hierarchical arrangement of the users and groups in your network. The tool also supports nested groups from multiple domains.
If your task extends beyond analyzing permissions then you may want to consider the SolarWinds Access Manager. It comes with extra functionalities like the ability to improve security posture, mitigate insider threats, and comprehensive reporting.
2. CJWDEV NTFS Permissions Reporter
The name may not be the most memorable but you will definitely not forget this tool. It provides you with an easy way to view NTFS permissions all the way down your directory tree. You can quickly determine which groups have access to which directories and further export the information to an HTML file for further analysis.
The standard edition of the software supports more file types like CSV and Excel XLSX.

CJWDEV NTFS Permissions Reporter
CJWDEV is a tool whose strength lies in its reporting. It has numerous ways to help you sort through the tangled mess of permission, therefore, helping you quickly identify permissions that go against your company standards.
When analyzing the permissions in your active directory you can sort the data based on their attributes such as the account name, account SID, whether or not the permission is inherited, account domain, and whether or not an account is active.
This tool allows you to view the permissions for both direct and nested groups in your report. And to enable you and others better understand the permissions report, the tool allows you to highlight different permissions with different colours so that there is a clear distinction between them. You can also choose to either display the report in tree form or as a table.
This CJWDEV NTFS Permissions Reporter comes with a modern easy to understand interface so that even first time users can easily generate reports a few moments after launching it for the first time.
3. NTFS Permissions Reporter
The NTFS Permission reporter is also a great tool to analyze and generate ready to use reports regarding NTFS permission in your Active Directory.
NTFS Permissions Reporter
It displays the permissions across all folders in a hierarchical manner that you can easily browse through and also includes colour codes to distinguish between different permissions which will help you make a better analysis.
You can also choose between tree and table views of the permissions. You will notice a lot of resemblance between this tool and the tool by CJWDEV except that it includes more features. For instance, it has more filter options to better sort through the permissions data.
The generated report can be exported to file formats like HTML and MS Excel.
4. Netwrix Effective Permissions Reporting Tool
This free tool from Netwrix is another tool you can rely upon to analyze permissions in your AD and produce a comprehensive report highlighting who has permission to what.

Netwrix Effective Permissions Reporting Tool
It will help you to ensure that the permission rights of every employee in your organization match with their roles and the report generated will be key in determining the necessary course of action.
From the report, you can also tell whether the permissions were explicitly assigned or inherited. But most importantly the reports will be excellent proof to the management and auditors when the need arises.
5. LIZA
LIZA is a largely unknown tool but is one of the best tools that you can rely upon to facilitate Active Directory Security and perform permission and ACL analysis.

LIZA Permissions Analyzer
It provides a comprehensive review of permissions and audit configurations across the active directory environment. The tool also allows you to track an account and determine where in the directory hierarchy it received the permissions.
How to Fix “Printer is in an error state” Issue?
The error “ WinRAR Error: Next Volume Is Required ” usually appears when you’re extracting a multi-part RAR archive and WinRAR can’t find (or can’t correctly identify) the next file in the sequence . This often happens when a volume is missing , stored in a different folder , or renamed in a way that breaks the archive’s expected order .

In this guide, we’ll go over the most reliable fixes confirmed by affected users, along with what each method is doing behind the scenes so you can choose the right one for your situation.
Important: To extract multi-volume archives, you should always start extraction from the first file in the set. This is usually file.part1.rar , or (in older sets) the main .rar file that comes before .r01 , .r02 , and so on.
1. Download and Place the Missing RAR File
WinRAR needs all parts of a multi-volume archive to complete extraction. This error usually appears when one of the volumes in a set like .part2.rar , .r01 , .r02 , .001 , and similar naming formats is missing . Downloading the missing volume and placing it in the same folder as the other parts allows WinRAR to continue extracting normally .
- Look at the error message or review the list of archive parts in the folder.
- Identify which volume is missing (for example, part2.rar , .r02 , .001 , etc.).
- Go back to the website or source where you downloaded the archive.
- Locate and download the exact missing file using the same naming format as the others.
- Make sure the new file name matches the pattern of the rest. Example: If you have file.part1.rar and file.part3.rar , the missing one must be file.part2.rar .
- Move the downloaded missing volume into the same folder as the other archive parts.
- Confirm that all parts are in a single folder before extracting.
- Right-click the first file in the series (usually part1 or the main .rar file) and select Extract Here or Extract to Folder .
- WinRAR should now detect all volumes and continue extraction normally .
2. Manually Browse & Select the Next Volume
Use this method only if the next volume already exists , but WinRAR is failing to detect it automatically. This can happen due to incorrect naming , the file being in a different location , or a temporary file access issue. Manually browsing helps WinRAR locate the correct volume and resume extraction without interruption .
- Right-click the first file in the series (usually .rar or part1.rar ) and select Extract Here or Extract to Folder .
- When WinRAR cannot find the next volume, it will show the “ Next Volume Is Required ” message.
- A small window will appear, allowing you to manually select the next volume .
- Use the file explorer window to locate the folder where the other archive parts are saved.
- Select the next part based on the naming order (example: select file.part2.rar after file.part1.rar ).
- Make sure the selected file matches the naming format of the archive (no extra characters like (1) and no mismatched numbering).
- WinRAR will resume extraction using the selected volume .
- If additional volumes are missing or stored separately, WinRAR may prompt you again. Repeat the same process until extraction completes.
3. Rename the RAR files in Order
WinRAR relies on a proper naming sequence (such as file.part1.rar , file.part2.rar , file.part3.rar ) to extract multi-volume archives. If a file is named incorrectly, contains extra characters, or is out of order, WinRAR may fail to locate the next volume and show this error. Renaming the files correctly helps WinRAR follow the sequence and extract the archive without interruptions .
Note: Renaming only changes the file name , not the file contents. The goal is to restore the correct sequence so WinRAR can detect the next volume.
- Go to the folder where all the RAR files are saved.
- Make sure all parts of the archive are present and stored in the same folder .
- Check how the parts are currently named . Common patterns include:
file.part1.rar, file.part2.rar, file.part3.rar
file.rar, file.r01, file.r02, file.r03
- Look for files that don’t match the expected numbering pattern (for example, file.part01.rar , file.part1(1).rar , or unrelated names).
- Rename each file so it follows the same order without extra characters or mismatched numbering. Example:
Incorrect: file.part1.rar, file.part3.rar, file.part2(1).rar
Correct: file.part1.rar, file.part2.rar, file.part3.rar
- Make sure the text before the number is exactly the same for all files.
- Only the last part number should change.
- Right-click the first file in the series (usually part1.rar or the main .rar file) and select Extract Here .
- WinRAR should now recognize the sequence and continue extraction normally .
If you still get the same prompt: the archive set is likely incomplete (a part was never downloaded or was removed), or one of the volumes is corrupt and must be re-downloaded from the original source.
