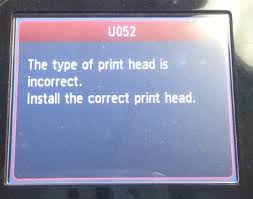
A lot of Canon printer users come across the error message, “U052 This type of print head is incorrect.” It is a very common error on Canon printers and is fairly easy to troubleshoot.
There are two different scenarios related to the U052 error message. One is where the print head is not installed at all, resulting in the ‘U052: This type of print head is incorrect’ error message.
In the second scenario, the print head is installed, but it is not functioning properly or might not be working at all. The following section will show step-by-step troubleshooting for both scenarios.
Receiving Error U052 with printhead installed.
Open the top lid of the printer to access the printer’s cartridges and print head. When you open the top lid, the cartridge slot will automatically lift up to the middle front of the printer.
Unplug the printer from the switchboard. Make sure that the cartridge lever, located just on the side of the cartridge cradle, is lifted up. In this position of the lever, the cartridge slot will not move automatically.
Remove all the ink cartridges from the cartridge slots.
Removing cartridges exposes the black print head. Now, gently remove the print head from the printer . The technique for removing the print head involves grabbing it where the cartridges are inserted, pulling it gently, and the print head will come out.
Then, perform the basic cleaning cycle on the print head.
Reinsert the print head and ink cartridges into the printer, ensuring that there are no open doors and the lever is returned to its original position.
Close the top lid of the printer.
Turn on the printer.
Take out a test print to check if the Error U052 has been resolved.
Getting U052 Without Any Print Head Installed.
Switch off the printer.
Open the top lid of the printer. If there are no cartridges or print heads in the printer, then the positioning of the cartridge slots will naturally be in the middle front of the printer with the lever lifted up.
Install the print head into the sliding rail, just beside the cartridge slot.
Install the cartridges into the cartridge slots. Close the lever, and ensure that there are no open doors and that the cartridges and print heads are properly installed.
Close the top lid of the printer.
Turn on the printer.
Take out a test print to check if the Error U052 has been resolved.
To resolve the Canon Printer error ‘U052: This type of print head is incorrect,’ the troubleshooting approach provided above should work for either of the scenarios. If the problem persists, contact the Canon Helpline or a printer technician.
How to Fix “Printer is in an error state” Issue?
- Even in our digital age, physical materials like paper still play a vital role, especially in printing, where the type of paper can greatly affect the final product.
- Different printers are best suited to specific paper types, such as glossy for photos or cardstock for invitations, highlighting the importance of choosing the right paper for your project.
- The variety of paper options, with different textures, weights, and finishes, allows for creativity and precision in achieving the desired look and feel for each print job.
Choosing the right paper for your print job is not an easy task. You need to understand factors like paper weight , finish , and brightness . The combination of these qualities results in numerous paper types, each suited to a specific use case.

Types of Paper for Printing
You wouldn’t want to print your cherished pictures on cardstock paper, and you certainly wouldn’t want to print your business card on standard printer paper. Knowing the different options available can help you make the most of your printer for a broader range of projects.
- Types of Printer Papers 1. Inkjet Paper 2. Laser Paper 3. Copy Paper 4. Matte Paper 5. Glossy Paper 6. Photo Paper 7. Card Stock Paper 8. Bond & Label Paper
- Which Paper is Best for Your Print Job?
Types of Printer Papers
1. Inkjet Paper

Inkjet Paper
As the name suggests, inkjet paper is specifically designed for inkjet printers to create clear text and sharp images . It can be further classified into various types, such as glossy , matte , and card , to suit different needs. However, this doesn’t mean that other paper types won’t work with these printers. The specification is simply to achieve the best results, as inkjet paper tends to absorb ink and is thus made slightly thicker .
2. Laser Paper

Laser Paper
Similarly, laser paper is specifically designed for laser printers to produce high-quality results. This type of paper is usually best for office use, such as memos , invoices , and high-volume documents . The finish is typically matte to avoid delaying drying time.
Since the toner stays on the surface of the paper in laser printing, it is not designed for maximum absorption, unlike inkjet paper, which can withstand more moisture comparatively.
3. Copy Paper

Copy Paper
While some may use copy paper and laser paper interchangeably, there’s a distinct difference between the two. Copy paper is the kind you usually find next to your office printer in a large box. It is thinner and less expensive than laser paper and, well , gets the job done. However, color accuracy and print quality may sometimes be compromised .
4. Matte Paper

Plain Matte Paper
Matte paper, or more commonly known as printer paper, features a non-reflective, smooth , and non-textured finish that provides a clean and professional appearance. For this reason, it is ideal for printing reports and resumes , although the latter is less common these days.
But what’s even better, you ask ? You can produce double-sided printouts without having silhouettes show on the other side. Talk about a great balance of cost-effectiveness and resource efficiency in the long run!
5. Glossy Paper

Glossy Paper
Looking for a touch of pizzazz ? Then a glossy finish is the way to go. It not only enhances contrast and color saturation , but when combined with durable inks and color-depth cartridges, it produces brilliant and crisp photographs and marketing materials . Text documents are not the best use of this paper, unless , of course, you’re aiming for an extra element of sophistication.
6. Photo Paper

Photo Paper
Photo paper is specifically designed for printing photographs and is available in several finish options, such as matte , glossy , and satin . In fact, it often has a different finish on each side and is thicker than most papers.
The purpose of this paper, as clear as the results it produces, is to deliver exceptional sharpness and color reproduction . After all , what good is a photograph if it’s not preserved in its best quality for many years to come? However, you should check your printer’s manual or the manufacturer’s website to see if it can handle photo paper and its thickness.
7. Card Stock Paper

Card Stock Paper
You might still be wondering what to use for printing business cards , wedding invitations , flyers , or other formal materials for your brand. Using regular printer paper or glossy paper for these purposes may not be very convincing. For this, you need the durability and sturdiness offered by card stock paper.
The premium feel and longevity of this material can withstand harsh handling and minimize damage. However, keep in mind that not all printers are designed to handle card stock. So, if you use an incompatible printer , be prepared for paper jams or other similar issues.
8. Bond & Label Paper

Bond & Label Paper
Ever noticed how receipts and labels paper feel different from your everyday paper? That’s because it’s a special material called thermal roll or bond roll , which features a texture similar to fabric.
The “ thermal ” in its name refers to the printing process that uses heat to imprint the image onto the paper. This method not only reduces ink costs but also prevents smudging and smearing . However, receipts and labels aren’t its only applications. Thermal paper is used in various fields, from art to business and beyond . But mostly where ink permanence is the top priority.
Which Paper is Best for Your Print Job?
Since everyday tasks typically require standard matte paper and most office printers use laser paper for document reproduction, you don’t need extraordinary printers or thicker paper for these tasks.
But if you wish to print cards , invitations , and brochures , you’ll definitely need to stock up on card stock and glossy paper. And if you’re a photographer with a studio, you wouldn’t need to purchase anything other than photo paper —until you decide to leave the profession, that is.

A and C-Series Paper Sizes
But it doesn’t end there. Each paper type is available in various sizes , ranging from A1 to A10 . While standard printers typically support A4 and/or A3 sizes, specialized printers can accommodate a wider range of sizes, along with different coatings and weights, providing maximum flexibility for your printing needs.
Modern operating systems, including the latest iterations of Windows, strive to provide seamless integration with peripheral devices. Printers, as essential peripherals, however, sometimes pose unique challenges. Users have encountered issues ranging from driver incompatibilities to persistent difficulties when attempting to remove printer software and hardware entries from their systems.

These problems can manifest in various ways; error messages may indicate unresolved printer issues, and the typical removal processes may falter—leaving devices in limbo within system settings. Attempting to uninstall printers sometimes leads to perpetual ‘removal in progress’ indicators, while other times, printers linger in the device list even after supposed successful uninstallation.
Despite the sophistication of Windows and frequent updates, such issues persist, necessitating a set of troubleshooting methods to aid users in effectively managing and removing their printer devices. This article provides a comprehensive guide on tackling these stubborn printer removal problems across various versions of Windows.
Method 1: Remove Old Drivers From Print Server Properties
Sometimes, printer drivers can get corrupted or become incompatible after a system update, leading to issues such as the printer being stuck in a state where it cannot be removed.
To address this, users have found success in resolving printer issues by removing outdated or problematic drivers directly from the Print Server Properties. This approach can often dislodge a printer that seems permanently attached to the system, paving the way for a cleaner and more conventional removal process.
- Open a new Run window by pressing Windows key + R . Then, type “ control ” and press Enter to open Control Panel . Open Control Panel
- Inside Control panel, click on Device and Printers . Open Devices and Printers
- In the Devices and Printers window, select the printer that you are having trouble removing and click on Print server properties (top ribbon bar). Open Print Server Properties
- In the Print Server Properties window, click on the Drivers tab. Then, systematically remove any driver that belongs to the printer that refuses to uninstall by selecting it (via the Installed printer drivers box) and clicking Remove . Remove the Faulty Printer’s Driver
- Once the printer driver is removed, click on Apply and restart your computer.
Method 2: Remove the Corrupted Printer Registry Entries
Some users have successfully resolved their printer issues by deleting registry entries related to the malfunctioning printer using the Registry Editor.
Removing these specific registry keys and subkeys removes the corresponding printer’s configuration data, potentially fixing corruption issues. After clearing the registry and restarting the computer, many were able to remove the printer in the usual way without further complications.
- Press Windows key + R to open up a Run box. Then, type “Regedit” and hit Enter to open Registry Editor . Open Regedit
- Inside Registry Editor, navigate to the following location using the left pane: HKEY_LOCAL_MACHINE > SYSTEM > CurrentControlSet > Control > Print > Printers
- In the Printers key, locate the entry associated with your the printer that you want to remove, right-click and choose Delete . Delete Faulty Printer’s Registry Entries Once the key (and subkeys) associated with your printer has been deleted, close Registry Editor and reboot your system.
Method 3: Clear the Print Jobs Queue
Many users have encountered a scenario where a printer cannot be removed due to stuck print jobs. These pending jobs can interfere with the printer’s removal process. Clearing the spooler, which stores print commands, can often resolve this issue by removing any obstructions and allowing the printer to be uninstalled successfully.
- Press Windows key + R to open up a Run box. Then, paste (or type) C:\Windows\System32\spool\PRINTERS in the Run box and hit Enter to open the folder holding the printing jobs. Open C:\Windows\System32\spool\PRINTERS
- Hit Yes at the UAC prompt to get permissions to edit the PRINTERS folder.
- If the PRINTERS folder is not empty, delete everything there to free up the printing queue.
- Once the PRINTERS folder is empty, try to remove (or uninstall) the printer again, then restart your computer.
Method 4: Remove the Printer from the Settings Menu
- Press Windows key + R to open up a Run window. Then, type ms-settings:connecteddevices and hit Enter to open the Connected Device tab of the Settings menu. Open ms-settings:connecteddevices
- In the Connected Devices menu, move over to the left pane and click on Printers & Scanners to expand the list. Now, click on your printer to expand the drop-down menu, then click on Remove Device .
- Hit Yes to confirm the removal of the device at the next prompt, then close the Settings menu and restart your computer to force the changes to take effect.
If you’re still seeing your printer listed in the Devices list at the next restart or if it continues to show “being removed”.
Method 5: Remove Printer via Control Panel
Using the legacy Control Panel interface can sometimes circumvent issues with removing a printer that persists in Windows. This method has proven effective especially after clearing old drivers through Print Server Properties, which can resolve conflicts or corruption within the printer’s installation files.
- Press Windows key + R to open up a Run window. Then, type “ control ” and hit Enter to open Control Panel . Open Control Panel
- Inside Control Panel, click on Devices and Printers, then expand the Printers drop-down menu.
- Right-click on the printer that you want to remove, then select Remove Device . Remove the Printer
- Hit Yes at the confirmation prompt, close Control panel and restart your system.
Method 6: Remove the Printer via Print Management (if applicable)
- Press Windows key + R to open up a new Run box. Then, type printmanagement.msc and hit Enter to open the Print Management wizard. Open printmanagement.msc
- In the Print Management window, expand the Print Servers drop-down menu and double-click on Printers to open them in the left pane.
- From the left pane, right-click on the printer that you want to remove and click on Delete.
- Click the Yes button to confirm the deletion, then close Print Management and restart your computer for the changes to take full effect.
At the next startup, see whether the printer driver has been successfully removed. If you’re still seeing listed among your other devices, move over to the other method below.
Method 7: Remove Printer via Device Manager
Removing the printer from the list of devices can also be done from Device Manager, but keep in mind that some users have reported that this method was ineffective in their case – the printer has only briefly removed from the list of devices and was back at the next startup.
- Press Windows key + R to open a Run box. Then, type devmgmt.msc and hit Enter to open Device Manager . Open devmgmt.msc
- In Device Manager, expand the Print queues drop-down menu, right-click on our printer and choose Uninstall Device . Uninstall the Faulty Printer in Device Manager
- Close Device Manager and make sure you disconnect the printer cable from the PC, then restart your computer.
Method 8: Remove the Printer via Command Prompt
Some users have finally managed to remove the printer using an elevated Command Prompt. This method will require you to get a little technical, but it has the potential of succeeding where other methods failed.
Note: The following procedure will not be successful unless you do the command in an elevated Command Prompt.
- Press Windows key + R to open up a new Run box. Then, type “ cmd ” and hit Ctrl + Shift + Enter and click Yes at the UAC (User Account Control) prompt to open an Elevated Command Prompt . Open Command Prompt
- In the Elevated Command prompt, type or paste the following command and press Enter to see a list with all your printers that are currently active: wmic printer get name
- Open a Notepad or a similar text editor and make a note of the exact name of the printer that you want to remove. Note Down Exact Name of the Faulty Printer
- Type the following command and press Enter to remove the printer from your Windows computer: printui.exe /dl /n “Name of Printer”
Note: Keep in mind that the Name of Printer is just a placeholder for the name that you previously noted down at step 3. Replace the placeholder with the actual name of the printer that you want to remove. The result should look like this:
Remove-Printer -Name "Canon IP1188 Inkjet Printer"
To verify if this method was successful, close the elevated Command Prompt and restart your computer. At the next startup, see whether your printer is still among the devices list. If it is, move over to the other methods below.
Method 9: Remove the Printer UsingPowerShell
Some users have successfully managed to remove the stubborn printer that was refusing to go away on Windows by using PowerShell. While this method will require you to get a little technical, it’s reportedly more efficient than the majority of methods that are done through a graphical interface.
- Press Windows key + R to open up a Run box. Then, type “ PowerShell ” and press Ctrl + Shift + Enter and hit Yes at the User Account Control prompt to open an elevated Powershell window. Open PowerShell
- In the Elevated PowerShell window, type or paste the following command and press Enter to get a list of all your active printers: Get-Printer | Format-List Name
- Open notepad and copy the exact name of the printer that you wish to remove. You’ll need it briefly. Copy the Faulty Printer Name
- In the same elevated Powershell window, type the command below and press Enter . Remove-Printer -Name " Printer name" Note: Be mindful that “Printer name” is just a placeholder for the actual name of your printer. Replace the placeholder with the name of the printer that you extracted at step 3 . The result should end up looking like this: Remove-Printer -Name “Canon IP1188 Inkjet Printer”
- Once the command has been successfully registered, close the Elevated PowerShell window and restart your system.
At the next startup, see whether the printer device is still present in the printer’s list. If it is, move down to the next method.
Method 10: Remove the Printer From the Printers Folder
- Open a new Run box by pressing the Windows key + R . Then, paste (or type) explorer shell:::{2227A280-3AEA-1069-A2DE-08002B30309D} in the Run box and press Enter to open the Printers folder. Open Printer Folder
- In the Printers folder, right-click on the printer that you wish to remove and choose Delete .
- Click Yes to confirm the removal of the printer, then restart your computer to force the changes to take effect.
At the next startup, see whether the printer has been removed from your computer.
The WPS method OR ( push button method ) is an easy and quick method for connecting the printer to the wireless router, access point, or gateway. Generally, the way it works is that you press this button on the printer first, and then on the router within 2 minutes, allowing both devices to connect to each other.
There are two ways you can access the WPS settings: either through the Setup or by pushing the WPS button on the printer. On some printer models, this button is not available; therefore, to access it, you will need to enter the printer’s setup menu, which is usually indicated by a Tools/Wrench icon on the printer’s panel.
If the button is available, how do i connect my printer to my router?
If the button is available, take a close look at the buttons on the printer to identify a button with a wireless icon. Press this button and then press the WPS button on your router within two minutes.
If the WPS button is not available, what do I do then?
If the button is not available, you can connect by entering the printer’s setup through touch. This article does not cover specific models but serves as a general guide.
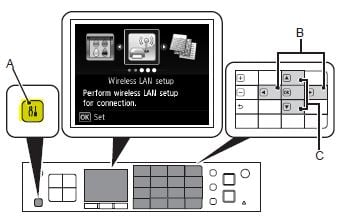
( A ) indicates the setup button, which is what you will need to press. Once you are in the settings, use the arrow keys to enter “ Wireless LAN Setup ,” “ Wireless Setup ,” or “ Network Setup “.
Once inside, locate the Push Button Method or WPS method and proceed with it.
You will then be told to press the WPS button on your router within 2 minutes.
Press the WPS button on the router for the connection to take place.
