The error code 0xc00d36b4 is encountered when Windows 10 users try to play certain files using the built-in Groove Music Player. If the file that’s triggering this error is attempted to be played as part of a playlist, the app will automatically skip it and begin to play the next one.

Error Code 0xc00d36b4 with Groove Music Player
Note: This problem is different from the situation in which the Google Music app is constantly crashing with no error message.
What’s causing the Groove Music Player error 0xc00d36b4 and How to Fix it?
- Media file is not supported – Groove Music Player only works with a limited number of file formats. It supports the most popular file formats, but it’s not equipped to support newer formats that are not widely adopted. If the file is not supported by Groove Music Player, you can use an offline or online converter to make the file compatible or by using a 3rd party tool that is equipped to support more file formats.
- Windows Media player is stuck in a limbo state – As it turns out, this problem can occur because the main component that powers Groove Music Player (Windows Media Player) is stuck in a limbo state. If this scenario is applicable, you can resolve the issue by accessing the Windows Feature screen and disabling the media features before restarting and turning them back on.
- Codec interference – There’s one particular set of third party codecs that are known to conflict with the Groove Music player app. If Nero Codecs is currently installed on your computer, you can fix the problem entirely by uninstalling the application via the Programs and Features menu.
- Glitched Audio format – Another real possibility that might cause this error code is a glitched audio format that was facilitated after an improper restart or system shutdown. If this scenario is applicable, you can resolve the issue by accessing the audio settings of the device that you use and changing the Default Format to a different sample rate and bit depth.
Method 1: Verifying if the file format is supported
Even though in most cases, the issue occurs with file formats that are supported by Groove Music Player, it’s still worth it to begin this troubleshooting attempt by verifying if the file that’s triggering the error code 0xc00d36b4 is among the supported file formats.
Keep in mind that the Groove Music app doesn’t support as many file formats as many of the other 3rd party equivalents. However, it is capable of playing every major file format that is popular nowadays. Here’s a list with every file format that the Groove Music app is capable of playing:
- .mp3
- .flac
- .aac
- .m4a
- .wav
- .wma
- .ac3
- .3gp
- .3g2
- .amr
If you’re encountering the error code 0xc00d36b4 with a different file format, the logical step would be to use a converter (offline or online) that’s capable of transforming your file to a format that is officially supported by the Groove Music app. There are plenty of free alternatives online that will allow you to do this.
If the file that’s triggering the 0xc00d36b4 error is already of a format supported by Groove Music app, move directly to the next potential fix below.
Method 2: Re-enabling Windows Media Player
As it turns out, in most cases, this issue will occur because the main component that powers the Groove Music app ( Windows Media Player ) is stuck in a limbo state (neither opened or closed). In this case, the Groove Music app will be unable to use this functionality, which will most likely trigger the 0xc00d36b4 error.
Several affected users that we’re struggling to resolve this issue have confirmed that they were finally able to get the issue resolved after they used the Program and Features interface to stop Windows Media Player and restart your computer. After doing so and turning the component back on, most affected users have reported that the issue was resolved and they were able to play supported files with the Groove Music app without encountering the 0xc00d36b4 error.
Here’s a quick guide on disabling & re-enabling the Windows Media Player integration from the Windows Features screen:
- Press Windows key + R to open up a Run dialog box. Next, type ‘appwiz.cpl’ and press Enter to open up the Programs and Files window. Typing in “appwiz.cpl” in the Run prompt
- Once you’re inside the Programs and Features menu, click on Turn Windows features on or off hyperlink from the left-hand section of the window. In Programs and Features, click on Turn Windows Features On or Off
- Wait until the Windows Features screen is fully loaded. Next, scroll down through the list of Windows features and expand the drop-down menu associated with Media Features . Then, uncheck the box associated with Windows Media Player and click Ok to save the changes. Disabling Windows Media Player
- After you attempt to disable Windows Media Player, you will be asked to confirm. To do this, click on Yes. Then, restart your computer and wait for the next startup sequence to complete.
- At the next startup sequence, follow steps 1 and 2 again to return to the Windows Features screen again. This time, check the box associated with Windows Media Player and click OK to re-enable it. Disabling Windows Media Player
- Restart your computer once again and see if the issue is now resolved by attempting to open the media file with the Groove Music app.
If you’re still encountering the same 0xc00d36b4 error, move down to the same potential fix below.
Method 3: Uninstalling Nero Codecs (if applicable)
As it turns out, the Groove Music app tends to conflict with a 3rd party codec pack supplied by NERO. Several affected users have confirmed that they managed to resolve the error and play supported files with the Groove Music app after they uninstalled the 3rd party codecs via the Programs and Features menu.
Keep in mind that this particular codec is in no way essential to your operating system. Windows 10 is perfectly capable of playing every major media format with the built-in codecs supplied by Windows Media Player.
Here’s a quick guide on uninstalling the Nero Codecs via the Programs and Features menu:
- Press Windows key + R to open up the Run dialog box. Next, type ‘appwiz.cpl’ and press Enter to open up Programs and Files menu. Type appwiz.cpl and Press Enter To Open Installed Programs Page
- Once you’re inside the Programs and Files menu, scroll down through the list of installed applications and locate the Nero codec pack that you suspect might be causing the conflict with the Groove Music app.
- When you locate the codec pack that needs to be uninstalled, right-click on it and choose Uninstall from the newly appeared context menu. Uninstalling Nero Codec Pack
- Follow the on-screen instructions to complete the uninstallation of the problematic codec pack.
- Once the operation is complete, restart your computer and see if the problem is resolved at the next system startup.
If the same 0xc00d36b4 error is still occurring, move down to the next method below.
Method 4: Changing the default Audio format
Under certain circumstances, the 0xc00d36b4 error will start occurring after an improper restart or system shutdown. Although there’s no official explanation of why this problem occurs in the first place, a lot of affected users have managed to resolve the problem by accessing the audio settings of the device that’s currently in use and changing the Default format (adjusting the sample rate and bit depth).
Note : If you want, you can determine the true bitrate of the audio file that is failing.
Here’s a quick guide on changing the default format on Windows 10 to fix the 0xc00d36b4 error:
- Right-click on the sound icon of your taskbar icon. Next, from the newly opened context menu, choose Open Sound settings .
- Once you’re inside the Sound settings screen, move down to the right-hand section of the screen and scroll down to the Related settings sub-menu and click on Sound Control Panel .
- After you manage to get inside the Classic Sound menu, select the Playback tab and then right-click on the active sound device that you’re currently using. From the newly appeared context menu, choose Properties.
- From the Properties screen of your audio device, choose the Advanced tab.
- Next, go to the Default Format section and adjust the Default format to a different value than the one it’s currently set to. NOTE : If the fix will be successful, you can return to this menu later and change the value to the preferred one again.
- Click Apply to save the changes, then attempt to play the media file again using the Groove Music app.
Changing the default audio format
If the same issue is still occurring, move down to the final method below.
Method 5: Using a 3rd party equivalent
If none of the methods above have allowed you to play the file using the Groove Music app without encountering 0xc00d36b4 error, you may be dealing with a file that is of a different format than the one suggested by its extension.
In this case, you will not be able to force the Google Music app to run it no matter how many fixing methods you try. The only workaround, in this case, is to let go of the proprietary media playing tool and move towards a more equipped 3rd party equivalent.
If you’re looking for one that’s capable of playing a huge array of different media formats, we encourage you to use the VLC media player. You can download it from here .

Downloading VLC Media Player
If you don’t want to make it the default media playing tool, you can use it on-demand by right-clicking on the media file that’s causing the problem and choosing Open with > VLC media player .
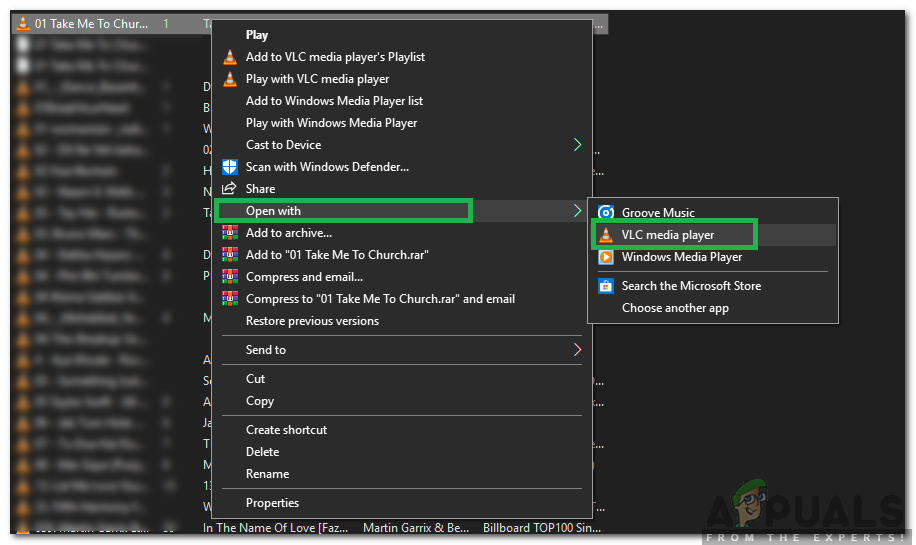
Right-clicking on the MP3 file, clicking on open with and selecting “VLC Media player” from the list
How to Fix “Printer is in an error state” Issue?
The error “ WinRAR Error: Next Volume Is Required ” usually appears when you’re extracting a multi-part RAR archive and WinRAR can’t find (or can’t correctly identify) the next file in the sequence . This often happens when a volume is missing , stored in a different folder , or renamed in a way that breaks the archive’s expected order .

In this guide, we’ll go over the most reliable fixes confirmed by affected users, along with what each method is doing behind the scenes so you can choose the right one for your situation.
Important: To extract multi-volume archives, you should always start extraction from the first file in the set. This is usually file.part1.rar , or (in older sets) the main .rar file that comes before .r01 , .r02 , and so on.
1. Download and Place the Missing RAR File
WinRAR needs all parts of a multi-volume archive to complete extraction. This error usually appears when one of the volumes in a set like .part2.rar , .r01 , .r02 , .001 , and similar naming formats is missing . Downloading the missing volume and placing it in the same folder as the other parts allows WinRAR to continue extracting normally .
- Look at the error message or review the list of archive parts in the folder.
- Identify which volume is missing (for example, part2.rar , .r02 , .001 , etc.).
- Go back to the website or source where you downloaded the archive.
- Locate and download the exact missing file using the same naming format as the others.
- Make sure the new file name matches the pattern of the rest. Example: If you have file.part1.rar and file.part3.rar , the missing one must be file.part2.rar .
- Move the downloaded missing volume into the same folder as the other archive parts.
- Confirm that all parts are in a single folder before extracting.
- Right-click the first file in the series (usually part1 or the main .rar file) and select Extract Here or Extract to Folder .
- WinRAR should now detect all volumes and continue extraction normally .
2. Manually Browse & Select the Next Volume
Use this method only if the next volume already exists , but WinRAR is failing to detect it automatically. This can happen due to incorrect naming , the file being in a different location , or a temporary file access issue. Manually browsing helps WinRAR locate the correct volume and resume extraction without interruption .
- Right-click the first file in the series (usually .rar or part1.rar ) and select Extract Here or Extract to Folder .
- When WinRAR cannot find the next volume, it will show the “ Next Volume Is Required ” message.
- A small window will appear, allowing you to manually select the next volume .
- Use the file explorer window to locate the folder where the other archive parts are saved.
- Select the next part based on the naming order (example: select file.part2.rar after file.part1.rar ).
- Make sure the selected file matches the naming format of the archive (no extra characters like (1) and no mismatched numbering).
- WinRAR will resume extraction using the selected volume .
- If additional volumes are missing or stored separately, WinRAR may prompt you again. Repeat the same process until extraction completes.
3. Rename the RAR files in Order
WinRAR relies on a proper naming sequence (such as file.part1.rar , file.part2.rar , file.part3.rar ) to extract multi-volume archives. If a file is named incorrectly, contains extra characters, or is out of order, WinRAR may fail to locate the next volume and show this error. Renaming the files correctly helps WinRAR follow the sequence and extract the archive without interruptions .
Note: Renaming only changes the file name , not the file contents. The goal is to restore the correct sequence so WinRAR can detect the next volume.
- Go to the folder where all the RAR files are saved.
- Make sure all parts of the archive are present and stored in the same folder .
- Check how the parts are currently named . Common patterns include:
file.part1.rar, file.part2.rar, file.part3.rar
file.rar, file.r01, file.r02, file.r03
- Look for files that don’t match the expected numbering pattern (for example, file.part01.rar , file.part1(1).rar , or unrelated names).
- Rename each file so it follows the same order without extra characters or mismatched numbering. Example:
Incorrect: file.part1.rar, file.part3.rar, file.part2(1).rar
Correct: file.part1.rar, file.part2.rar, file.part3.rar
- Make sure the text before the number is exactly the same for all files.
- Only the last part number should change.
- Right-click the first file in the series (usually part1.rar or the main .rar file) and select Extract Here .
- WinRAR should now recognize the sequence and continue extraction normally .
If you still get the same prompt: the archive set is likely incomplete (a part was never downloaded or was removed), or one of the volumes is corrupt and must be re-downloaded from the original source.
