- PC Health Check not showing results is caused by temporary glitches or faulty installation
- The Windows PC Health Check is a great tool to know if your PC meets Windows 11 requirements
- To fix the issue, restart your PC and app or reinstall the app.
- The tool is necessary for all Windows users who want to check their PC health and performance status
The issue of PC Health Check not showing results on Windows 10 occurs when a user attempts to determine whether their PC is eligible for a Windows 11 upgrade . The issue is caused by the corrupted app and system files that result in the dysfunction of the PC Health Check. In this article, we will look at the causes of the error and how to fix it. The problem occurs even after updating or enabling TPM 2.0 in BIOS, and in some cases, the PC Health Check will say the PC doesn’t meet the Windows 11 requirements and won’t display all the results.
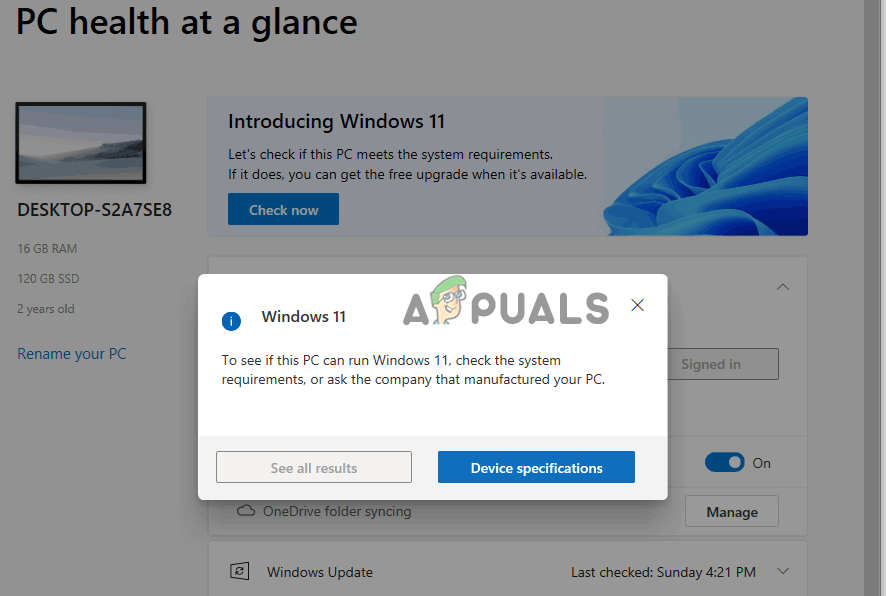
PC Health Check Not Showing Results
It’s quite annoying, especially when a user has tried everything they can to fix the issue and has restarted their PC several times. When they try to check the results, they receive the following message on the PC Health Check, and clicking the ‘See all results’ button displays nothing:
To see if this PC can run Windows 11, check the system requirement, or ask the company that manufactured your PC.
What causes PC Health Check not to show results?
The PC Health Check app fails to display results due to corrupted app files or faulty installation. However, there could be other possible reasons that we cannot rule out. Other causes of the PC Health Check not showing results may include:
- Compatibility issues: If there are incompatibilities hitches between the versions of your operating system and PC Health Check, the app will have issues that may include not showing results.
- Insufficient memory or system resources: Obviously, if there is not enough memory or resources that an app requires to run, it will not perform its tasks properly, and so it the PC Health Check. It will not work or show results.
- A firewall or security app is blocking the PC Health Check tool: These apps can interfere with how the tool works and trigger hitches that make the app unable to display results.
- Hardware issues: If components like hard drives, RAM, etc have technical problems, the PC Health Check app will not show results or even fail to work completely. However, this is a rare issue and when it happens, it can affect how the entire system works.
- Lack of necessary privileges and permissions: Some users might have set some restrictions in their system that prevent the health check tool to access some offline and online components.
The cause of PC Health Check not showing results on Windows PCs can be device-specific and in such cases, the list above might not apply.
How Do I Fix PC Health Check Not Showing Results on Windows?
If PC Health Check app is not showing results on your Windows PC, cancel the error message and start the process afresh. According to a Microsoft independent advisor , you can also fix the error by restarting Windows Explorer in the Task Manager processes. If that doesn’t work, we have more solutions that will ensure you fix the issue successfully. To resolve this error try the following solutions:
- Restart your PC and PC Health Check app: If you restart your computer, it automatically repairs any simple technical issues that might have triggered the error. The same applies to the PC Health Check app. Any temporary issues will be repaired.
- Repair the PC Health Check tool: The PC Health Check app can have a faulty or incomplete installation that causes the app to behave abnormally. Repairing the app fixes such things and brings it back to how it should function.
- Perform SFC scan: Damaged, corrupted or missing system files can actually cause many issues including the PC Health Check tool not showing all the results. The tool automatically detects corrupted or missing file and fix them or suggest what you need to do.
- Reinstall the PC Health Check app: If the app has technical issues or there was incomplete or faulty installation. Also, app files can be broken and the only way to fix this is by reinstalling the app. The app will have new files and it will also fix glitches that we had in the previous app.
- Update your OS and PC Health Check app: If either your OS or the PC Health Check app is outdated, there can be incompatibility issues. Ensure both are in the most recent versions.
- Try an in-place upgrade: If your computer meets system requirements for Windows 11, but the PC Health Check app says otherwise, you can perform an in-place upgrade. This is the process where you upgrade from Windows 10 to Windows 11 while keeping your data, settings, and server roles. It is the last resort method but it’s worth trying. It actually takes the same time as other methods of upgrading your OS.
1. Restart your PC and PC Health Check app
Restarting your computer and the PC Health Check is a recommended preliminary step that ensures that the temporary technical issues are repaired automatically on restart. Some bugs or technical hitches cause temporary issues to apps and systems, but they are not fatal. Such issues can make the PC Health Check app not show results. So, restart your PC and the app and see if the issue is fixed; close the app and restart your system from the Start button.
2. Repair the PC Health Check tool
- Press the Windows button + R , type Control in the Run dialog box, and press Enter to open Windows Control Panel .
- Locate and click on Programs and Features .
- You will see a list of apps; locate Windows PC Health Check , right-click on it, and select Repair . Repair PC Health Check tool
- Your computer will restart the app; check if you have fixed the issue.
3. Perform SFC scan
- Open Command Prompt as an administrator. Press the Windows button + R, type CMD and hit Ctrl + Shift + Enter .
- Next, type the following command line and press Enter : sfc /scannow
- Open the PC Health Check and see if the app can now show all results. Run SFC scan
4. Reinstall the PC Health Check app
- Press the Windows button + R , type Control , and press Enter on the keyboard.
- Click on the Programs and Features option to access all apps.
- Locate and right-click Windows PC Health Check and choose Uninstall . This will remove the app from your Windows PC completely. Reinstall PC Health Check tool
- Next, download the Windows PC Health Check app and follow the onscreen directions to complete its installation.
5. Update your OS and PC Health Check app
Update your Windows system and PC Health Check tool. Windows updates both of them automatically, but if you have disabled these settings, you can update Windows manually . These ensure that if the previous version had bugs or other technical issues, they are resolved.
6. Try an in-place upgrade
- Go to the Windows download page and select Windows 11. Scroll a bit and select Download Now which is located under the Create Windows 11 Installation Media . Try an in-place upgrade
- Run the file you just downloaded by following the on-screen directions.
- Remember to select the recommended settings like Keep your files and apps and then proceed with the installation.
- Give your PC time to complete the process and restart your computer.
Still Stuck?
To check your PC health status, search Windows Security. Click Open and go to the Device performance & health option. Here you will see your report and any recommended actions you need to take. Alternatively, you can download and install the Windows PC Health Check app which offers a detailed report on your PC health status.
The Windows PC Health Check app is necessary for any user who wants to check the health status of the system, performance, and compatibility. For example, the health check app can indicate whether your computer meets Windows 11 requirements. So you won’t need to install it and cause issues if it’s not compatible with your PC.
How to Fix “Printer is in an error state” Issue?
The error “ WinRAR Error: Next Volume Is Required ” usually appears when you’re extracting a multi-part RAR archive and WinRAR can’t find (or can’t correctly identify) the next file in the sequence . This often happens when a volume is missing , stored in a different folder , or renamed in a way that breaks the archive’s expected order .

In this guide, we’ll go over the most reliable fixes confirmed by affected users, along with what each method is doing behind the scenes so you can choose the right one for your situation.
Important: To extract multi-volume archives, you should always start extraction from the first file in the set. This is usually file.part1.rar , or (in older sets) the main .rar file that comes before .r01 , .r02 , and so on.
1. Download and Place the Missing RAR File
WinRAR needs all parts of a multi-volume archive to complete extraction. This error usually appears when one of the volumes in a set like .part2.rar , .r01 , .r02 , .001 , and similar naming formats is missing . Downloading the missing volume and placing it in the same folder as the other parts allows WinRAR to continue extracting normally .
- Look at the error message or review the list of archive parts in the folder.
- Identify which volume is missing (for example, part2.rar , .r02 , .001 , etc.).
- Go back to the website or source where you downloaded the archive.
- Locate and download the exact missing file using the same naming format as the others.
- Make sure the new file name matches the pattern of the rest. Example: If you have file.part1.rar and file.part3.rar , the missing one must be file.part2.rar .
- Move the downloaded missing volume into the same folder as the other archive parts.
- Confirm that all parts are in a single folder before extracting.
- Right-click the first file in the series (usually part1 or the main .rar file) and select Extract Here or Extract to Folder .
- WinRAR should now detect all volumes and continue extraction normally .
2. Manually Browse & Select the Next Volume
Use this method only if the next volume already exists , but WinRAR is failing to detect it automatically. This can happen due to incorrect naming , the file being in a different location , or a temporary file access issue. Manually browsing helps WinRAR locate the correct volume and resume extraction without interruption .
- Right-click the first file in the series (usually .rar or part1.rar ) and select Extract Here or Extract to Folder .
- When WinRAR cannot find the next volume, it will show the “ Next Volume Is Required ” message.
- A small window will appear, allowing you to manually select the next volume .
- Use the file explorer window to locate the folder where the other archive parts are saved.
- Select the next part based on the naming order (example: select file.part2.rar after file.part1.rar ).
- Make sure the selected file matches the naming format of the archive (no extra characters like (1) and no mismatched numbering).
- WinRAR will resume extraction using the selected volume .
- If additional volumes are missing or stored separately, WinRAR may prompt you again. Repeat the same process until extraction completes.
3. Rename the RAR files in Order
WinRAR relies on a proper naming sequence (such as file.part1.rar , file.part2.rar , file.part3.rar ) to extract multi-volume archives. If a file is named incorrectly, contains extra characters, or is out of order, WinRAR may fail to locate the next volume and show this error. Renaming the files correctly helps WinRAR follow the sequence and extract the archive without interruptions .
Note: Renaming only changes the file name , not the file contents. The goal is to restore the correct sequence so WinRAR can detect the next volume.
- Go to the folder where all the RAR files are saved.
- Make sure all parts of the archive are present and stored in the same folder .
- Check how the parts are currently named . Common patterns include:
file.part1.rar, file.part2.rar, file.part3.rar
file.rar, file.r01, file.r02, file.r03
- Look for files that don’t match the expected numbering pattern (for example, file.part01.rar , file.part1(1).rar , or unrelated names).
- Rename each file so it follows the same order without extra characters or mismatched numbering. Example:
Incorrect: file.part1.rar, file.part3.rar, file.part2(1).rar
Correct: file.part1.rar, file.part2.rar, file.part3.rar
- Make sure the text before the number is exactly the same for all files.
- Only the last part number should change.
- Right-click the first file in the series (usually part1.rar or the main .rar file) and select Extract Here .
- WinRAR should now recognize the sequence and continue extraction normally .
If you still get the same prompt: the archive set is likely incomplete (a part was never downloaded or was removed), or one of the volumes is corrupt and must be re-downloaded from the original source.
