Mathematically, a number cannot be divided by zero. The same holds true in Excel. Excel cannot calculate a value that is divided by zero and denotes it with #Div/0! In addition to zero, division by a blank or empty cell is also displayed as #Div/0!
#Div/0! Error in Excel
Simply put, when Excel encounters a value divided by zero , a blank/empty cell , or a value that equals zero, it displays the #Div/0! error. Although we will discuss the #div/0! error with respect to Excel, this article is also applicable to other spreadsheet programs such as Google Sheets, Open Office, etc.
Error Due to Division by Zero.
Enter the following formula in cell B2:
=12/0
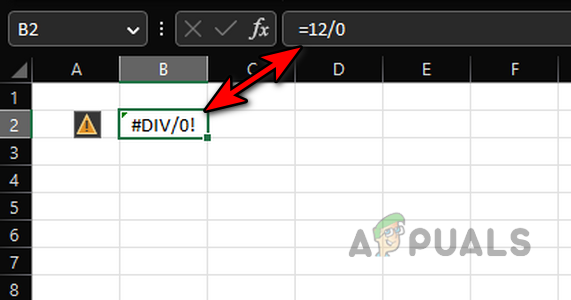
#Div/0! Error Due to Division by Zero
This will immediately throw a #Div/0! error, as the denominator in the formula is zero.
Look at the image below, and you will notice a divide-by-zero error in cell E9. Here, the formula is:
=C9/D9
But D9 is 0, so the error.
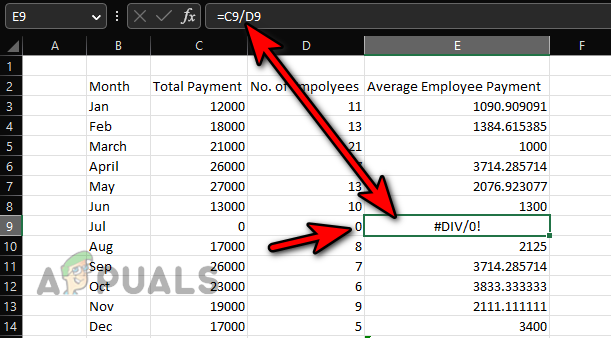
#Div/0! Error Due to Division by a Cell Containing Zero
Error after division by a blank cell.
Enter 10 in cell B2 and input the following formula in cell D3 :
=B2/C2
This will result in a #Div/0! error because cell C2 is blank and treated as zero in Excel calculations.
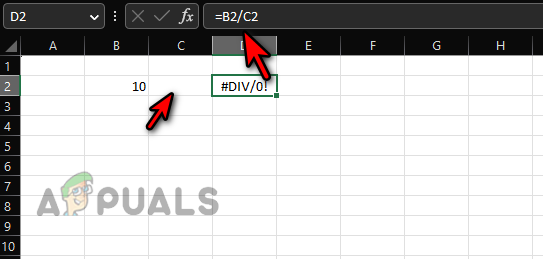
Division by Zero Error Due to a Blank Cell C2
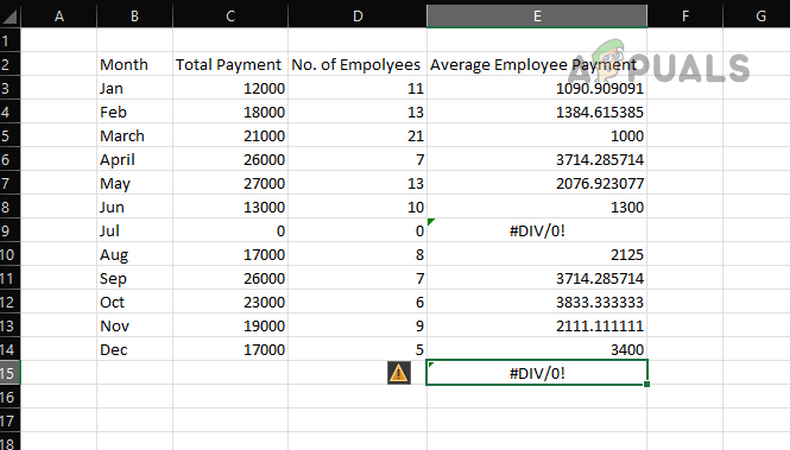
Error in an Average Formula Due to Non-Numeric Value
Enter the values shown in the image below and input the following formula into cell C15 :
=AVERAGE(C3:C14)
However, this will result in a #Div/0! error in cell C15.
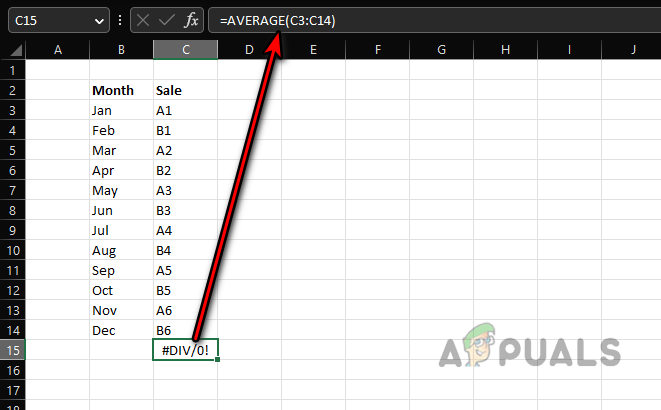
#Div/0! Error in Average of Non-Numeric Values
Average is
=sum/count
Since the sum and count of numeric values in the given range are both zero (because the values are non-numeric), it results in a 0/0 situation, leading to the div/0! error.
The Averageifs Formula
The statement above is also true for the AVERAGEIF and AVERAGEIFS formulas; however, let us focus on discussing the error at hand with respect to the AVERAGEIFS function. Please refer to the image below:
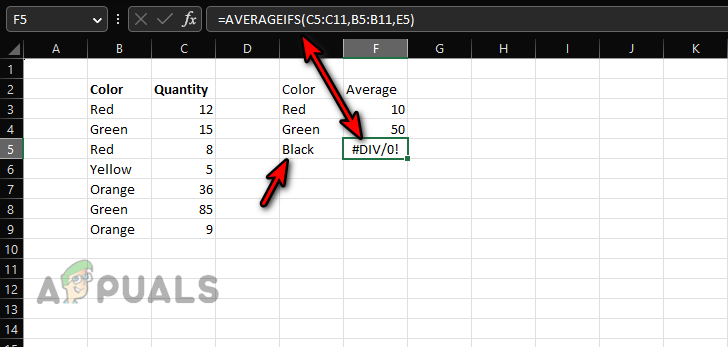
#Div/0! Error in the Averageifs Formula
There are two columns: one for color and the other for quantity . We want to calculate an average of the color values based on the data in cells C3:C9 . Enter the formula in cell F3 .
=AVERAGEIFS(C5:C11,B5:B11,E3)
Copy it to cells F4 and F5. You will immediately notice a #DIV/0! error in cell F5. But why?
For cell F3 , the count of red is 2 (B3 and B5), and the sum is 12 + 8 = 20 (C3 and C5). The average will be 20/2 = 10 .
For cell F5 , the count of black is 0 (since black is not present in the reference range), and the sum is also zero ; therefore, it results in a 0/0 calculation, causing a #DIV/0! error.
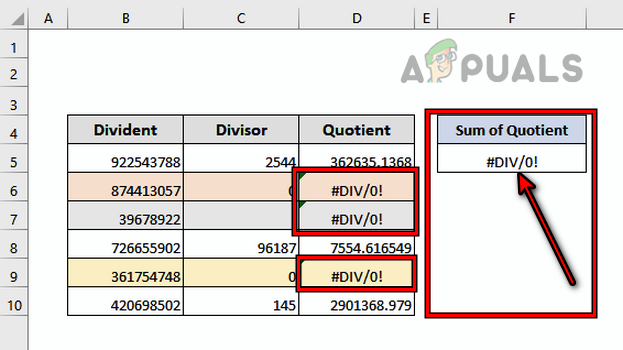
Error in Another Formula Where Division Is Not Involved.
Enter the following formula in cell E15 :
=SUM(E3:E14)
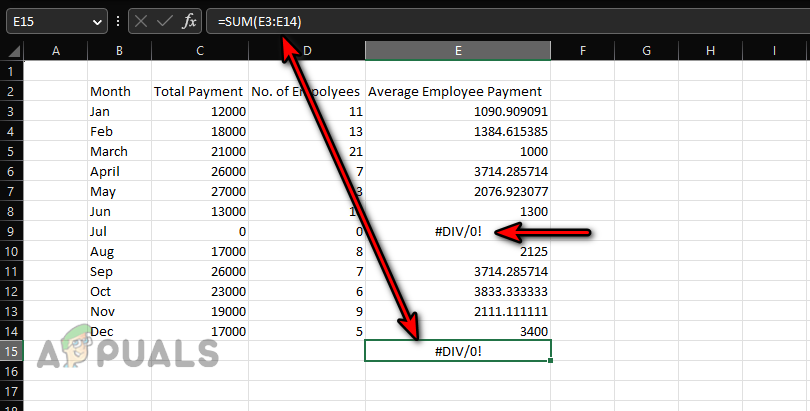
Divided by Zero Error in a Sum Function
But why does it show a #div/0! error? This is a simple sum function, and there is no division involved. The #div/0! error in cell E3 is causing the error in cell E15 .
MOD is also an Excel formula that can directly cause a #div/0! error.
Reasons for #Div/0! Errors.
So, Excel will display a division by zero error.
- If there is a division by zero , a blank , or an empty cell is involved.
- If the information in the formula range is not valid , for example, trying to get the average of a range of non-numeric cells.
- If the formula range already contains a #div/0! error.
Methods for Handling #Div/0! Errors.
As the #Div/0! error has its roots in mathematics and cannot be avoided, first ensure that the error is not caused by a mistake or human error. To do so:
- Ensure there is no division by zero, blank, or empty cell in the process.
- Check if the information in the formula range is valid . For example, ensure that you are not attempting to calculate an average of non-numeric cells.
- Make sure there is no cell already displaying a #DIV/0! error in the formula range.
- Use the Excel formulas to mask, trap, or fix #div/0! errors (discussed later).
If error reporting is enabled, click on the yellow triangle icon and select ‘ Show Calculation Steps .’ You can use that to isolate the problem.
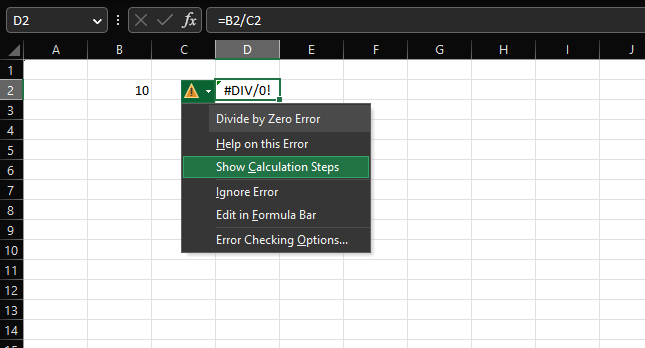
Use Error Reporting to Find Issues Causing a #div/0! error
How to Find #DIV/0! Error Cells.
One can manually overlook a division by zero error when going through a large data set, and using Excel’s capabilities to find all the cells with #div/0! errors will be of great help. This can also help us decide how to manage these errors.
- Press Control + F keys to open the Find and Replace box.
- Expand the options , and in the “ Find What ” box, enter: #DIV/0!
- Select ‘ Sheet ‘ or ‘ Workbook ‘ (in the ‘Within’ dropdown) and set the ‘ Look in ‘ dropdown to ‘ Values ‘.
- Click on ‘ Find All ,’ and all the cells with the #Div/0! errors will be displayed. You can examine each cell to determine whether the error is a result of a mistake or if another action can be taken, such as deleting the cell if it is not required. Find All #Div/0! Errors in an Excel Workbook
Use Excel Formulas to Overcome ‘Divided by Zero’ Errors.
There will always be cases where division by zero is inevitable , but you do not want to show a calculation error on your worksheet to your senior, colleague, client, etc. For this purpose, you can trap or mask the #DIV/0! error by using the IF or IFERROR formulas.
Use the IFERROR formula to trap #DIV/0! errors.
IFERROR is an Excel formula used to mask all errors on an Excel sheet. It also functions to trap or mask #Div/0! errors. The syntax of the IFERROR formula is as follows:
=IFERROR(value, value_if_error)
Here, ‘value’ represents the formula displaying an Excel error (in this case, #DIV/0!), and ‘value_if_error’ is a value that you specify to appear in place of the error.
Let’s clarify with a simple example . Enter 10 in cell B2 and input the following formula in cell D2:
=B2/C2
This will cause a #DIV/0! error in cell D2. Now, enter the following formula in cell D2 :
=IFERROR(B2/C2,"")
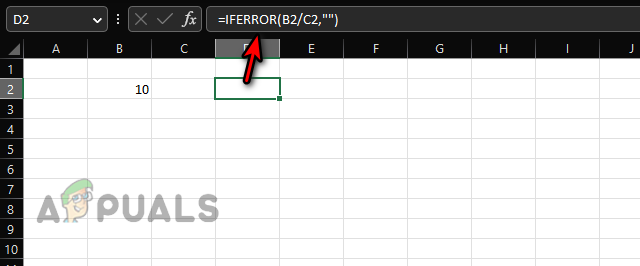
Use the IFERROR to Hide a Divide by Zero Error
You will see that cell D2 is now blank because we have asked the IFERROR formula to display a blank space (denoted by “”) instead of the #DIV/0! error.
Add a custom message to the IFERROR formula.
If you do not want to display a blank cell, you can add a custom message to your formula, which can be helpful in the future when you or someone else revisits the formula. To do so, let’s continue with our simple example:
- Enter the following formula in the D2 cell: =IFERROR(B2/C2,“C2 is empty, enter a value”) Add a Custom Message to an IFERROR Formula
- You will notice that cell D2 now clearly indicates that C2 is empty . Please enter a value .
If you want to apply the IFERROR formula to a column or row, simply copy and paste it.
Limitations of the IFERROR Formula.
Here are some limitations of the IFERROR formula:
- The IFERROR formula is compatible with Excel 2007 and above . For versions below that, such as Excel 2003 or earlier, this formula will not work. Instead, you can use the IF and ISERROR functions, which will be discussed later.
- IFERROR will mask all error values , including #DIV/0!, N/A, #VALUE!, #REF!, #NUM, #NAME, etc., not just #div/0! errors . If your formula returns an error other than #div/0!, it will be treated in the same way. This can lead to incorrect calculations and decisions.
Use the IF formula to solve #Div/0!
#Div/0! can be solved (not just masked or trapped) by using the logic of the IF formula, but the solution will differ from case to case.
The general syntax of the IF formula is as follows:
=IF(Logical_test, [value_if_true], [value_if_false])
A logical test is a condition that you want to test. If it is true , the first value is returned; otherwise , the second value is returned. To better understand, let us continue with our simple example:
- Enter the following formula in cell D2: =IF(C2,B2/C2,"") Use If to Show a Blank Cell in Place of a #Div/0! Error
- You will see a blank cell in cell D2. In this case, the formula states that if the C2 cell contains a non-zero value , proceed with the division of B2 by C2; otherwise, return an empty value .
- Let’s change the formula to display a custom message. =IF(C2,B2/C2,“Input Value in C2”) Show a Custom Message in the Place of A #div/0! An error by Using IF
- You will see ‘Input Value in C2’ in the D2 cell. In this case, the formula states that if the C2 cell has a non-zero value, proceed with the division of B2 by C2; otherwise, display the text ‘Input Value in C2’.
- Enter the following formula in cell D2: =IF(C2<>0,B2/C2,“Input non-Zero Value in C2”) Use the IF Formula to Show a Custom Message to Enter a Non-Zero Value to Correct a Divide by Zero Error
- Now, whenever the value of C2 is not equal to zero (denoted by <>), the formula will calculate; otherwise, it will display ‘Input a non-zero value in C2’.
- You can combine multiple criteria in a single IF formula by using OR . For example, if we do not want to calculate the formula if B2 or C2 is empty, we can use the following: =IF(OR(B=2"",C2=""),"",B2/C2) Use IF and OR to Use Multiple Criteria to Fix #div/0! errors
The same logic can be applied to other, more complex scenarios as well. There is no limit to the logic that can be used with IF and OR to overcome any #div/0! error, but that logic is dependent on your particular use case.
Remove the #DIV/0! error using ISERROR and IF.
If you are using an older version of Excel (2003 or earlier) or plan to share your workbook with a user of such a version, then IFERROR will not function, and you will need to use IF and ISERROR to mask or trap #div/0! errors.
ISERROR is a Boolean function that checks for errors. If an error is present, it displays ‘True’; if not, it shows ‘False.’ Let’s continue with our simple example.
- Enter the following formula in cell D2 : =ISERROR(B2/C2) Use the ISERROR Formula to Check if the Division Formula is Returning a Divide by Zero Error
- You will see ‘ True ,’ indicating that there is an error. Again, enter the following formula in cell D2: =IF(ISERROR(B2/C2),“Not Available”,B2/C2) Use the IF and ISERROR Formulas to Trap a #div/0! Error
- This means that if there is an error , display “ Not Available ” (you may use any other string if you prefer); otherwise, calculate B2/C2 .
A point to remember is that ISERROR will also mask all other errors , not just #div/0! errors, and must be used with caution to avoid incorrect calculations or decisions.
Remove the #DIV/0! error in the PivotTable.
#DIV/0! errors in PivotTables can be handled differently. Moreover, a PivotTable will not display the desired text in place of a #DIV/0! error if the text is the name of a row or column. Look at the image below, and you will notice #DIV/0! errors in cells D6, D7, D9, and F5.
Divide by Zero Error in a PivotTable
To change this:
- Click anywhere in the PivotTable , and head to the PivotTable Analyze tab in the Ribbon.
- Expand the PivotTable option and select Options . Open PivotTable Options in the PivotTable Analyze Tab
- Select ‘ Layout & Format ‘ and in the ‘Format’ section, enable ‘ For Error Values Show .’
- In the text box , enter “Unavailable” (or any other text that you want to use), and the #Div/0! errors will be replaced by “Unavailable.” Remember this point. Set For Error Values Show to Unavailable in the PivotTable’s Layout and Format Options If your PivotTable is showing some other errors, they will also be masked; therefore, use the masking with caution.
How to Fix “Printer is in an error state” Issue?
The error “ WinRAR Error: Next Volume Is Required ” usually appears when you’re extracting a multi-part RAR archive and WinRAR can’t find (or can’t correctly identify) the next file in the sequence . This often happens when a volume is missing , stored in a different folder , or renamed in a way that breaks the archive’s expected order .

In this guide, we’ll go over the most reliable fixes confirmed by affected users, along with what each method is doing behind the scenes so you can choose the right one for your situation.
Important: To extract multi-volume archives, you should always start extraction from the first file in the set. This is usually file.part1.rar , or (in older sets) the main .rar file that comes before .r01 , .r02 , and so on.
1. Download and Place the Missing RAR File
WinRAR needs all parts of a multi-volume archive to complete extraction. This error usually appears when one of the volumes in a set like .part2.rar , .r01 , .r02 , .001 , and similar naming formats is missing . Downloading the missing volume and placing it in the same folder as the other parts allows WinRAR to continue extracting normally .
- Look at the error message or review the list of archive parts in the folder.
- Identify which volume is missing (for example, part2.rar , .r02 , .001 , etc.).
- Go back to the website or source where you downloaded the archive.
- Locate and download the exact missing file using the same naming format as the others.
- Make sure the new file name matches the pattern of the rest. Example: If you have file.part1.rar and file.part3.rar , the missing one must be file.part2.rar .
- Move the downloaded missing volume into the same folder as the other archive parts.
- Confirm that all parts are in a single folder before extracting.
- Right-click the first file in the series (usually part1 or the main .rar file) and select Extract Here or Extract to Folder .
- WinRAR should now detect all volumes and continue extraction normally .
2. Manually Browse & Select the Next Volume
Use this method only if the next volume already exists , but WinRAR is failing to detect it automatically. This can happen due to incorrect naming , the file being in a different location , or a temporary file access issue. Manually browsing helps WinRAR locate the correct volume and resume extraction without interruption .
- Right-click the first file in the series (usually .rar or part1.rar ) and select Extract Here or Extract to Folder .
- When WinRAR cannot find the next volume, it will show the “ Next Volume Is Required ” message.
- A small window will appear, allowing you to manually select the next volume .
- Use the file explorer window to locate the folder where the other archive parts are saved.
- Select the next part based on the naming order (example: select file.part2.rar after file.part1.rar ).
- Make sure the selected file matches the naming format of the archive (no extra characters like (1) and no mismatched numbering).
- WinRAR will resume extraction using the selected volume .
- If additional volumes are missing or stored separately, WinRAR may prompt you again. Repeat the same process until extraction completes.
3. Rename the RAR files in Order
WinRAR relies on a proper naming sequence (such as file.part1.rar , file.part2.rar , file.part3.rar ) to extract multi-volume archives. If a file is named incorrectly, contains extra characters, or is out of order, WinRAR may fail to locate the next volume and show this error. Renaming the files correctly helps WinRAR follow the sequence and extract the archive without interruptions .
Note: Renaming only changes the file name , not the file contents. The goal is to restore the correct sequence so WinRAR can detect the next volume.
- Go to the folder where all the RAR files are saved.
- Make sure all parts of the archive are present and stored in the same folder .
- Check how the parts are currently named . Common patterns include:
file.part1.rar, file.part2.rar, file.part3.rar
file.rar, file.r01, file.r02, file.r03
- Look for files that don’t match the expected numbering pattern (for example, file.part01.rar , file.part1(1).rar , or unrelated names).
- Rename each file so it follows the same order without extra characters or mismatched numbering. Example:
Incorrect: file.part1.rar, file.part3.rar, file.part2(1).rar
Correct: file.part1.rar, file.part2.rar, file.part3.rar
- Make sure the text before the number is exactly the same for all files.
- Only the last part number should change.
- Right-click the first file in the series (usually part1.rar or the main .rar file) and select Extract Here .
- WinRAR should now recognize the sequence and continue extraction normally .
If you still get the same prompt: the archive set is likely incomplete (a part was never downloaded or was removed), or one of the volumes is corrupt and must be re-downloaded from the original source.
