Even though the digital age is upon us, we’re still at the frontier, so there are going to be times where we still need to produce paper-based copies of certain documents. Or, even better, you might need to make certain documents digitally. For both of these scenarios, an all-in-one wireless printer will get the job done – if you know how to configure it under Windows 11, that is.
Setting up a wireless printer on Windows 11
If you’re on Windows 11 and currently scratching your head on how to connect and configure your wireless printer, this article will walk you through the whole thing. You shouldn’t feel bad either, as Microsoft has changed some things around, making the initial connection to a wireless printer a bit harder than it used to be.
As it turns out, there are actually two different ways of connecting a wireless printer to Windows 11:
- Utilizing the supporting software
- Connecting the printer directly via the Printers & Scanners tab
We’re going to follow both scenarios, so feel free to follow whichever guide you feel most comfortable with:
IMPORTANT: Both of these guides will assume that you’re just unpacking a new wireless printer and you need to connect it to your home or work environment. Also, the outlined steps are general, so depending on the printer manufacturer or model, the information provided below might not be applicable to your current setup. Don’t rely on these guides alone – consult the user manual provided by the manufacturer of your printer.
Initial Setup
- First things first, unbox your printer and make sure to put the important components on the side. These include power cables, ink cartridges, and the user manual. Configure the Wireless Printer on Windows 11
- Next, connect the power cable to a power outlet, then press the power button on your printer to switch it on. Power on your printer
- Once your printer is powered on, it’s time to take care of your cartridges. Of course, our recommendation is to install them according to the manufacturer’s instructions. But as for some general guidelines, make sure you remove the protective tape before sliding them in. Inserting the printer cartridges correctly Note: Make sure to install the color and the black in the cartridge in the correct bays. Almost all printers provide clear illustrations on which is which, so pay attention to the icons.
- Once the two cartridges are installed correctly, close the cartridge bay and move over to the Windows 11 computer and pick one from the following guides below.
Connect Wireless printer via supporting software
Most printers will have some kind of supporting software that you’ll need to install (especially for wireless printers). However, most of the major players in the printers sector will have the supporting software available inside the Microsoft Store.

Downloading the supporting software
Note: HP has HP Smart, Canon has Office Printer and Lexmark has Printer Home . But keep in mind that there are different variations of these supporting software for different printer models, so it’s best to consult your user manual before downloading the supporting software.
- Access the Microsoft Store or download the supporting software developed by your printer manufacturer from the official website.
- Once the download of the supporting application is complete, launch it and follow the on-screen instructions to install the printer and update its firmware to the latest . Connecting the printer Note: In case you get some sort of an error when installing the software, make sure your printer is turned on and connected to the same network as your Windows 11 PC.
- Once you get a message on the screen saying that the wireless printer has been detected, you should be taken to an installation wizard to carry over the remainder of the steps. Installing the printer
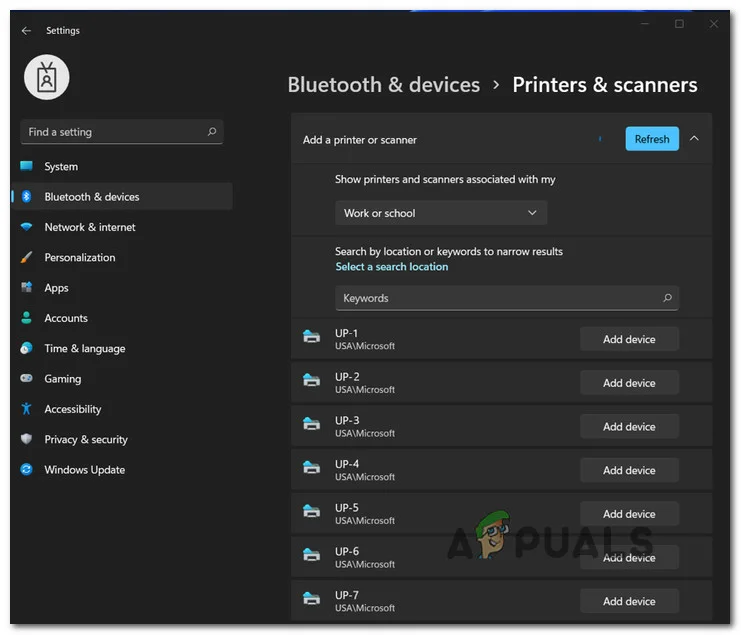
- After you successfully manage to configure the printer, all that’s left to be done at this point is to configure it as the default choice. This is done from the Printers & Scanners tab . Follow the instructions below to get there.
- Press Windows key + I to open up the Settings menu on Windows 11.
- Next, access the Bluetooth & devices tab from the menu on the left, then click on Printers & scanners from the menu on the right. Accessing the Printers and Scanners pane Note: If the vertical menu on the left is invisible by default, click on the action button in the top-left corner of the screen.
- Finally, identify your printer under Printers & Scanners and set it as the default choice.
Connect Wireless Printer via the Printers and Scanners tab
If you’re using a printer model that doesn’t come with supporting software or you’re just a fan of doing things the techy way under Windows, there are also some advanced steps of connecting a wireless printer under Windows 11.
This method involves connecting your wireless printer via the Printers & scanners tab inside the Settings menu. To do this, you’ll need to fetch the WPS pin from the back/bottom of your printer (full instructions below).
Note: The instructions below might not work for certain wireless printer models. A good indication of either this method will work or not is to check the bottom or back of your printer and see if you find the WPS pin or key.
Follow the instructions below to connect your Wireless printer via the Printers and Scanners tab on Windows 11:
- First things first, you need to put your wireless printer into pairing mode . This will be different from model to model, but in most cases, it’s a combination of button presses (like pressing the wireless and cancel button at the same time) Putting the printer in pairing mode Note: If you don’t know how to put your printer into pairing mode, check the user manual for specific instructions in doing so.
- Once you manage to make your wireless printer show up under Windows 11, press Windows key + I to open up the Settings menu.
- Inside the Settings menu, access the Bluetooth & other devices tab from the menu on the left, then click on Printers & Scanners from the menu on the left. Accessing the Printers and Scanners pane Note: If the vertical pane on the left is not visible by default, click on the action button (top-left corner).
- Once you’re inside the Printers & scanners tab, click on Add devices (under Add printers & scanners ).
- You’ll then be prompted to insert the WPS PIN – you can typically find it by looking on the back or bottom of your printer. Discovering the WPS pin
- After you find your WPS PIN key, insert it in the prompt and hit Next to establish the connection.

Inserting the WPS PIN
How to Fix “Printer is in an error state” Issue?
The WPS method OR ( push button method ) is an easy and quick method for connecting the printer to the wireless router, access point, or gateway. Generally, the way it works is that you press this button on the printer first, and then on the router within 2 minutes, allowing both devices to connect to each other.
There are two ways you can access the WPS settings: either through the Setup or by pushing the WPS button on the printer. On some printer models, this button is not available; therefore, to access it, you will need to enter the printer’s setup menu, which is usually indicated by a Tools/Wrench icon on the printer’s panel.
If the button is available, how do i connect my printer to my router?
If the button is available, take a close look at the buttons on the printer to identify a button with a wireless icon. Press this button and then press the WPS button on your router within two minutes.
If the WPS button is not available, what do I do then?
If the button is not available, you can connect by entering the printer’s setup through touch. This article does not cover specific models but serves as a general guide.
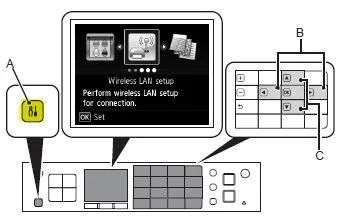
( A ) indicates the setup button, which is what you will need to press. Once you are in the settings, use the arrow keys to enter “ Wireless LAN Setup ,” “ Wireless Setup ,” or “ Network Setup “.
Once inside, locate the Push Button Method or WPS method and proceed with it.
You will then be told to press the WPS button on your router within 2 minutes.
Press the WPS button on the router for the connection to take place.
Before starting, ensure you are logged in as an administrator , saved your work, and closed other programs.
Connect MG3620 Wirelessly Using Control Panel
- If the printer is busy (printing, cleaning, aligning), wait until it finishes. If the Wi-Fi light is flashing, press the Stop button [B] .
- Press and hold the Wi-Fi Button [A] until the ON light [B] flashes.
- Press the Color button [C] then the Wi-Fi button . Ensure the Wi-Fi light flashes and the ON light is lit.
- To continue the wireless setup , install the drivers and software on your computer.
- Insert the software CD into the CD drive. The setup should start automatically. If not, browse to the CD-ROM folder and run the exe . Alternatively, download Canon MG3620 software from the Canon website.
- If any dialog boxes from Windows User Account Control or antivirus/firewall pop up, allow the installation.
- Click the Start Setup button.
- Follow on-screen instructions. Select your country, accept the license agreement, etc. When you reach Select Connection Method , choose Wireless LAN Connection and click Next .
- Next, select Connect via wireless router (recommended) and click Next .
- The following screens will appear in order. Ensure your Canon PIXMA3620 is selected in all of them. Verify the serial number on the sticker at the back of the printer. Check Power Printers on Network List (Ensure the printer is selected) Connection Completed Setup Complete
- The Software Installation List will appear. Choose optional software you want to install and click Next .
- An “Installation completed successfully” screen will appear. Click Exit to finish setup.
