A Chromebook is a laptop or tablet running the Chrome OS as its operating system. Chrome OS is designed by Google and based on the Linux kernel operating system. It is based on the free software Chromium OS and uses the Google Chrome web browser as its main user interface. As a result, Chrome OS supports web applications with data mostly residing in the cloud rather than on the system itself. Since late 2017, all released Chromebooks can also run Android apps from the PlayStore.
Chromebook
Google has been updating its Chrome OS with new features since its release, but it’s nowhere near Windows, Mac, or even some Linux distributions.
Chromebooks don’t typically run Windows software, which can be both the best and worst thing about them. You can avoid Windows junk applications, but you also can’t install Adobe Photoshop, the full version of MS Office, or other Windows desktop applications.
Luckily, there are workarounds to use Windows desktop programs on a Chromebook: either running them remotely, through Android, through developer mode, or running them on your Chromebook itself.
Method 1: Windows Online Apps
If you just want to use the Office suite and don’t care about any of the other apps offered on Windows 10, this is the easiest option, which can be done through the Chrome browser.
- Launch the Chrome browser and navigate to Microsoft Office site .
- Click on Use Free at Office.com Use Free at Office.com
- Click on Sign In Sign In Office.com
- Enter your Microsoft Account ID and Password
- After successful login, you will be taken to the office.com page Applications portal of Office.com
- Click on the relevant application that you want to use, and you will be redirected to the website of that particular application and start using the online free application there.
Method 2: Chrome Remote Desktop
The Chrome Remote Desktop is an extension of Google Chrome that simply allows you to access another desktop while using your Chrome browser, just like a virtual machine. It has an interface that shows an entirely different OS that you can use. The base of this method is that you need another Windows 10 system connected to the internet so you can link to it. That’s the way it will work. It won’t be possible in some situations, but if you have a Windows computer around, this can be an effective workaround.
- On your Chromebook, Navigate to the Chrome Remote Desktop Website . Chrome Remote Desktop Website
- Click on the Download Button Download Chrome Remote Desktop
- You will be redirected to the Chrome Remote Desktop Webstore page
- Click on the Add to Chrome button Add to Chrome on Chrome Webstore
- On the next screen, click on Add Extension Add Extension to Chrome
- Chrome Remote Desktop will be added to your extensions and will be shown next to the address bar. Chrome Remote Desktop extension next to the address bar
- Repeat the same process on your Windows PC.
- On the Windows PC , you will be asked to download an installer. Download that installer and click on Accept and Install

Accept and Install Chrome Remote Desktop on Windows
- Click Yes Open Chrome Desktop Remote Download
- The installer will run, and then you will be asked to enter the name of the device. Choose the Name of Device for Chrome Remote Desktop
- Enter the name as per your convenience for the device so you can easily remember and access it from your Chromebook.
- You will be prompted to enter a 6-digit PIN . Enter the PIN as per your convenience. Enter The PIN for Chrome Remote Desktop
- Click start, and you will be directed to the access page . Your device name should be in the middle, and the status will start as “Starting” for some time and then become online (if there is no problem). I have named it “My PC”. Device Online for Chrome Remote Desktop
- Now, from your Chromebook, go to the Chrome Remote Desktop Site .
- Click on the remote support tab and in the Get Support section, click on the Generate Code . Generate Code for Remote Support
- On your Windows PC, go to the Chrome Remote Desktop Site .
- Click on the Remote Support Tab and in the Give Support section enter the code generated in Step 15 Give Support on Remote Support Tab
- Now you will be able to access your Windows computer and can use your favorite Windows applications.
Method 3: Emulators
An emulator is hardware or software that enables one computer system (called the host ) to behave like another computer system (called the guest ). The host system can run software or use peripheral devices designed for the guest system through the use of an emulator.
Different software emulators can enable a Chromebook to run Windows. Examples are CrossOver by CodeWeavers and Exagear by Eltechs (which is discontinued now). More Chromebook emulators are expected in the coming years.
For now, we have to go with CrossOver. CodeWeavers developed the CrossOver app as a solution to run Windows apps on other operating systems. In recent updates, CrossOver was given the ability to run Windows apps on Chromebook. Remember that the CrossOver Chrome OS version is not yet stable and is still in a beta phase of development. Some other requirements for this route include that it can only run on an Intel-based Chromebook . All Android apps or devices will also have to be Android 5.x (or later)-compatible.
It will also need to have at least 2GB of RAM installed and 200MB of storage space free for the installation, plus any additional room required for the apps you intend to use. Google created a list of Android supporting models , which is the way Windows apps work on Chromebooks, so check that before beginning any of the steps below.

CrossOver by CodeWeavers
Some Chromebooks, especially older ones, might have some trouble with this new app as the CrossOver for Chrome OS can run on an Intel processor .
Simply put, you will need one of the best Chromebooks that run Android apps to run the emulator without any lag.
Install CrossOver for Chrome OS
- Go to Profile Picture > Settings > Menu > Google Play Store Click Turn On if it hasn’t been already Open Play Store on your Chromebook And download CrossOver from the Google Play Store
Prepare for Windows Program Installation
The CrossOver application will automatically fetch the installation files for some Windows software for you. However, for most programs, it is a good idea to first download the offline installer of the desired program.
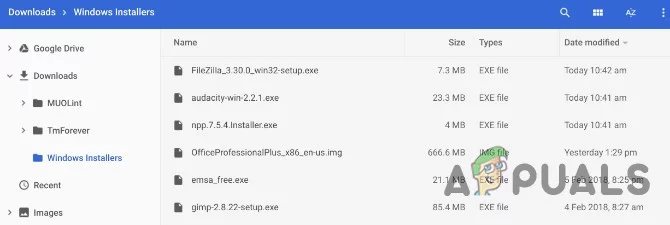
Download Windows Installer for CrossOver
Whether it’s Microsoft Office, Adobe Photoshop , or even a small program like IrfanView, get the full offline installer from its site. If you can’t find it there, go to Standalone Offline Installers and download it from there. Keep the downloaded installer in an easy-to-find location on your Chromebook.
Install Windows Programs on Chromebooks
- Run CrossOver for Chrome OS. Start typing the name of your desired app in the Search Applications box. CrossOver will suggest names. Click Install on the correct one to get started. Depending on the program, CrossOver will now fetch the correct files online to install it. Go through the installation procedure as you would with any Windows program. Windows Application Installing in CrossOver Don’t change the destination folder! You are right, Chrome OS doesn’t have anything like “C:\Program Files\Paint.NET,” but do not change the destination folder. Changing the destination folder routinely causes errors in CrossOver. Finally, Installation Finished will be shown once the whole process is complete. Don’t open the app yet even if you see a prompt for it.
Install Unlisted Windows Programs on Chromebooks
The simple process expressed in step 4 works for some games and software, but not all. As already noted, it’s best if you downloaded an offline installer. In that case, the installation procedure is slightly different.
- Run CrossOver for Chrome OS.
- If CrossOver shows the name in the search box, install it, or click Install Unlisted Application when CrossOver could not find your desired app and prompts you.
- Enter the name of the program you are installing and click Select Installer .
- On the next screen, open the folder where you saved the offline installer on your hard drive. CrossOver will list all Windows installers in that folder, so find the right one and click Install .
- Again, follow the installation procedure as you normally would, and don’t change the destination folder .
- Finally, Installation Finished will be displayed once the whole process is complete. Don’t launch the program just yet, even though you see a prompt for it.
Run Windows Programs on Chromebook
- After installing the app, close and restart CrossOver. Search Apps in CrossOver
- You’ll see your new programs in Installed Apps. On clicking the program, you will see two options: Manage program or Launch program.
- Launch Program to use the Windows application as a Chrome app.
Limitations of CrossOver for Chromebooks
CrossOver for Chrome OS is in beta , so some features might not work as advertised and expected. And even when they do, remember, you are essentially running Wine with a virtual Windows environment that will retain the look and feel of Windows software.
Method 4: Install Wine For Android
If all the above methods do not work for you, then it is time to move to deep waters. Chromebooks aren’t “just a browser”—they’re Linux laptops , as a result, you can install a full Linux desktop alongside Chrome OS and switch between the two.
Wine is an open-source application that allows Windows applications to run on Linux and macOS. Wine is desktop software with no specific version designed for Chromebooks, but there are workarounds. Since Chrome OS is based on Linux, there are two ways to run Wine on your Chromebook: using the new Wine Android app , or by using Crouton to run it in Linux.
Remember that Wine in Linux would run smoothly on Intel Chromebooks but won’t run on ARM Chromebooks, and the Android version only supports Windows RT apps.
Wine also has an Android app that’s still currently in beta, but if you have a Chromebook that runs Android apps, it can allow you to run Windows programs without installing Crouton. It’s not yet available in the Google Play Store, so you’ll have to enable and use “ Unknown Sources .” This will only work if Google Play and Android Apps are supported by your Chromebook.
If you’re used to Android, you know that you need to enable the “Unknown Sources” option to install apps that aren’t available in Google Play. But in Chrome OS, this option is not normally available and is hidden.
Step 1: Change Release Channel to Developer
By default, all Chrome installations are on the stable channel—this includes browser installs on Windows, Mac, or Linux, as well as Chromebooks. And that makes sense. Google wants everyone to have the best experience possible right out of the gate.
If you’re not a “stable channel” kind of person, you can get access to all sorts of new stuff by switching to a different release channel. Right now, there are three primary channels:
- Stable : This is the default channel option. Choose this channel for rock-solid dependability.
- Beta: Offers access to newer features that are almost ready to be included in the stable channel. The beta channel allows you to test new features before they roll out to the masses, and it is still mostly stable in our experience.
- Developer: Designed for developers to test new features, this is the most unstable of the three release channels, but it also offers the newest features quicker than the others. Only use this channel if you don’t mind a little instability.
If you’re not scared away from changing channels yet, here’s how you can jump from the stable channel to something a little more rough around the edges.
First, click the “ Customize ” button (the one with three dots) in the upper right corner of the Chrome window, and then choose the “Settings” option.
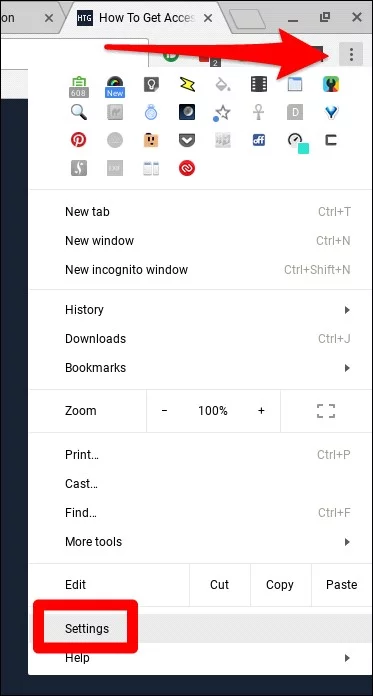
Setting Menu of Chrome
On the “ Settings ” window, click the Main Menu button, i.e., the icon with three lines in the top left corner, and then choose “ About Chrome OS .”
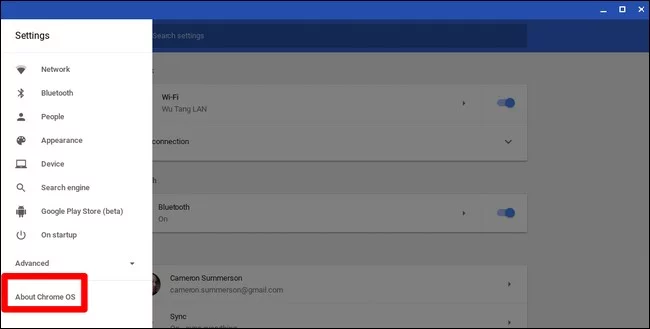
About Chrome OS
In the “About Chrome OS” window, find “ Detailed build information ” and click this button.
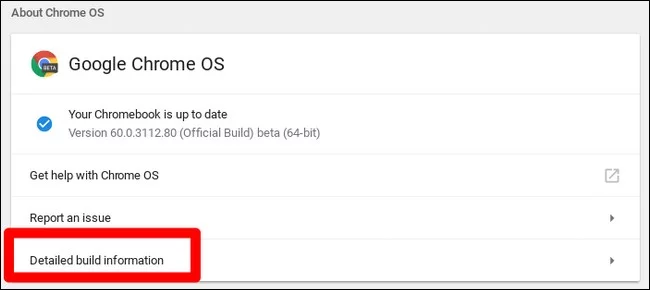
Detailed build information
Next, click the “ Change Channel ” button, and then choose the developer channel.
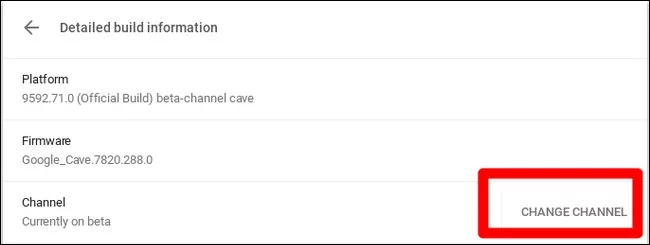
Change Channel
Step 2: Put Chromebook In Developer Mode
Now, “Developer Mode” needs to be enabled on your Chromebook. Chromebooks are locked down for security purposes and will only boot if the operating system is properly signed after checking the OS for tampering and preventing users and applications from modifying the Chrome OS. In Developer Mode, you can disable all these security features, so you have a laptop to tweak and play with to your heart’s content.
When Developer Mode is enabled, you’ll be able to access a Linux terminal within Chrome OS and do whatever you like.
There are two quick warnings you should understand:
- Enabling and Disabling Developer Mode erases and wipes data on your Chromebook : For the process of enabling Developer Mode, your Chromebook will be “power washed.” All user accounts, their files, and data will be removed from your Chromebook. Of course, most of your data should be stored online, and afterward, you can access that data by logging into the Chromebook with the same Google account.
- Google Doesn’t Offer Support For Developer Mode : Developer mode is not officially supported by Google. It’s for the use of developers and power users. Google won’t provide support for this stuff. And the basic “This may void your warranty” warnings apply, so in case of hardware failure in developer mode, just disable developer mode before getting warranty support. Developer Mode Warning
To enable developer mode on modern Chromebooks, hold down the Esc and Refresh keys and tap the Power button to enter recovery mode. In older Chromebooks, there were physical developer switches that you’ll need to toggle instead.
So, at the recovery screen, press Ctrl+D to agree to the prompt, and you’ll boot into developer mode.

Recovery Screen
Now, whenever you boot your Chromebook, a warning screen will show. To continue booting, either press Ctrl+D or wait for 30 seconds for the warning to disappear.
This warning screen is to alert the user that the Chromebook is in developer mode and normal security measures are not intact.
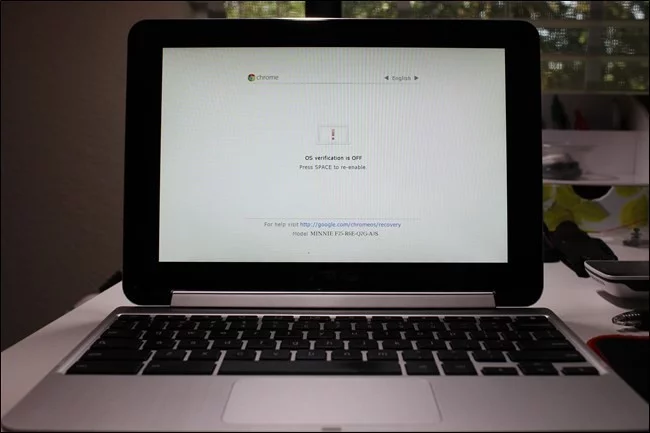
Warning Screen
Step 3: Enable Unknown Sources
Now apps from “ Unknown Sources ” can be enabled by opening the Chrome OS settings screen, finding the “ App Settings ” link under Android Apps, and clicking on it.
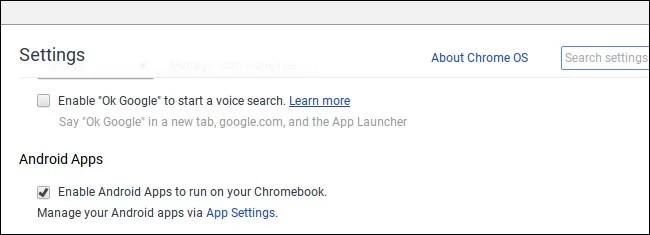
App Settings
A new window will open showing Android’s Settings screen on your Chromebook. Click or tap the “ Security ” option.
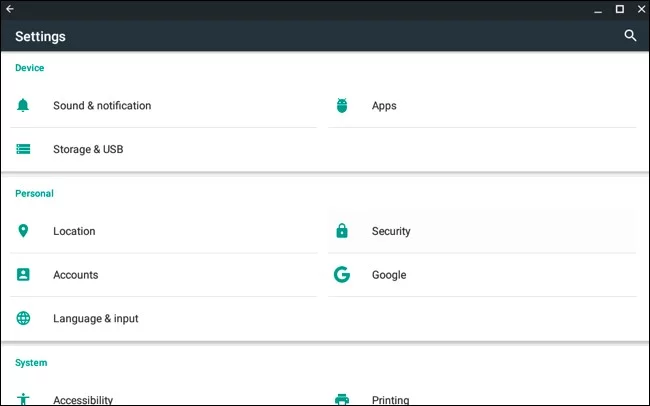
Android’s Settings Screen
Enable the “ Unknown Sources ” option under Device Administration. A warning will appear, advising caution about what you install.
If the option for Unknown Sources does not appear, your Chromebook isn’t in developer mode. This option only appears here when your Chromebook is in developer mode, so try going through Step One again.
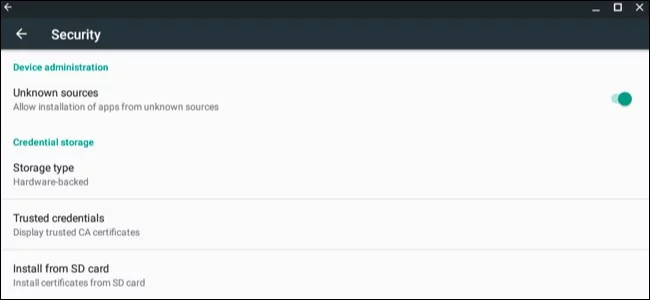
Unknown Sources
Step 4: Install the APK File
Now an app can be installed from an APK file. First, download the relevant version of the APK file and save it in your Downloads folder.
You might expect that you can simply double-click or load an APK file from Chrome’s Files application, but that doesn’t work. You’ll just see an error message saying “This file type is not supported.”
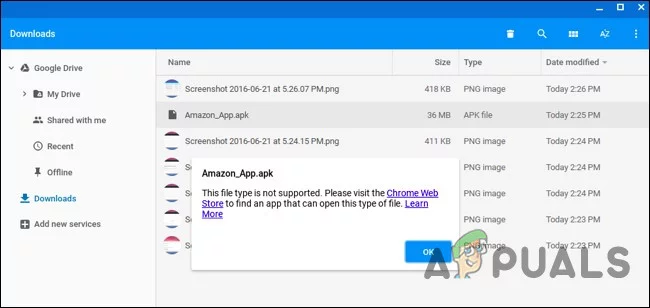
File Type Not Supported
You’ll need an Android file management app to install APKs. Open Google Play and install any of the file management apps. We like Solid Explorer, but there are many other options. (For some reason, Android’s built-in file manager app won’t let you open and install APK files.)
Open your downloaded file manager app, open your “ Download ” folder through this app, and open the APK file. Select the “ Package Installer ” option on the app, and you’ll be asked to install the APK.

Package Installer Option
Step 5:Linux Usage
After the installation of Wine is completed, simply open the app like normal to get access to a minimal, emulated version of Windows. It is still in beta, so the user experience may not be perfect. That said, I would recommend at least trying this option before going through the trouble of setting up Crouton if all you plan on doing is using it for Wine.
You now have a traditional Linux desktop. All that traditional Linux software is just an apt-get away in Ubuntu’s software repositories. Linux terminal utilities that you may want like graphical utilities, local image editors, text editors, office suites, and development tools are easy to install.
There’s one catch, though. On ARM Chromebooks, you’re a bit limited in what you can do. Some programs don’t run on ARM–basically, you won’t be able to run closed-source applications that haven’t been compiled for ARM Linux. Now you can access multiple open-source tools and desktop applications that can be recompiled for ARM, but closed-source applications won’t work on these machines mostly.
Whereas you enjoy much more freedom on an Intel Chromebook where Steam for Linux, Minecraft, Dropbox, and all the typical applications that normally work on the Linux desktop could be installed.
You cannot run every Windows application on Wine as Wine is not perfect. You may not run some applications without manual tweaking. You have to consult the Wine application database for detailed information about applications and tweaks that are supported.
Method 5: Use Developer Mode and Install Wine for Crouton
Installing Linux on your Chromebook isn’t as simple as installing the standard Ubuntu system—at least not at the moment. You’ll need to choose a project developed especially for Chromebooks. There are two popular options:
- ChrUbuntu : ChrUbuntu is an Ubuntu system built for Chromebooks. It works like a traditional dual-boot system. You have to restart your Chromebook to change between Chrome OS and Ubuntu at boot time. You can install ChrUbuntu on Chromebook’s internal storage, USB device, or SD card.
- Crouton : Crouton basically uses a “chroot” environment to run both Ubuntu and Chrome OS at the same time. Ubuntu runs alongside Chrome OS and you can switch between Chrome OS and the Linux desktop environment with a keyboard shortcut. You can take advantage of both environments without rebooting your system.
Google has added native support for Linux apps directly to Chrome OS, and this feature is available on many Chromebooks . You don’t need Crouton to run Linux software anymore if supported by your Chromebook.
If your Chromebook does not natively support Android Apps, We’ll use Crouton for this. It takes advantage of the Linux system underlying Chrome OS to run both environments at once and is a much slicker experience than traditional dual-booting. With Crouton, you don’t need to worry about the drivers of your hardware as it uses standard drivers for your Chromebook’s hardware.
With Crouton, you’re just running one operating system, i.e., Linux, but you’re running two environments on top of the OS, i.e., Chrome OS and a traditional Linux desktop.
Step 1:Enable Developer Mode:
Enable Developer Mode as explained in Method 4 of this article.
Step 2:Download and Install Crouton
Next, it’s time to download Crouton .
Download Crouton
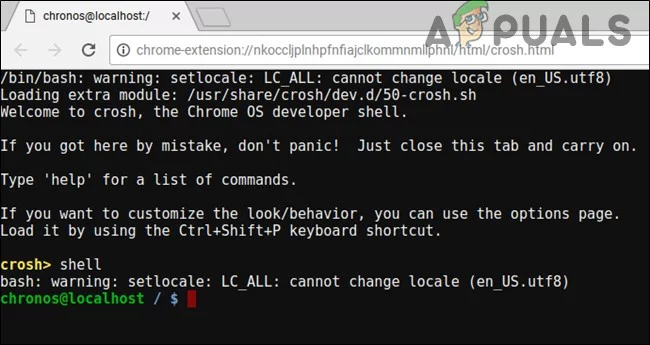
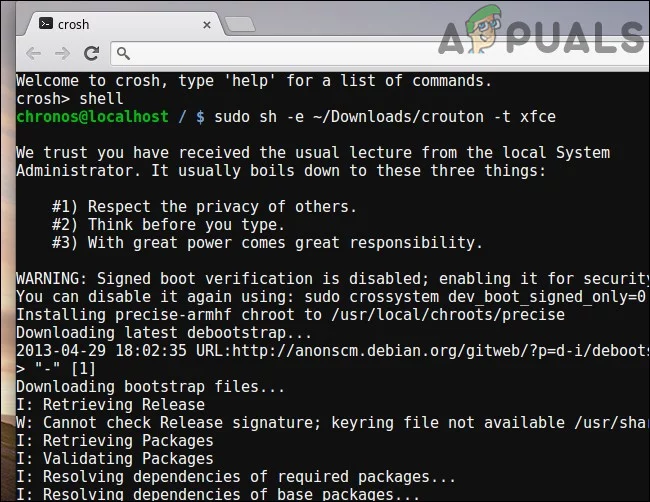
- After the download is complete, open a shell: (Ctrl+Alt+T, type shell, and hit enter). This will only work if your Chromebook is in Developer Mode.
- Run the following command to copy the installer to an executable place: “sudo install -Dt /usr/local/bin -m 755 ~/Downloads/crouton”
- Now that it’s executable, run the installer itself: sudo crouton -t xfce
- To install Crouton the easy way, run the following command. This will install Crouton with the Xfce desktop along with an encrypted chroot for security: sudo sh ~/Downloads/crouton -e -t xfce
The installation process will be completed in a while.
Step 3: Usage ofCrouton
- After completing the installation process, either of the following commands could be run to enter your Crouton session (if you installed Crouton with Xfce):
Usage of Crouton
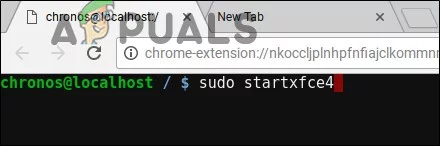
sudo enter-chroot startxfce4

sudo startxfce4
Step 4:Switching Between Environments
To switch between the Chrome OS and your Linux desktop environment, use the following keyboard shortcuts:
- For an ARM Chromebook Which are in majority : Ctrl+Alt+Shift+Back and Ctrl+Alt+Shift+Forward. Note: back and forward browser navigation buttons on the top row, not the arrow keys.
- For an Intel x86/AMD64 Chromebook : Ctrl+Alt+Back and Ctrl+Alt+Forward plus Ctrl+Alt+Refresh.
If you want to exit the chroot, just log out (using the “log out” option) of the Xfce desktop (or the Unity desktop, if you’re using that) – you should not use the “shut down” as it will not log you out but in fact will power the Chromebook down. You’ll then need to run the sudo startxfce4 command above to enter the chroot again.
Switch Between Environments
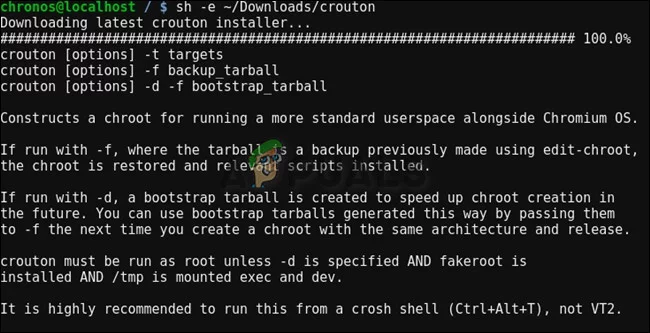
If you’d rather install Ubuntu’s Unity desktop instead, use -t unity instead of -t xfce in the command above. It’s worth noting that Unity won’t run as smoothly on most Chromebooks’ limited hardware. Run the following command to see the list of installation types, even installations without a graphical desktop:
sh -e ~/Downloads/crouton
List of Installation Types
Method 6: Run Linux Software in Developer Mode
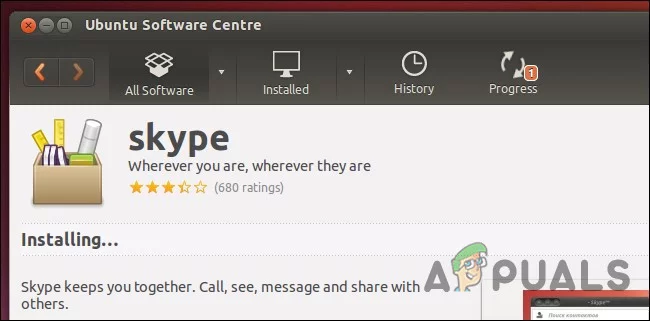
The user of Chromebook may not need to run a Windows program at all as Windows programs have their own Linux versions and can be run on a Chromebook using Crouton’s Linux desktop. E.g. if you want to run games on a Chromebook, Steam for Linux offers many games, and its catalog is continually expanding. So, technically you are not “running Windows software,” but in some cases, it’s just as good.
Keep in mind that many Linux programs, such as Minecraft, Skype, and Steam, are only available for Intel x86 processors and cannot run on devices with ARM processors.
Linux Versions of Windows Applications
Method 7: Use Developer Mode and Install a Virtual Machine
If Wine is not your piece of cake, you can also run a Windows virtual machine from the Linux desktop with Crouton. Similarly to the above-discussed option,
- Enable developer mode.
- To get a Linux desktop alongside your Chrome OS, install Crouton.
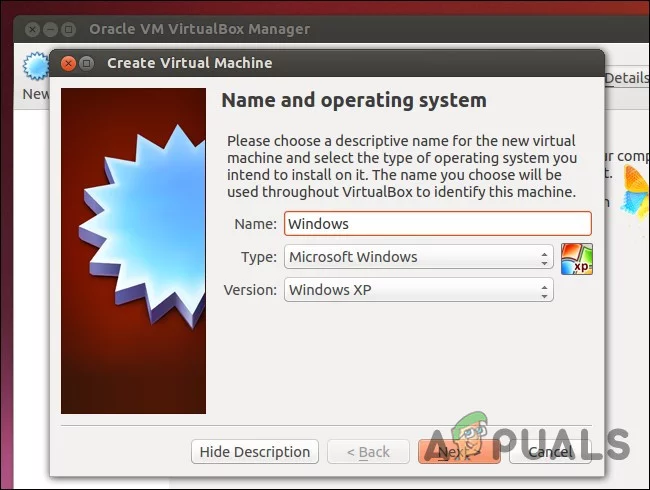
- Install a virtualization program like VirtualBox.
- Install Windows inside VirtualBox like normal.
- With a keyboard shortcut, you can switch back and forth between your Chrome desktop and Linux desktop.
Virtual Machine in Linux
Important : Many virtual machine applications like VirtualBox would not run on ARM Chromebooks and will run on an Intel-based Chromebook to try this out.
Virtual machines are the heaviest way to do this and you will need a powerful Chromebook to drive the virtual machine software, Windows, and desktop applications. Newer Chromebooks with modern and fast processors may be able to handle this. Virtual machines will take up a lot of disk space, and Chromebooks don’t often have, so it’s not a great combination.
How to Fix “Printer is in an error state” Issue?
- Common Chromebook printing issues include printer incompatibility, network connection problems, and outdated software or firmware.
- Solutions involve checking printer compatibility, ensuring both devices are on the same network, adding the printer manually, updating software, or using a USB connection.
- If issues persist, restart devices, troubleshoot the wireless connection, and update printer firmware; contacting support may be necessary for unresolved problems.
We’ve all been there—you need to print something important, and your Chromebook isn’t cooperating. Don’t worry; you’re not alone. Printing issues with Chromebooks are common but usually easy to fix.

Samsung Chromebook | Unsplash
- Check Printer Compatibility
- Connect Both Devices to the Same Network
- Select Your Printer
- Add Your Printer Manually
- Restart Devices
- Check Printer Settings
- Update Chrome OS
- Update Printer Firmware
- Use a USB Connection (if applicable)
- Troubleshoot Wireless Connection
- Check for Print Quality Issues
- Contact Support
In this guide, we’ll take you through straightforward steps to get your Chromebook working with your printer again. Let’s tackle this together, one step at a time.
But before we get into the solutions, let’s identify some common causes of printing issues on Chromebooks.
- Printer Incompatibility: Chromebooks have built-in drivers that may not be compatible with all printer models. Older printers or those requiring specific drivers may not work.
- Network Connection Problems: Both the Chromebook and printer must be connected to the same Wi-Fi network for wireless printing to work. Issues with the network configuration can prevent successful connections.
- USB Connection Issues: Problems with the USB cable or the USB ports on either device can cause printing failures when using a USB cable.
- Outdated Chrome OS: Running an outdated version of Chrome OS can lead to compatibility issues with printers.
- Outdated Printer Firmware: Older printer firmware may not work well with the latest Chrome OS versions, causing printing problems.

Chromebook Supported Printers by Epson
Now that you know the probable causes, check out the solutions below to fix the issue:
1. Check Printer Compatibility
Before attempting any fixes, ensure your printer is compatible with Chrome OS . Visit your printer manufacturer’s website to find information about your specific printer model and its compatibility with Chrome OS or Chromebook.
You can also check the list of ‘Certified “Works with Chromebook” printers’ on the Chromebook Help forum by Google . If your printer is listed, proceed to the next step. If not, you might need a compatible printer .

List of Printers Compatible with Chromebooks by Google | See Full List onChromebook Help
How This Helps: Ensuring printer compatibility with Chrome OS is crucial, as not all printers work seamlessly with Chromebooks. If incompatible, consider purchasing a different model verified to work with Chrome OS.
2. Connect Both Devices to the Same Network
- Turn on your printer and connect it to your Wi-Fi network. Refer to your printer’s manual for instructions. Connect Your Printer to Wi-Fi | WikiHow
- On your Chromebook, click the time in the bottom right corner to open the quick settings menu. Opening the quick settings menu on your Chromebook by clicking the time in the bottom right corner
- Ensure your Chromebook is connected to the same Wi-Fi network as your printer. If not, click the Wi-Fi icon and select your network. Ensure the Wi-Fi toggle is on and connected to the same network as your printer
How This Helps: Both devices need to be on the same network to communicate effectively. If they’re not, the Chromebook won’t find the printer, leading to printing failures.
3. Select Your Printer
- Press Ctrl + P on your Chromebook to open the print dialog. Press Ctrl + P to open the print dialog on your Chromebook
- In the print dialog, click the “Destination” dropdown and find your printer in the list. Select it and proceed to print. In the print dialog, select your printer from the ‘Destination’ dropdown
- If your printer is not listed, click “See more” at the bottom. If your printer isn’t listed, click ‘See more’ at the bottom
How This Helps: Selecting the correct printer is essential for printing. If the wrong printer is selected, or if the printer is not visible, the print job won’t proceed. This step ensures the Chromebook recognizes and is set to use the correct printer.
4. Add Your Printer Manually
- If your printer is not showing up, click on the time in the bottom right corner to open the quick settings menu. Opening the quick settings menu on your Chromebook by clicking the time in the bottom right corner
- Click the gear icon ⚙️ to open Settings . Open the Settings Menu
- Scroll down and click “Advanced” to expand advanced settings. Click on Advanced
- Under “Printing” , click “Printers” . Click on Printers
- Click on Add Printer icon Click Add Printer Icon
- Enter the following information about your printer: Name: Give your printer a recognizable name. Address: Enter your printer’s IP address. Print a network configuration page from your printer to find this. Protocol: Select “Internet Printing Protocol (IPP)” . Fill in Your Printer Details
- Click “Add” to save the printer settings. Click Add to Save the Printer
How This Helps: Manually adding your printer can resolve issues where automatic detection fails, allowing the Chromebook to communicate with the printer directly using its IP address.
5. Restart Devices
- Turn off your printer and wait for about 30 seconds.
- Turn your printer back on and wait for it to fully power up. Turn off your printer, wait 30 seconds, then turn it back on and wait for it to fully power up | WikiHow
- On your Chromebook, click the time in the bottom right corner and select “Sign out” . Click the time and select ‘Sign out’
- Sign back in to your Chromebook and check if the printer is now recognized.
How This Helps: Restarting both devices can clear temporary glitches or connectivity issues. This simple step often resolves many common problems.
6. Check Printer Settings
- Click the time in the bottom right corner and select the gear icon ⚙️ to open Settings . Open the Settings Menu
- Scroll down and click “Advanced” to expand advanced settings. Click on Advanced
- Under “Printing” , click “Printers” . Click on Printers
- Ensure that your printer is listed correctly with the right name and IP address.
- If necessary, remove the printer by clicking on the three-dot menu next to it and selecting “Remove” .
- Add the printer again manually using the steps in Section 4 .
How This Helps: Verifying and correcting printer settings ensures that the Chromebook is properly configured to communicate with the printer. Discrepancies in the printer name or IP address can lead to connection issues.
7. Update Chrome OS
- Click the time in the bottom right corner and select the gear icon ⚙️ to open Settings . Open the Settings Menu
- Scroll down and click “About Chrome OS” . Click ‘About Chrome OS’
- Click “Check for updates” . Click on ‘Check for Updates’
- If an update is available, it will start downloading automatically. Once downloaded, click “Restart” to install the update.
How This Helps: Keeping Chrome OS updated ensures you have the latest features, bug fixes, and compatibility improvements. Updates can resolve issues affecting printing functionality.
8. Update Printer Firmware
- Visit your printer manufacturer’s website and search for your specific printer model.
- Look for a “Support” or “Downloads” section and find the latest firmware update for your printer.
- Follow the instructions provided by the manufacturer to download and install the firmware update on your printer.

Canon G1330 Support Page
How This Helps: Printer firmware updates can fix bugs and improve compatibility with newer operating systems, including Chrome OS. This is essential for ensuring that your printer functions correctly with your Chromebook.
9. Use a USB Connection (if applicable)
- Ensure your printer is turned on and ready to print.
- Connect your printer to your Chromebook using a USB cable.
- A notification should appear on your Chromebook, asking if you want to set up the printer. Click “Set up” to proceed.
- Follow the on-screen instructions to complete the USB printer setup.

Connect your Chromebook to the printer via USB | WikiHow
How This Helps: Using a USB connection can bypass network issues entirely, allowing you to print directly from your Chromebook. This method is often more reliable when wireless connections fail .
10. Troubleshoot Wireless Connection
- On your printer, ensure Wi-Fi is enabled and connected to the correct Wi-Fi network.
- Power cycle your printer by turning it off, waiting for 30 seconds , and then turning it back on.
- Power cycle your Wi-Fi router by unplugging it from the power source, waiting for 30 seconds , and then plugging it back in.
- Wait for the router to fully power up and reconnect your Chromebook and printer to the Wi-Fi network.

Power Cycle Your Wi-Fi Router
How This Helps: Troubleshooting the wireless connection ensures that both devices are properly connected to the network. This can resolve issues caused by network interruptions or misconfigurations.
11. Check for Print Quality Issues
- Check the ink or toner levels in your printer. Replace any cartridges that are low or empty.
- Clean the printer heads by following the instructions in your printer’s manual. This can help resolve issues with blurry or faded prints.
- Run a test print from your printer to ensure that the print quality is satisfactory.

Check your printer’s ink or toner levels
How This Helps: Addressing print quality issues ensures that your documents print clearly and correctly. Low ink or clogged print heads can lead to poor print results, which may be mistaken for connectivity problems .
12. Contact Support
If the steps above didn’t fix the printing issue on your Chromebook, don’t stress. You can always reach out to your printer’s customer support—they might have more specific tips based on your printer model. If you’re still stuck, try posting your problem on the Chromebook Help Forum or contact Google support for extra help.

Chromebook Help
Follow these solutions, and you should fix most printing problems on your Chromebook. Ensure your printer and Chromebook are compatible, double-check that everything’s connected to the same network, keep your software updated , and if all else fails, try connecting in a different way. You’ve got this!
If your printer shows as “offline,” first check if it is powered on and connected to the same network as your Chromebook. Restart both the printer and Chromebook. If it’s still offline, try unplugging the printer for a minute, then plug it back in. Also, check the printer’s network settings to ensure it is connected to the correct Wi-Fi network.
If you can print some documents but not others, the issue may be related to the specific file type or format. For example, PDFs can sometimes have compatibility issues. Try opening the document in a different application or converting it to another format. Other than that, check the printer settings to ensure they are configured correctly for the document type.
To clear the print queue, open the Chrome browser and type chrome://devices in the address bar. Under the “Printers” section, find your printer and click “Manage.” From there, you can clear the print queue by selecting “Clear spooler.” This can help resolve issues with stuck print jobs.
If your printer is connected but won’t print, check for any error messages on the printer itself. Ensure that there are no paper jams, and that ink or toner levels are sufficient. Restart both the printer and Chromebook, and verify that the correct printer is selected in the print dialog. If the problem persists, consider updating your printer firmware.
Yes, you can print from a Chromebook without a Wi-Fi connection by using a USB cable to connect the printer directly to the Chromebook. This method allows you to bypass network issues and print directly from your device.
