‘A problem prevented the document from being scanned’ Error
There are multiple bottom-line culprits that might end up causing this error:
- Generic glitch – You might encounter this particular issue due to a generic glitch caused by long idle periods. In this case, you should be able to fix the issue by initiating a power cycling procedure in order to clear any temp data that might be causing this issue. Additionally, you can attempt to run the Printer troubleshooter to see if any of the automated repair strategies will fix the issue.
- Windows Image Acquisition service is turned off – Scanning jobs won’t be processed unless the WIA service is running. If it’s disabled or if it’s stuck in a limbo state, you will need to restart it and configure it to remain open before you’ll be able to complete any scanning jobs on your computer.
- Insufficient permissions – If you’re encountering this error while attempting to complete a scanning job via the Windows Fax & Scan utility, try opening the application with administrative privileges and see if this manages to fix the issue for you.
- Install & Alignment job not completed – In case you’re seeing this error with a new printer, chances are you will need to complete the cartridge install and alignment by printing a test page before your printer will let you scan anything.
- Old printer/scanner is connected to USB 3.0 port – If you’re facing this issue with an old scanner, you might need to switch to a USB 2.0 connection in order to eliminate any incompatibilities facilitated by the new USB format. Additionally, if you’re using a front USB, switch to a rear one to ensure that the device receives enough power.
- Corrupted OEM scanning app – This problem can also be caused by a corrupted scanning app. If this scenario is applicable, you can circumvent the issue entirely by using a proprietary scanning app like HP’s Scan Extended utility or by downloading and using the UWP version of Windows Scan from the Microsoft Store.
- Corrupted Still Image key – Under certain circumstances, this particular error code can be caused by a corrupted key (StillImage). In this case, you can fix the issue by using the Registry Editor utility to navigate to its location and delete it.
- Bad USB cable – It’s also possible that a non-congruent or corroded cable might end up causing this problem. Replace it with a new one laying around in your house to see if you need to order a replacement or not.
- System File Corruption – In rare cases, this particular issue might end up being caused by some underlying system file corruption. In this case, refreshing every OS component with a clean install or repair install (in-place repair) will surely fix the problem for you.
Method 1: Power cycling the scanner
As it turns out, a lot of users encountering the ‘ A problem prevented the document from being scanned ‘ error have reported that they managed to fix the issue by performing a power-cycling procedure. This operation consists of turning the device off and disconnecting it from the power source in order to drain the power capacitors and ensure that the next startup is completed without any cached data.
Here’s a quick step by step guide on power cycling your scanner in order to fix this error message:
- Clear any pending jobs in your scanner queue, then turn it off conventionally via the physical On / Off button. Turning your scanner off
- Unplug the scanner from the power outlet and wait at least 60 seconds to ensure that the power capacitors are cleared.
- After that time period has passed, plug your scanner back into your power outlet and start the scanner once again via the power button.
- Once the startup is complete, repeat the action previously triggering the ‘ A problem prevented the document from being scanned’ error and see if the problem is now resolved.
In case the problem is still not fixed, move down to the next method.
Method 2: Running the printer troubleshooter (Windows 10 Only)
In case you’re encountering the issue on Windows 10 and the problem originates from one of your USB ports, you might be able to fix the issue automatically simply by running the Windows Printer troubleshooter. This fix has been confirmed by several affected users.
This built-in utility contains a selection of automated repair strategies for the most common issues related to connected hardware and peripherals. If the issue you’re having is already covered by a repair strategy, then the Windows Printer Troubleshooter will be able to fix the issue automatically.
Here’s a quick guide on running the Windows Hardware troubleshooter utility in order to fix the ‘ A problem prevented the document from being scanned’ error:
- Press Windows key + R to open up a Run window. Once you see the dialog box, type ” ms-settings:troubleshoot’ and press Enter. This will open up the Troubleshooting tab of the Settings app on Windows 10. Accessing the Troubleshooting tab
- After you’re inside the Troubleshooting tab, move to the right section of the screen and then scroll all the way down to the Get up and running section, click on Printer, then click on Run the Troubleshooter from the newly appeared context menu. Running the Printer Troubleshooter
- Wait until the initial scan is complete and see if any fixes get recommended. If a repair strategy is applicable to your current situation, click on Apply this fix . Applying the Fix Note: Depending on the problem that gets discovered, you might need to perform some manual steps in order to apply the recommended fix.
- After the fix has been successfully applied, restart your computer and see if the problem is fixed at the next startup.
In case the problem is still there, follow the next potential fix below.
Method 3: Restarting the Windows Image Acquisition (WIA) service
As it turns out, you should expect to see the ‘ A problem prevented the document from being scanned ‘ error in case an essential service (Windows Image Acquisition – WIA) is not running or is stuck in a limbo state. Some users that were also encountering this problem have confirmed that they managed to fix the issue simply by restarting the WIA service and changing its Startup type to Automatic.
This service enables the communication between your operating system and imaging hardware such as scanners, digital cameras, and another video/image equipment – It’s absolutely essential to the well functioning of connected scanners.
If you suspect this service might be responsible for this issue, here’s a step by step guide on restarting and changing its Startup Type accordingly:
- Open up a Run box by pressing Windows key + R . Next, type ‘services.msc’ and press Enter to open up the Services screen. Type “services.msc” into the Run dialog and press Enter
- Once you’re inside the Services screen, move down to the right section and scroll down through the list of services until you locate the Windows Image Acquisition (WIA) service.
- When you see it, right-click on it and choose Properties from the newly appeared context menu. Accessing the Properties screen of Windows Image Acquisition (WIA)
- From the Properties screen of the WIA service, select the General tab. Next, change the Startup type (using the associated drop-down menu) to Automatic, then click on Stop > Start button to restart the service. Note: If the service is stopped, click on Start to ensure it’s running. Restarting / Starting the WIA service
- Save the changes by clicking on Apply, then repeat the action that was previously causing the A problem prevented the document from being scanned’ error and see if the issue is now resolved.
In case the same problem is persisting, start following the next method below.
Method 4: Running Windows Fax & Scan as Admin
As it’s been reported by some affected users, this problem can also occur due to the fact that the application you’re using to que your scanning jobs doesn’t have admin access in order to send the information to your scanning device.
If this scenario is applicable, you should be able to fix the issue by ensuring that the default scanning app (Windows Fax & Scan) is forced to run with administrative access.
Here’s a quick guide on doing this:
- If Windows Fax & Scan is already opened, close the application, but make sure that your scanning device stays open.
- Press Windows key + R to open up a Run dialog box. Next, type ‘ wfs’ inside the text box and press Ctrl + Shift + Enter to open it with administrative privileges. Opening Windows Fax & Scan with admin access
- When prompted by the User Account Control (UAC) , click Yes to grant admin access.
- After the Windows Fax & Scan utility is opened with admin access, queue another job and see if you’re still encountering the same error.
If the same ‘A problem prevented the document from being scanned’ error returns, move down to the next potential fix below.
Method 5: Finishing the printer’s cartridge install & alignment
In case you’re encountering the issue with a brand new printer (not a standalone scanner), ensure that you have completed any requirement that the printer asks for. Some users that were facing the same issue have confirmed that they’ve eliminated the error by completing cartridge install and alignment.
With most printers, you will need to physically print the scan and alignment page before the printer will let you scan anything. Of course, the steps of doing so will be different depending on your printer’s manufacturer. Some models will allow you to do this from their proprietary utility, but you should also be able to print an alignment page via the physical buttons of the printer.
Note: If you’re not sure about how to do this, read you’re printer’s user manual or search online for specific steps on aligning your printer.
In case you did this to no avail or this scenario is not applicable, move down to the next potential fix below.
Method 6: Connecting scanner to USB 2.0 port
In case none of the potential fixes above have helped, you should start investigating the port you’re using for your printer/scanner. Is it plugged in the front/rear? Is it a USB 3.0 port or 2.0?
Keep in mind that if you’re using an older scanner model, it might not be configured to work with the newer Univeral Serial Bus 3.0 interface. This problem is recurring and it’s affecting both printers and scanners released before the apparition of USB 3.0.
In case you’re using a USB 3.0 port for your scanner, switch to a USB 2.0 port and see if the issue is still occurring.
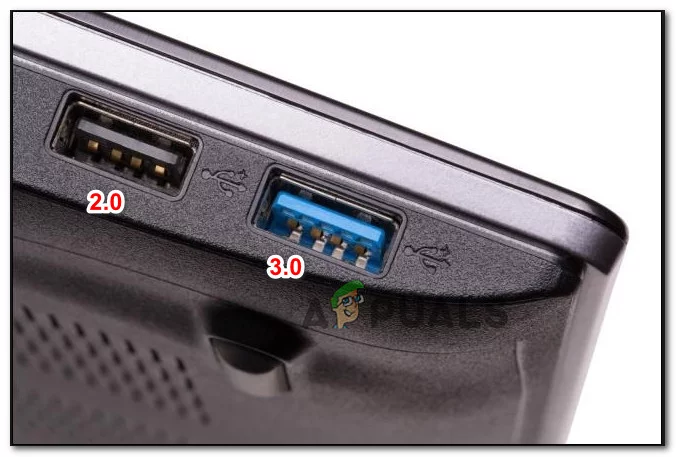
Plugging the keyboard into a 2.0 or 3.0 USB port
Also, in case you’re using a front USB port, switch to a rear one – Front USB ports tend to provide less power than their real equivalents.
Method 7: Using Scan Extended utility (HP Only)
If you’re encountering the issue with an older HP scanner model, you might need to use their proprietary scanning feature in order to avoid the ‘A problem prevented the document from being scanned’ error.
Some HP users have confirmed that they managed to fix this issue by installing and using HP Scan Extended as an alternative scanning solution.
Important: This software is proprietary and only works with HP printers.
If this scenario is applicable, here’s a quick guide on installing and using the HP Scan Extended in order to circumvent the error:
- Access Official HP HD Scan to download the HD Scan Extended utility.
- Once the download is complete, open the HPScanExt.msi file, accept the End-User License Agreement, then follow the on-screen prompts to install the utility. Installing the HD Scan Extended utility Note: When prompted by the UAC (User Account Control) , click Yes to grant Administrative privileges .
- After the installation is complete, click on Finish and restart your computer if you’re not prompted to do so automatically.
- Once your computer boots back up, click on Start and search for ‘ HP Scan extended ‘. Then click on the utility from the list of results. Opening the HP Scan Extended utility
- Create a new Scanning job and see if the operation completes without the same error.
In case this method was not applicable, move down to the next potential workaround below.
Method 8: Using the Windows Scan app (Windows 10 Only)
if you’re encountering the issue on Windows 10, there’s one additional workaround that you can try. As it turns out, Microsoft published a UWP application (Windows Scan) that you can potentially use to avoid the ‘A problem prevented the document from being scanned’ error.
Some users have confirmed that using this Scan app instead of the OEM equivalent allowed them to complete the scanning jobs with no issues.
Here’s a quick step-by-step guide on installing and using the Scan app on Windows 10:
- Press Windows key + R to open up a Run dialog box. Inside the text box, type ‘ ms-windows-store://home’ and press Enter to open up the Home screen of the Microsoft Store . Opening the Windows Store via Run dialog box
- Inside the Microsoft Store, use the search function (top-right section) to find the Scan App . Then, click on it from the list of results to open it. Opening the Microsoft Scan App
- From the next screen, click on Get to initiate the download of Windows Scan . Downloading and installing the Windows Scan Utility
- Wait until the installation is complete, then click on Launch to open the utility.
- Next, follow the on-screen connections to connect a scanner and see if it allows you to circumvent the error message
If the same problem is still occurring, move down to the next method below.
Method 9: Deleting the StilIimage key
As it turns out, you might also encounter the ‘A problem prevented the document from being scanned’ error due to a corrupted Registry entry that ends up preventing the scanning jobs from being executed. This problem is typically reported to occur after an AV ends up quarantining or removing OS items.
Several affected users that were facing this error with Canon printers have confirmed that the issue was resolved after they used the Registry Editor to delete the StillImage key. Most of them reported that the issue was resolved after they rebooted their computer.
Here’s a quick guide on deleting the StillImage key in order to fix the ‘A problem prevented the document from being scanned’ error:
- Press Windows key + R to open up a Run dialog box. Next, type ‘regedit’ inside the text box and press Enter to open up Registry Editor . Open Regedit Note: When prompted by the UAC (User Account Control) , click Yes to grant administrative privileges.
- Once you’re inside the Registry Editor utility, use the left-hand menu to navigate to the following location: HKEY_LOCAL_MACHINE\SYSTEM\CurrentControlSet\Control\StillImage Note: You can also get there instantly by pasting the location directly into the navigation bar and pressing Enter.
- After you get to the StillImage key, right-click on it from the left-hand side menu and click on Delete from the context menu. Deleting the StillImage keys Note: Don’t worry about causing any issues by deleting this key. Windows will recreate it from scratch due to the fact that the scanner driver rewrites it at the next startup.
- Close the Registry Editor and restart your computer.
In case the same problem is still occurring, move down to the next potential fix below.
Method 10: Replacing the bad USB cable
Another potential culprit is a faulty USB cable that’s connecting your computer and your scanner/printer. An old cable can turn out to be non-congruent or corroded, and this might end up affecting the transfer of data.

Replacing the bad USB cable
Since very few printer and scanner nowadays are being released with proprietary cables, try replacing it with a generic one and see if you still have the same problem. However, if the cable is proprietary, you have no other choice but to order a new one or send it for warranty.
In case this method was not applicable, move down to the final fix below.
Method 11: Changing Windows Image Acquisition (WIA) Startup Type
Another noticeable module which we found to be causing problems was the Windows Image Acquisition. This service is involved in fetching details of Windows image from official Microsoft servers. However, it is known to cause problems with other modules which includes the scanning module as well. In this solution, we will change the startup type of this service to Delayed Automatic and see if this fixes the problem.
- Press Windows + R, type “services.msc” in the dialogue box, and press Enter.
- Once in the Services tab, search for the entry of Windows Image Acquisition, right-click on it and select Properties . Windows Image Acquisition Properties
- Now, change the startup type to Automatic (Delayed Start) . Save changes and exit. Restart your computer and see if the problem is resolved. Delayed Automatic Start – Windows Image Acquisition
How to Fix “Printer is in an error state” Issue?
Nothing is more terrifying than when a printer stops doing what it’s supposed to do, printing. And it gets worse if you have just installed a new cartridge. The time when you expect a shining print, all you get is a blank page. This issue can also occur in a printer that is using an old cartridge.
Mostly it is a hardware issue responsible for this. But hardware is only as good as the drivers or software you are using on your computer, so the issue can be caused by that end too.
Follow the guidelines stated below to troubleshoot the issue.
Inspect Cartridge
Incorrect installation of the cartridge can stop it from printing hence blank pages will be printed. In case this issue has started appearing after installing a new cartridge, a common mistake that you could have made is failing to remove the protective sheet or cover on the cartridge before inserting it into the printer. It is used to protect the sensitive part of the cartridge drum getting damaged or dirty. You have to remove it before you can use the cartridge.
Firstly, take your cartridge out . Based on your cartridge type, the protective tape (usually orange/yellow in color) can be of different types and in a different location.
In some printers, there is a colored tab on the new cartridge. Pull it and the protective sheet will be removed. In some, it a plastic little sheet placed on the contacts and ink nozzle. You just have to pull it off to remove it.

You will have to consult the manual for your exact printer’s model to know the location of the protective sheet. A user can easily miss this, so make sure you double-check it. Once done, firmly insert the cartridge(s) back into the printer.
Check Ink Levels
Make sure the ink cartridges are not completely empty. You can easily check that by printing out a report by using the menu buttons on your printer.
It will be mentioned as “ Ink Levels ” or “ Print Quality ” as it differs by your printer’s model. Or you can consult your printer’s manual to see the exact way to check Ink levels.
If there is no ink in the black cartridge, then, of course, you will be unable to print.
In the case of some color printers (Epson’s, for example), completely empty color cartridges can also cause your printer to print blank pages even if you are printing a black and white document. The reason behind this is that a little amount of colored ink is required to keep the heads of the printer clean.
Unclog Print Heads
If you have not used your printer for a long time, a heavy amount of ink can dry up and clog at the print heads on the cartridge. To unclog them, in most printers there is an option to clear print heads or print nozzles in the menu of the printer or in the software that came with the printer installed on your computer.
To manually unclog and clean the printer head , turn the printer on. Remove the cartridge from the printer.
The location of the print head varies by printer brand and location. It’s usually the place where the protective sheet is placed in a new cartridge. Once again you will have to consult its manual to know the exact location. Once you find it, clean it with a lint-free cloth and cotton swabs .
To stop this problem from happening in the future, make sure you print a page at least once every 3 days .
Use Another Software
Try different software to print your file. For example, if you are using Microsoft Word to print a document, then save it as a PDF and use Adobe Reader instead to open and print it.
Update Printers Drivers
An outdated driver can be messing up your print command. To install updates , visit your printer’s manufacturer’s website .
- Once there, type in your exact printer’s model and search for the Download or Support section of your model.
- In there, download the drivers that are specifically made for your operating system (e.g. Windows 7 x86, Windows 10 x64, Mac OS, etc.)
- Install them and check. If there are no drivers available for Windows 10, you can try Windows 8/8.1 drivers instead.
