Typically printers print on one side of the paper . This leads to the usage of more paper, which is not efficient. Duplex or double-sided printing is a feature that allows you to use both sides of the paper.
Printing a Document
By default, printers are set to print on one side of the paper. To enable double-sided printing, you will have to configure your printing preferences.
The ability to print on each side of the paper can vary per printer. Not all printers support duplex printing. If this case is applicable, you must manually print on both sides by commanding your printer to only print on odd/even papers. After that, you will have to flip the papers and reissue the print command to achieve double-sided prints.
In this article, we will show you how to set up your printer for double-sided printing. In addition, you will also learn the printing procedure on both sides if your printer does not support duplex printing. So, let us start right away.
1. Configure Duplex Printing on Windows
We will start with configuring a printer on Windows for duplex printing. If you want to perform double-sided printing for a single print task only, you can do so via the Microsoft Word Document.
However, the procedure will vary slightly if you want to set duplex printing as the default mode. In this case, you will need to change the printing preferences of your printer via the Settings window to enable duplex printing. Keep in mind this only works for printers that support it.
If your printer does not support duplex printing, we recommend jumping to the last method below, which guides you through the manual process.
1.1 Double-Sided Print for a Single Job
For a single duplex printing job, follow the instructions down below:
- First, open up the document you want to print with Microsoft Word.
- In the top-left corner, click on the File option.
- After that, on the left-hand side, click on the Print option. Navigating to Print Options
- Choose your printer from the drop-down menu and click the Printer Properties option below. Opening Printer Properties
- Now, on the pop-up window, tick the Duplex Printing checkbox. If you see Duplex Printing (Manual) , your printer does not support double-sided printing, and you will have to do it manually. Move to the last method in such a scenario.
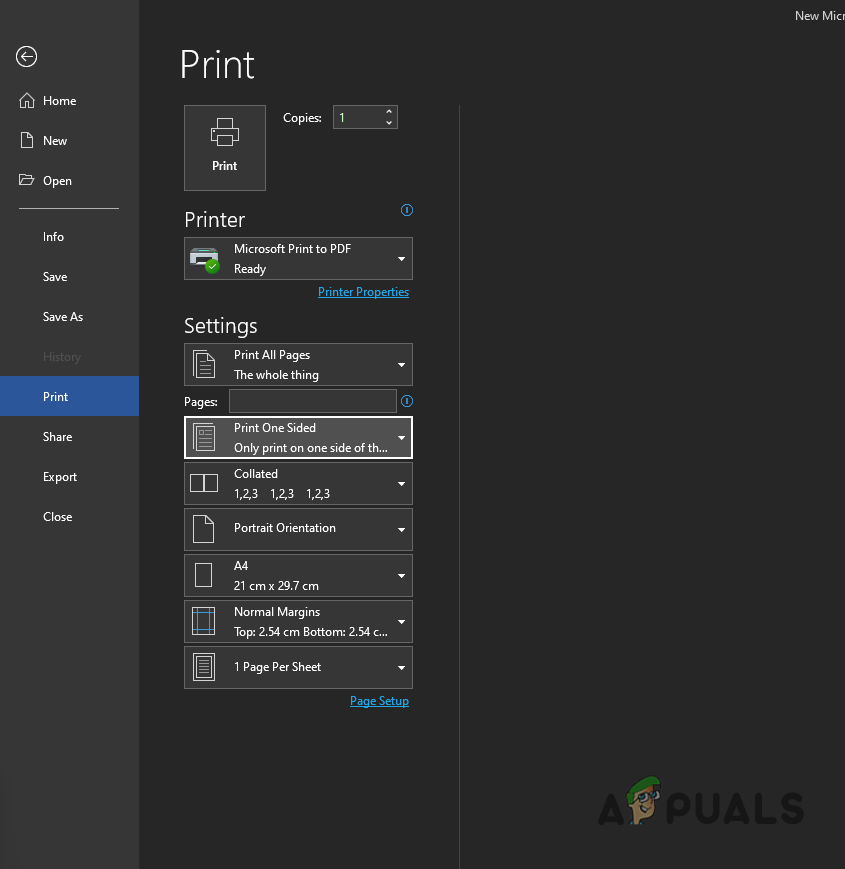
- Alternatively, on the Print screen, you can click on the Print One Sided drop-down menu and choose the Print on Both Sides option to enable duplex printing. Print One Sided drop-down Menu
- Once you do that, your printer should now print on both sides of the paper.
1.2 Set Duplex Printing as Default
If you want your printer to perform double-sided prints on all of the future print jobs, follow the instructions down below:
- To start, open up the Settings app by pressing the Windows key + I on your keyboard.
- On the Settings window, navigate to Bluetooth & devices. Navigating to Bluetooth and Devices Settings
- After that, click on the Devices option. Navigating to Devices
- On the Devices screen, scroll down to the bottom and click the More devices and printer settings option. Opening Additional Printer and Devices Settings
- Once you do that, on the new window that appears, right-click on your printer and choose Printing Preferences from the drop-down menu. Opening Printing Preferences
- From there, enable Double-sided printing . The exact option may vary depending on your printer, model and manufacturer.
2. Double-Sided Printing on Mac
Performing duplex printing on a Mac is also quite straightforward. This depends on whether your printer can perform duplex printing or not. With that in mind, follow the instructions down below to perform double-sided printing on a Mac :
- To start, open up the document you want to print with Microsoft Word, Pages, or something similar.
- After that, click on the File option in the menu bar and from the drop-down menu, choose the Print option. Alternatively, you can press the Command + P keys on your keyboard. Navigating to Print Options
- On the Print dialog box, look for the Two-SIded option. By default, it will be set to Off. Enabling Two-Sided Printing
- From the drop-down menu, choose either Short-Edge Binding or Long-Edge Binding . Double-Sided Print on Mac
- Once you do that, click the Print button to start double-sided printing your document.
3. Double-Sided Printing on Google Docs
If the document you want to print is available on Google Docs, you do not have to go through the trouble of downloading and then printing it. Instead, you can follow the instructions down below to perform a double-sided printing job on Google Docs:
- First, open the document you want to print on Google Docs.
- Once the document is open, click on the File option in the top-left corner (under the document name) and click on the Print option. You can also use the CTRL + P shortcut on your keyboard. Navigating to Print Options
- After that, on the Print screen, click on the More settings option. Expanding More Options
- Once you do that, it will reveal the Two-sided option. Tick the checkbox and then click on the Print button.
- Your document will be printed on both sides of the paper.
4. Double-Sided Printing a PDF File
If you have a PDF file you want to print on both sides of the paper, you can do so easily via Adobe Acrobat Reader. Follow the instructions down below to do this:
- To start, open your document with Adobe Acrobat Reader.
- After that, click on File in the top-left corner, and choose Print. Navigating to Print Options
- On the Print dialog box, tick the Print on both sides of paper checkbox. Printing on Both Sides Adobe Acrobat
- Once you do that, click on the Print button, and you should be ready.
5. Manually Print on Both Sides
Not all printers support duplex printing. If you find yourself in such a situation, you can do so manually. This requires a little more effort than having a duplex printer, but it still is quite easy.
The process involves printing on specific pages (even or odd) at first and then flipping the stack. You will be able to nail it off with that. Follow the instructions down below to do this:
- First, open up the document you want to print with Microsoft Word .
- Once Microsoft Word is open, click on the File option in the top-left corner.
- After that, click on the Print option on the left-hand side. Navigating to Print Options
- On the Print screen, click on the Print One Sided drop-down menu and choose the Manually Print on Both Sides option. Print One Sided drop-down Menu
- Once you do that, click on the Print All Pages drop-down menu under Settings. Print All Pages drop-down Menu
- From the drop-down menu, choose the Only Print Odd Pages option. Printing Odd Pages Only
- Click on the Print button to start the printing process.
- Once the odd pages have been printed, flip the paper stack in your printer.
- After that, navigate to the Print screen again. This time, click the Print All Pages option under Settings and choose the Only Print Even Pages option from the drop-down menu.
- Once you do all that, your document will have been printed on both sides.
How to Fix “Printer is in an error state” Issue?
- Even in our digital age, physical materials like paper still play a vital role, especially in printing, where the type of paper can greatly affect the final product.
- Different printers are best suited to specific paper types, such as glossy for photos or cardstock for invitations, highlighting the importance of choosing the right paper for your project.
- The variety of paper options, with different textures, weights, and finishes, allows for creativity and precision in achieving the desired look and feel for each print job.
Choosing the right paper for your print job is not an easy task. You need to understand factors like paper weight , finish , and brightness . The combination of these qualities results in numerous paper types, each suited to a specific use case.

Types of Paper for Printing
You wouldn’t want to print your cherished pictures on cardstock paper, and you certainly wouldn’t want to print your business card on standard printer paper. Knowing the different options available can help you make the most of your printer for a broader range of projects.
- Types of Printer Papers 1. Inkjet Paper 2. Laser Paper 3. Copy Paper 4. Matte Paper 5. Glossy Paper 6. Photo Paper 7. Card Stock Paper 8. Bond & Label Paper
- Which Paper is Best for Your Print Job?
Types of Printer Papers
1. Inkjet Paper

Inkjet Paper
As the name suggests, inkjet paper is specifically designed for inkjet printers to create clear text and sharp images . It can be further classified into various types, such as glossy , matte , and card , to suit different needs. However, this doesn’t mean that other paper types won’t work with these printers. The specification is simply to achieve the best results, as inkjet paper tends to absorb ink and is thus made slightly thicker .
2. Laser Paper

Laser Paper
Similarly, laser paper is specifically designed for laser printers to produce high-quality results. This type of paper is usually best for office use, such as memos , invoices , and high-volume documents . The finish is typically matte to avoid delaying drying time.
Since the toner stays on the surface of the paper in laser printing, it is not designed for maximum absorption, unlike inkjet paper, which can withstand more moisture comparatively.
3. Copy Paper

Copy Paper
While some may use copy paper and laser paper interchangeably, there’s a distinct difference between the two. Copy paper is the kind you usually find next to your office printer in a large box. It is thinner and less expensive than laser paper and, well , gets the job done. However, color accuracy and print quality may sometimes be compromised .
4. Matte Paper

Plain Matte Paper
Matte paper, or more commonly known as printer paper, features a non-reflective, smooth , and non-textured finish that provides a clean and professional appearance. For this reason, it is ideal for printing reports and resumes , although the latter is less common these days.
But what’s even better, you ask ? You can produce double-sided printouts without having silhouettes show on the other side. Talk about a great balance of cost-effectiveness and resource efficiency in the long run!
5. Glossy Paper

Glossy Paper
Looking for a touch of pizzazz ? Then a glossy finish is the way to go. It not only enhances contrast and color saturation , but when combined with durable inks and color-depth cartridges, it produces brilliant and crisp photographs and marketing materials . Text documents are not the best use of this paper, unless , of course, you’re aiming for an extra element of sophistication.
6. Photo Paper

Photo Paper
Photo paper is specifically designed for printing photographs and is available in several finish options, such as matte , glossy , and satin . In fact, it often has a different finish on each side and is thicker than most papers.
The purpose of this paper, as clear as the results it produces, is to deliver exceptional sharpness and color reproduction . After all , what good is a photograph if it’s not preserved in its best quality for many years to come? However, you should check your printer’s manual or the manufacturer’s website to see if it can handle photo paper and its thickness.
7. Card Stock Paper

Card Stock Paper
You might still be wondering what to use for printing business cards , wedding invitations , flyers , or other formal materials for your brand. Using regular printer paper or glossy paper for these purposes may not be very convincing. For this, you need the durability and sturdiness offered by card stock paper.
The premium feel and longevity of this material can withstand harsh handling and minimize damage. However, keep in mind that not all printers are designed to handle card stock. So, if you use an incompatible printer , be prepared for paper jams or other similar issues.
8. Bond & Label Paper

Bond & Label Paper
Ever noticed how receipts and labels paper feel different from your everyday paper? That’s because it’s a special material called thermal roll or bond roll , which features a texture similar to fabric.
The “ thermal ” in its name refers to the printing process that uses heat to imprint the image onto the paper. This method not only reduces ink costs but also prevents smudging and smearing . However, receipts and labels aren’t its only applications. Thermal paper is used in various fields, from art to business and beyond . But mostly where ink permanence is the top priority.
Which Paper is Best for Your Print Job?
Since everyday tasks typically require standard matte paper and most office printers use laser paper for document reproduction, you don’t need extraordinary printers or thicker paper for these tasks.
But if you wish to print cards , invitations , and brochures , you’ll definitely need to stock up on card stock and glossy paper. And if you’re a photographer with a studio, you wouldn’t need to purchase anything other than photo paper —until you decide to leave the profession, that is.

A and C-Series Paper Sizes
But it doesn’t end there. Each paper type is available in various sizes , ranging from A1 to A10 . While standard printers typically support A4 and/or A3 sizes, specialized printers can accommodate a wider range of sizes, along with different coatings and weights, providing maximum flexibility for your printing needs.
If you are a new Mac user and need to print a color page in black and white, or in grayscale, you do not need any special software to do it. However, Black & White printing available on your Mac is directly dependent on the printer you use.
Note: Some printers do not support printing in black and white. If this is the case, you cannot force the printer (which doesn’t support B&W printing) to have an ability that its hardware does not support.
If your printer supports B&W printing, here is how can you do it on a Mac.
- While your document or image is opened (in the appropriate app – TextEdit, Microsoft Word, Pages, Preview, etc.) click on the file menu and choose Print .
- In the Print Options window, click on Show Details (if available), to reveal more information about the printing procedure. If you see Hide Details instead of Show Details, you can just continue to the next step.
- Now depending on your printer you may or may not see a Black & White toggle on the Print Options window.
- If available, just check that toggle and you can print your document or image .
- If not available, click on the non-labeled Application Drop-down menu (check the image below).
- Now, choose the Printer Settings option (or Paper Type/Quality). Depending on your printer this option may be named differently in your particular case. Usually, it is located in the bottom options.
- Once you choose the right option in the Application Drop-down menu, a Color (or color options) field will show up . Click on the Color drop-down and choose Black (or Grayscale, or any other option that stands for Black and White printing).
Note: Keep in mind that the fields’ names may vary depending on the printer model. Sometimes the grayscale option may be named Mono, or Black Cartridge Only, or something similar. Also, the positioning of these fields may be different.
Create Black and White Preset
If you print black and white documents often, you can create a preset with these settings and use it instead repeating this procedure whenever you need to print in black and white.
- Click on the Preset drop – down , at the top of the Pring Option window.
- Choose Save Current Settings as Preset …
- Type a name for your preset (B&W for example).
- Choose if you want to save it for the current printer or all printers .
- Click save .
