The WPS method OR ( push button method ) is an easy and quick method for connecting the printer to the wireless router, access point, or gateway. Generally, the way it works is that you press this button on the printer first, and then on the router within 2 minutes, allowing both devices to connect to each other.
There are two ways you can access the WPS settings: either through the Setup or by pushing the WPS button on the printer. On some printer models, this button is not available; therefore, to access it, you will need to enter the printer’s setup menu, which is usually indicated by a Tools/Wrench icon on the printer’s panel.
If the button is available, how do i connect my printer to my router?
If the button is available, take a close look at the buttons on the printer to identify a button with a wireless icon. Press this button and then press the WPS button on your router within two minutes.
If the WPS button is not available, what do I do then?
If the button is not available, you can connect by entering the printer’s setup through touch. This article does not cover specific models but serves as a general guide.
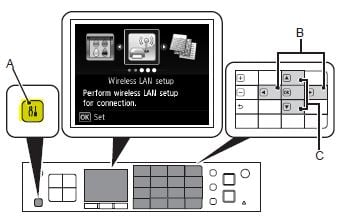
( A ) indicates the setup button, which is what you will need to press. Once you are in the settings, use the arrow keys to enter “ Wireless LAN Setup ,” “ Wireless Setup ,” or “ Network Setup “.
Once inside, locate the Push Button Method or WPS method and proceed with it.
You will then be told to press the WPS button on your router within 2 minutes.
Press the WPS button on the router for the connection to take place.
How to Fix “Printer is in an error state” Issue?
Nowadays, most modern printers have built-in Wi-Fi connectivity. It means that you don’t need to buy a separate printer for every room in your home or office. Just buy a wireless printer, place it in a location where everyone can access it easily, and connect it to your Wi-Fi network. However, many users prefer sticking with their old printers, because after all “old is gold”. And most older printers, do not have the functionality to connect directly to the Wi-Fi. Considering the technical changes and advancements, the technology is pushing users to start using the latest technology. However, in this case the latest tech enhancements turn into the favor of those with a USB-printer. Luckily, you can now connect it to your network using the Airport Express. In this guide, we will see how to achieve this.
Connecting a USB Printer to Airport Express
Connect one end of your printer’s standard USB cable into the printer and connect the other end of USB cable to Apple’s AirPort Express.
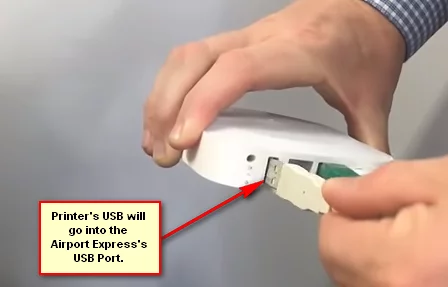
Turn on the power of your printer and Apple’s AirPort Express.
Your printer is now connected to the Airport Express. Now, in order for the printer to show up on your network your Mac or PC must also be connected to Airport Express. What this will do is share your USB Printer over the Network.
Assuming that you are connected to the Airport Express or Extreme, go to System Preferences -> Print & Scan and click the + symbol to add the printer. This method is not limited to Airport Express or Extreme, as long as your router supports usb devices, this method can be applied onto any of them.
In addition to wireless printing, you can use your AirPort Express to set up AirPlay or access the internet. You can also use it to create or extend your existing Wi-Fi network. Download AirPort Utility from here . This utility lets you see your network graphically, change network settings and more.
