It gets trickier for users to choose between the “32-bit” and “64-bit” Architectures that Windows supports. In spite of the fact that 64-bit is much faster and capable of handling more RAM. Some applications still only support the “32-bit” architecture. Newer operating systems do have the option to use 32-bit applications on 64-bit architecture. This is achieved by having two “Program Files Systems” on the same computer.
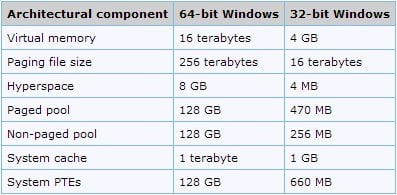
A comparison of 32-bit and 64-bit operating systems
The 32-bit File system is stored as “Program Files(x86)” this way Windows can identify a 32-bit application and provide the accurate “.dll” file depending upon it.
How to Install 32-bit Software on 64-bit Windows?
In this article, we will guide you with the easiest method to allow the installation of 32-bit programs on 64-bit Windows. In order to achieve this task follow the guide below
- Press the “ Windows ” + “ S ” keys simultaneously to open Search.
- Type in “Control Panel ” and click on the first option. Clicking on the “Control Panel” option
- Click on the “ Programs ” option and then select “Turn Windows Features ON or OFF ” button. Clicking on “Programs” inside Control panel
- Check the box for “ Internet Information Services ” and click on “ OK “. Checking the box for Internet Information Services
- Windows will start to enable the features, wait for the process to be completed.
- Press the “ Windows “+ “ S ” keys simultaneously to open Search .
- Type in “ Internet Information Services ” and click on the first option. Clicking on the “Internet Information Services” option
- Double click on the “ Desktop ” option in the left pane. Double-clicking on the “Desktop” option in the left pane
- Double click on “Application Pools “. Double-clicking on the “Applications Pools” option
- Right – click on the “Default Application Pool” option and select “Advanced Settings “. Right-clicking on “DefaultAppPools” and selecting “Advanced Settings”
- Under the “ General ” heading, click on the “ Enable 32 – bit Applications ” option and click on the “ dropdown ” in front of the “ False ” value. Clicking on the “Enable 32-bit Applications” option under the General heading and clicking on the dropdown in front of “False”
- Select “ True ” and click on “OK”. Selecting “True” as the Value from the dropdown
- Try to install a 32-bit Software and check to see if the issue persists.
