Foobar2000 is one of the most popular media players for audiophiles – it supports nearly every audio format out there, is highly customizable, and comes with a load of useful plug-ins for achieving the best audio quality you can imagine.
For a long time, people were content with on-board computer audio – Realtek HD onboard audio, for example, is loaded in more motherboards than you can imagine. And while Realtek HD isn’t bad , its not a dedicated sound card – or the more popular option nowadays, a USB audio interface .
There is a little bit of confusion about what a USB audio interface is and isn’t – what are they for, and do you still need a dedicated sound card? Well, a USB audio interface is a dedicated sound card, and they typically have some kind of built-in preamp. A USB interface just connects via USB (or FireWire / Thunder) instead of your typical PCIe slot on your motherboard.
It’s too much of a mouthful to call them “USB Input/Output Dedicated External Sound Cards”, so the name “USB audio interface” stuck, but make no mistake, a USB audio interface is practically the exact same thing as a dedicated sound card that goes inside your computer.
Popular USB audio interfaces include:
- Tascam US-2×2
- PreSonus AudioBox iTwo
- Focusrite Scarlett 2i2
- Behringer U-Phoria UMC22
If you’re a total beginner to the world of high-quality audio, and you just hooked up your first USB audio interface to your PC, and you want to bypass your on-board mixer, it can be a total pain figuring out how to optimally configure Foobar2000 ( or any other audio program that will be outputting signal from your PC through your USB interface) . This guide will walk you through optimal hardware and software configuring for getting the most out of your USB audio.
The Hardware Setup
A quick note – I personally do not own any of the “popular” USB audio interfaces mentioned above. I own a Zoom G2.1Nu multi-effects guitar pedal, which has a built-in USB audio interface at a sample rate of 16/48kHz. With its custom ASIO drivers, it is exactly the same thing as any USB audio interface out there, it just has the addition of a pedal and multiple effects for playing guitar through the input jack.
Here is my hardware setup ( yours should be similar):


So as you can see, it basically goes like this:
USB audio interface has USB cable that goes to computer.
USB audio interface has stereo Line-Out jack, I’m using a 3.5mm stereo male to 6.35mm stereo female adapter ( they’re like $1) for the Zoom’s Line-Out jack, which is connected to my 5.1 speaker system’s AUX / RCA input.
My Zoom G2.1Nu can be powered by either AC wall-plug or USB power, however when using ( or choosing ) a USB audio interface, you should opt for one that has AC power! Sometimes, especially during heavy audio load, the USB power supply from your computer is not enough for the device – causing stutter or low volume. By using AC to power your device, you can ensure it is always operating at optimal power consumption.
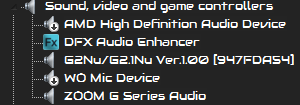
As you can see in the screenshot for my computer’s Device Manager, my Zoom USB interface has its own “Zoom G Series Audio”, which is ASIO-based. Your USB audio interface probably has its own driver as well – you should always try to use the manufacturer’s driver, unless it is totally buggy and outdated, in which case you can try something like ASIO4ALL. I have completely disabled the on-board audio driver from my BIOS.

Finally, here in my Sound > Playback Devices settings, you can see my Zoom USB interface is set as the Default Device, and its Default Format is set to the highest possible it can handle, 16 bit / 48000 Hz. Some USB audio interfaces can achieve as high as 24 bit / 192000 Hz, but this is absolutely useless for audio playback – I’ll explain why later.
Configuring Foobar2000 (or similar media player)for Optimal USB Audio Playback
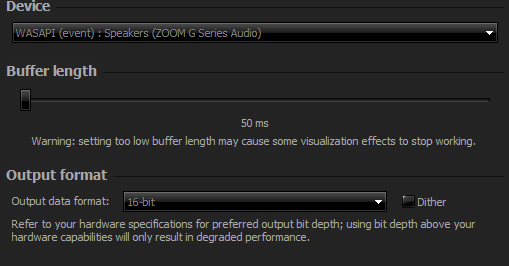
Go into Foobar’s Preferences > Output menu, and choose your USB audio interface as the main output. DirectSound is good, but if you want completely uninterrupted audio ( no Windows sounds) , you should go with WASAPI Event Mode.
This boils down to preference, there isn’t a whole lot of evidence that WASAPI is better than DirectSound from an audio quality perspective. The main difference is that DirectSound will always use the Windows mixer, so you can tack on additional things to your sound chain, like having an external DSP ( like DFX / FXSound) or a system-wide equalizer application ( Equalizer Pro, Equalizer APO) .
When you use WASAPI, however, it completely bypasses the Windows mixer . This means audio output will be sent directly through your USB audio interface from your computer, and you cannot use any external DSP / Equalizer outside of the media player you are using.
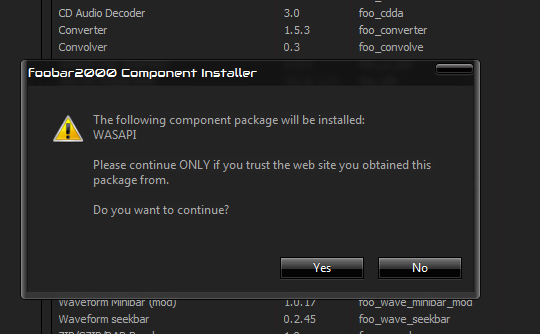
If you want to use WASAPI output in Foobar2000, download Foobar’s WASAPI output support plug-in HERE , open Foobar2000, double-click the component file to automatically install it, and restart Foobar2000.
Some additional things to adjust for optimal playback quality:
- Preferences > Output > Buffer Length = <500 ms, I typically run at 50 ms, but increase this value if you encounter any stuttering.
- Preferences > Playback > ReplayGain = None . No replay gain! It just degrades audio quality by creating fake levels in perceived audio volume.
- Preferences > Advanced > Playback > Full file buffering up to = 10000
- Preferences > Advanced > WASAPI > High worker process priority checked
- Preferences > Advanced > WASAPI > MMCSS mode: Pro Audio ( type it in)
Now find the best lossless audio file on your computer, and play it!
Using Impulse Responses in Foobar2000
Loading impulse responses is a popular way to completely change the soundscape of music, especially for Android users who use the rooted app Viper4Android . However, we can actually use an IR loader plug-in for Foobar2000, and very easily “convert” Viper4Android IR files to .WAV for loading into Foobar2000.
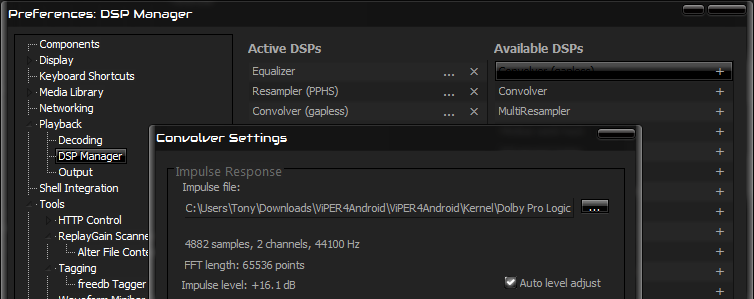
Download the foo_dsp_convolver_0.4.7 plug-in and install it ( it’s a .DLL file, so you will need to drag and drop it onto your Preferences > Components menu).
Now, this convolver will only load .WAV impulse responses, whereas a good majority of IR files are created in .IRS file extension.
So what we’ll do is simply download some IR packs of our choice. Here is a great pack of “ Dolby IRS ” impulse responses that were created for Viper4Android, but we will convert them to .WAV for loading into Foobar.
Once you download and extract the .ZIP file containing all the .IRS files, launch a command prompt and CD to the folder containing all the .IRS files.
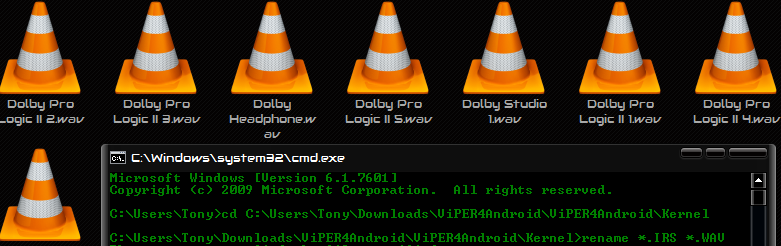
Now run this command in the command prompt: rename *.IRS *.WAV
All of the .IRS files will automatically be converted to .WAV files, which can now be loaded in the foo_dsp_convolver plug-in without any problem.
( Note: You should load the foo_dsp_convolver plug-in after your resampler in the component chain!)
Foobar2000 Playback Error (Unsupported Stream Format)
Uh-oh! What happened here? I was trying to play a 24 bit / 192 Hz lossless FLAC file, and Foobar2000 gave me this message. What gives?
Well, there are two possibilities here.
- You have the Output Format bit-rate set to something higher than what your USB audio interface is capable of. Remember that my Zoom USB interface has a maximum of 16 bit / 48 Hz, so I will set the Output Format in Foobar2000 to 16-bit.
- If that isn’t the problem, then you need to enable Foobar’s Resampler (PPHS) plug-in, under Preferences > DSP Manager.
This is because when I tried to play a 24 bit / 192 Hz file, my audio driver could not process it – so by resampling (or downsampling, in this case) the audio file down to my driver’s native frequency, the file plays perfectly fine.

Now here you might be thinking, “ I want 24 bit / 192 Hz playback! Why should I downsample?” – honestly, you don’t really want 24 bit / 192 HZ playback. There is literally no benefit to this. The human hear cannot hear above 22kHz, and while some may claim otherwise, blind-tests often prove them wrong ( unless they have Superman hearing, which puts them in like 0.01% of the population).
Now, if you were using an ultra hi-fi setup with thousand-dollar speakers, then yes, you might hear a slight difference in 16 bit / 48Hz versus 24 bit / 192Hz. It will be very slight though, and mostly boils down to slightly wider sound-space, especially during quiet interludes ( e.g. gentle passages in classical music) . For modern music, however, your ears will never perceive the difference.
If you’re using an ultra hi-fi setup, you probably bought an expensive USB interface that can support 24 bit / 192Hz playback, so none of this even applies to you.
How to Fix “Printer is in an error state” Issue?
The error “ WinRAR Error: Next Volume Is Required ” usually appears when you’re extracting a multi-part RAR archive and WinRAR can’t find (or can’t correctly identify) the next file in the sequence . This often happens when a volume is missing , stored in a different folder , or renamed in a way that breaks the archive’s expected order .

In this guide, we’ll go over the most reliable fixes confirmed by affected users, along with what each method is doing behind the scenes so you can choose the right one for your situation.
Important: To extract multi-volume archives, you should always start extraction from the first file in the set. This is usually file.part1.rar , or (in older sets) the main .rar file that comes before .r01 , .r02 , and so on.
1. Download and Place the Missing RAR File
WinRAR needs all parts of a multi-volume archive to complete extraction. This error usually appears when one of the volumes in a set like .part2.rar , .r01 , .r02 , .001 , and similar naming formats is missing . Downloading the missing volume and placing it in the same folder as the other parts allows WinRAR to continue extracting normally .
- Look at the error message or review the list of archive parts in the folder.
- Identify which volume is missing (for example, part2.rar , .r02 , .001 , etc.).
- Go back to the website or source where you downloaded the archive.
- Locate and download the exact missing file using the same naming format as the others.
- Make sure the new file name matches the pattern of the rest. Example: If you have file.part1.rar and file.part3.rar , the missing one must be file.part2.rar .
- Move the downloaded missing volume into the same folder as the other archive parts.
- Confirm that all parts are in a single folder before extracting.
- Right-click the first file in the series (usually part1 or the main .rar file) and select Extract Here or Extract to Folder .
- WinRAR should now detect all volumes and continue extraction normally .
2. Manually Browse & Select the Next Volume
Use this method only if the next volume already exists , but WinRAR is failing to detect it automatically. This can happen due to incorrect naming , the file being in a different location , or a temporary file access issue. Manually browsing helps WinRAR locate the correct volume and resume extraction without interruption .
- Right-click the first file in the series (usually .rar or part1.rar ) and select Extract Here or Extract to Folder .
- When WinRAR cannot find the next volume, it will show the “ Next Volume Is Required ” message.
- A small window will appear, allowing you to manually select the next volume .
- Use the file explorer window to locate the folder where the other archive parts are saved.
- Select the next part based on the naming order (example: select file.part2.rar after file.part1.rar ).
- Make sure the selected file matches the naming format of the archive (no extra characters like (1) and no mismatched numbering).
- WinRAR will resume extraction using the selected volume .
- If additional volumes are missing or stored separately, WinRAR may prompt you again. Repeat the same process until extraction completes.
3. Rename the RAR files in Order
WinRAR relies on a proper naming sequence (such as file.part1.rar , file.part2.rar , file.part3.rar ) to extract multi-volume archives. If a file is named incorrectly, contains extra characters, or is out of order, WinRAR may fail to locate the next volume and show this error. Renaming the files correctly helps WinRAR follow the sequence and extract the archive without interruptions .
Note: Renaming only changes the file name , not the file contents. The goal is to restore the correct sequence so WinRAR can detect the next volume.
- Go to the folder where all the RAR files are saved.
- Make sure all parts of the archive are present and stored in the same folder .
- Check how the parts are currently named . Common patterns include:
file.part1.rar, file.part2.rar, file.part3.rar
file.rar, file.r01, file.r02, file.r03
- Look for files that don’t match the expected numbering pattern (for example, file.part01.rar , file.part1(1).rar , or unrelated names).
- Rename each file so it follows the same order without extra characters or mismatched numbering. Example:
Incorrect: file.part1.rar, file.part3.rar, file.part2(1).rar
Correct: file.part1.rar, file.part2.rar, file.part3.rar
- Make sure the text before the number is exactly the same for all files.
- Only the last part number should change.
- Right-click the first file in the series (usually part1.rar or the main .rar file) and select Extract Here .
- WinRAR should now recognize the sequence and continue extraction normally .
If you still get the same prompt: the archive set is likely incomplete (a part was never downloaded or was removed), or one of the volumes is corrupt and must be re-downloaded from the original source.
