Silhouette Studio is a software that is used to create logos, designs, and patterns by professionals. The software can be used along with a cutting machine to create your own dies out of fabric, paper, cardboard, vinyl, etc. However, there have been many reports of the software running slow on various devices. The main reason for this is because of either the small amount of RAM or old graphics card or drivers.

Silhouette Studio
Silhouette Studio running slow primarily revolves around software problems locally on your computer. We have some workarounds that proved to be working perfectly for numerous users. Take a look below:
Solution 1: Changing Preferences
One major reason for the software being slow is some of the settings that are set as default options. These are usually CPU extensive and require a firm build. To speed up the software, we can change some of the preferences and see if this does the trick for us.
- Go to Preferences and click on Advanced . Advanced Settings
- Scroll down until you see the option Include Cut Data and make sure that the option is not selected .
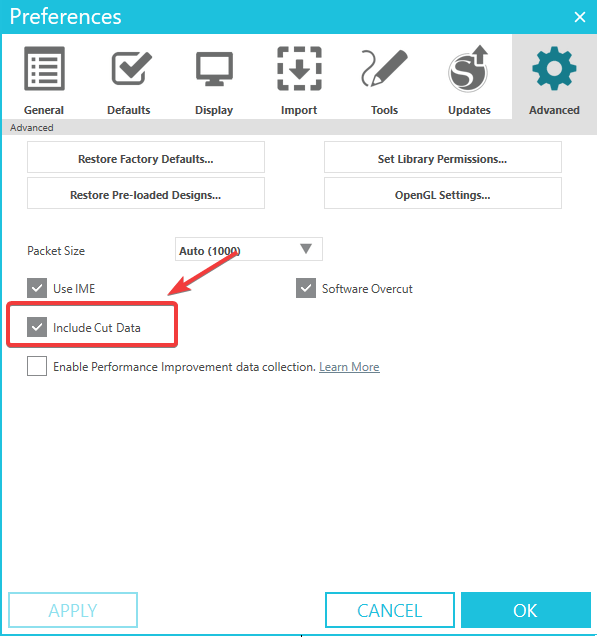
Deselect Include Cut Data
- Save changes and exit. Restart the software and see if this made any difference in performance.
Solution 2: Updating Software
Silhouette Studio running slow may be caused because of an outdated version of the applications. The developers launch a lot of beta versions and not all of the installations are stable. The best option, in this case, is to keep updating the software so that fixes for previous issues are resolved. To update the software, follow the steps below:
- Before starting, close all running background processes using the Task Manager.
- Now, go to Silhouette Studio’s official website.
- Download the latest stable release either for Mac or Windows.

Choose the latest stable release
- Install the downloaded .exe file and restart your computer before launching the software again.
Try to avoid the beta versions as they are usually unstable and there is a chance the software will run even slower.
Solution 3: Updating Graphics Drivers
Another reason for the software running slow could be that the graphics drivers of your PC are out of date. Outdated drivers are one of the most primary reasons for the software to run slow since the workload is already processing intensive.
Press Windows + R, type “devmgmt.msc” in the dialogue box and press Enter.
Open the Device Manager and expand Display Adapters Device Manager
Right-click and select Update Driver . Choose the Search Automatically option and wait for Windows to automatically install the latest drivers.
After updating the driver, restart your PC and check if the issue still persists.
Solution 4: Move Fonts to Local Storage
Fonts in Silhouette Studio take up a lot of processing power. As a result, the software becomes slow both in startup and while running. There is an option in the software where the fonts can be stored in your local storage from where they can be easily fetched.
- Scroll down to Cloud folder in your Silhouette Library . Silhouette Library
- Click on the designs or the files you want to move to your computer. Now, click on File and click Save Selection and Save to Library . Save to library
- Select the folder where you want to save the items and repeat for all required items. Restart your computer after you are done and see if this made any difference.
Solution 5: Deleting Application Data
App Data contains temporary user configurations and settings which are fetched by the software whenever it loads up. However, there are instances where this application data gets corrupt. We can attempt at deleting the temporary application storage and see if this makes a difference.
The following are the steps for Windows and Mac users respectively.
For Windows:
- Close the Silhouette Studio software and press the Windows +R key. Type in %appdata% and press Enter. Run Box
- Delete the following folder with all its sub-contents. Make sure to empty the recycle bin as well. com.aspexsoftware.Silhouette_Studio
- Restart your computer and launch the application. Check if the issue is resolved.
For macOS:
- Close the Silhouette Studio software and open the Finder .
- Press CMD+SHIFT+G . Type in the following and press Return . ~/Library/Preferences
- Delete the following folder with all its sub-contents. com.aspexsoftware.Silhouette_Studio
- Empty Trash and restart the computer. See if the performance has increased.
Solution 6: Re-indexing the Library
There are several libraries present for fonts and designs which can get corrupt. So whenever the software is traversing through it, it can get slow. To re-index the library so all corrupt entries are removed, follow the following steps.
- Navigate to the Settings in Silhouette Studio and select Preferences and then Advanced . Preferences Icon
- Click the Reindex My Library option and wait for the process to complete. Reindex My Library
Wait for the process to complete before restarting your computer and launching the application.
How to Fix “Printer is in an error state” Issue?
The error “ WinRAR Error: Next Volume Is Required ” usually appears when you’re extracting a multi-part RAR archive and WinRAR can’t find (or can’t correctly identify) the next file in the sequence . This often happens when a volume is missing , stored in a different folder , or renamed in a way that breaks the archive’s expected order .

In this guide, we’ll go over the most reliable fixes confirmed by affected users, along with what each method is doing behind the scenes so you can choose the right one for your situation.
Important: To extract multi-volume archives, you should always start extraction from the first file in the set. This is usually file.part1.rar , or (in older sets) the main .rar file that comes before .r01 , .r02 , and so on.
1. Download and Place the Missing RAR File
WinRAR needs all parts of a multi-volume archive to complete extraction. This error usually appears when one of the volumes in a set like .part2.rar , .r01 , .r02 , .001 , and similar naming formats is missing . Downloading the missing volume and placing it in the same folder as the other parts allows WinRAR to continue extracting normally .
- Look at the error message or review the list of archive parts in the folder.
- Identify which volume is missing (for example, part2.rar , .r02 , .001 , etc.).
- Go back to the website or source where you downloaded the archive.
- Locate and download the exact missing file using the same naming format as the others.
- Make sure the new file name matches the pattern of the rest. Example: If you have file.part1.rar and file.part3.rar , the missing one must be file.part2.rar .
- Move the downloaded missing volume into the same folder as the other archive parts.
- Confirm that all parts are in a single folder before extracting.
- Right-click the first file in the series (usually part1 or the main .rar file) and select Extract Here or Extract to Folder .
- WinRAR should now detect all volumes and continue extraction normally .
2. Manually Browse & Select the Next Volume
Use this method only if the next volume already exists , but WinRAR is failing to detect it automatically. This can happen due to incorrect naming , the file being in a different location , or a temporary file access issue. Manually browsing helps WinRAR locate the correct volume and resume extraction without interruption .
- Right-click the first file in the series (usually .rar or part1.rar ) and select Extract Here or Extract to Folder .
- When WinRAR cannot find the next volume, it will show the “ Next Volume Is Required ” message.
- A small window will appear, allowing you to manually select the next volume .
- Use the file explorer window to locate the folder where the other archive parts are saved.
- Select the next part based on the naming order (example: select file.part2.rar after file.part1.rar ).
- Make sure the selected file matches the naming format of the archive (no extra characters like (1) and no mismatched numbering).
- WinRAR will resume extraction using the selected volume .
- If additional volumes are missing or stored separately, WinRAR may prompt you again. Repeat the same process until extraction completes.
3. Rename the RAR files in Order
WinRAR relies on a proper naming sequence (such as file.part1.rar , file.part2.rar , file.part3.rar ) to extract multi-volume archives. If a file is named incorrectly, contains extra characters, or is out of order, WinRAR may fail to locate the next volume and show this error. Renaming the files correctly helps WinRAR follow the sequence and extract the archive without interruptions .
Note: Renaming only changes the file name , not the file contents. The goal is to restore the correct sequence so WinRAR can detect the next volume.
- Go to the folder where all the RAR files are saved.
- Make sure all parts of the archive are present and stored in the same folder .
- Check how the parts are currently named . Common patterns include:
file.part1.rar, file.part2.rar, file.part3.rar
file.rar, file.r01, file.r02, file.r03
- Look for files that don’t match the expected numbering pattern (for example, file.part01.rar , file.part1(1).rar , or unrelated names).
- Rename each file so it follows the same order without extra characters or mismatched numbering. Example:
Incorrect: file.part1.rar, file.part3.rar, file.part2(1).rar
Correct: file.part1.rar, file.part2.rar, file.part3.rar
- Make sure the text before the number is exactly the same for all files.
- Only the last part number should change.
- Right-click the first file in the series (usually part1.rar or the main .rar file) and select Extract Here .
- WinRAR should now recognize the sequence and continue extraction normally .
If you still get the same prompt: the archive set is likely incomplete (a part was never downloaded or was removed), or one of the volumes is corrupt and must be re-downloaded from the original source.
