The problem of the printer icon not showing in the devices and printers is remarkably frequent, and a multitude of factors can influence it. As a result, this article will cover the most effective methods for resolving this problem. However, it is dependent on the type of operation necessary to fix this. These methods will vary depending on the operating system but will be helpful for the majority of devices.
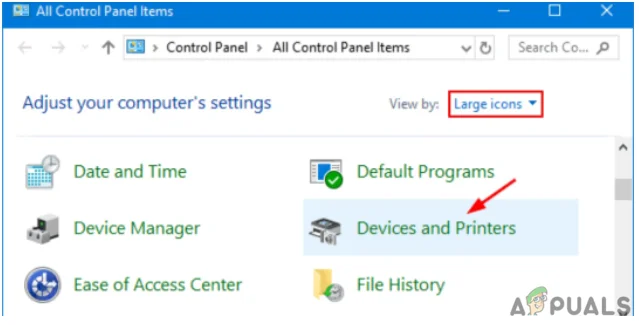
All control panel items
What Does the “Printer Icon Not Showing In Devices and Printers” Indicate?
There is a multitude of reasons why the “printer icon” goes missing from devices and Printers. Problems with a corrupted system, obsolete drivers, and other malfunctioning software are among them. The absence of the printer icon could also indicate that the application was incorrectly loaded, corrupted, or removed.
The following are the primary causes of the missing printer icon from devices and Printers Panel:
- Corrupted Printer Driver
- Multi Functioning device
- No Bluetooth Support
You can use any of the ways given below to resolve the “printer icon not showing in devices and Printers” problem.
Visit if Windows Cannot Connect to the Printer to fix this issue
Run Printer Troubleshooting
Try the Printer Troubleshooter if the Printer Icon is not showing on the Devices & Printers screen. You may use your device to do basic troubleshooting that will assist you in resolving the problem. Depending on your printer model, specific troubleshooting methods will differ. However, after you have figured out a few typical issues, you will be able to search for and locate solutions tailored to your unit rapidly.
- Right-click the printer icon in the Control Panel, Devices & Printers, and select Troubleshoot .

Furthermore, you must follow onscreen instructions when running printer troubleshooting and completing the troubleshooting procedure.
That’s all there is to it; after you have run the troubleshooter, it will resolve the issue with the printer icon not showing in the devices and printers area. It isn’t always practical, but it is worth a go.
Create a Shortcut
Create desktop shortcuts for your printers as the next best thing.
- To do so, go to Start, Control Panel, and then Printer Control Panel. Click on it to open it.
- Then, right-click on the icon for your printer and select Create Shortcut from the menu that displays.
- This will create a shortcut on your desktop that you can use to access the printer settings whenever you want.
- The Printer Icon should now be accessible on your computer’s desktop.
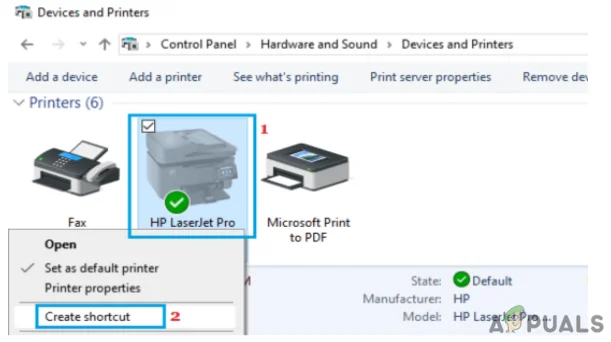
Create a Shortcut
Update the Printer’s Driver
Users have noticed that the Printer Icon is missing from the desktop and does not appear on the Devices and Printers page. This issue is most commonly reported after updating the device from a prior version and applying a system update.
A printer driver is a software that converts data from your computer into a format that your printer can comprehend. Drivers, like other software, can become outdated or incompatible with your operating system after an update.
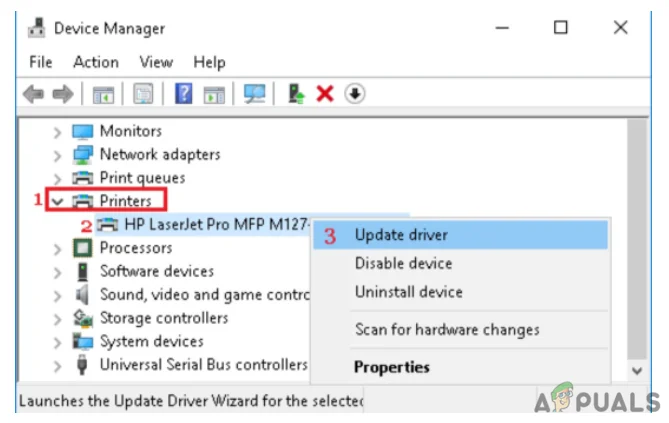
Update the printer’s driver
The problem of the printer icon not displaying in devices & Printers is frequently resolved by downloading and installing the most recent printer driver. If your printer drivers are out of sync, they may not function until you download and install the latest update. If you have had power outages, computer infections, or other issues, your driver might be harmed. As a result, you must install the most recent updates to ensure that any driver updates are implemented.
Visit this to Fix: Windows cannot locate a suitable printer driver
Create a New Registry Key
If the Printer icon does not appear on your Desktop, Control Panel, Devices, and Printers, you may need to make changes to the Windows Registry.
- Back up the Registry or build a System Restore Point before you begin.
- After that, launch the Registry Editor by typing Regedit into Start Search and pressing Enter. Create a new registry key
- Navigate to the following key: HKEY LOCAL MACHINE\SOFTWARE\Microsoft\Windows\CurrentVersion\Explorer\Desktop\NameSpace
- Then select NameSpace > New Key with a right-click. You must name the key as: 2227a280-3aea-1069-a2de-08002b30309d. If you are curious about the name of the key, it’s the CLSID for the Printers folder.
- Then, change the value of ‘Default’ to ‘Printers’ in the right pane. Finally, exit Regedit and restart your computer to see if it has made any difference.
Check Bluetooth Support Service
If the printer icon does not show up in Devices and Printers, try enabling the Bluetooth Support service.
- To begin, right-click on the Start button and select Run. Furthermore, type Services. msc in the Run Command window and click OK.
- Right-click Bluetooth Support Service and select Start on the next screen.
- After that, restart your computer and look at the Devices & Printers window. If this is the case, it may resolve the issue with the printer icon not showing up.

Check Bluetooth support service
Reinstall the Printer
You can try reinstalling the printer if the printer icon does not appear in Devices and Printers. All you have to do is follow a few simple steps.
- Open the search menu and type “printers and scanners” into the search box. To begin, turn on the printers and scanners. Reinstall the printer
- Select and click on the printer with which you are having trouble.
- Then click Remove, Yes, and your printer will be completely uninstalled and removed from your Windows computer.
- Correspondingly, restart your Windows computer, and then go ahead and add and install a printer on your computer.
We have outlined all of the options for resolving the issue of the printer icon not showing up in devices and printers in this article. First and foremost, you must install the printer’s drivers.
If all else fails, you can use the Windows troubleshooter to attempt to resolve the most common printer setup issues. If you are still having trouble setting up and using your printer, try uninstalling it and reinstalling the driver. We hope that our solutions have assisted you in resolving this problem.
Visit to know more on Setup MG6820/MG6821 Wirelessly using the Printer’s Control Panel
How to Fix “Printer is in an error state” Issue?
Sometimes doing a simple thing such as adding a network shared printer can become a hell of a task when Windows cannot connect to the printer error is returned. The issue is usually seen with windows 7 based 64 bit systems, however it is not limited to it and many, around 30% of users running 32-bit have also reported this. The most common reason for this to occur is if the print spooler service is stucked, has a document pending in the que locked, a corruption or update and improper installation of the print-driver, more specifically the incorrect installation pushes the printer and the system to look for files in a subfolder different then windows\system32 subfolder. The printer may still work on the source system where it is physically connected to.
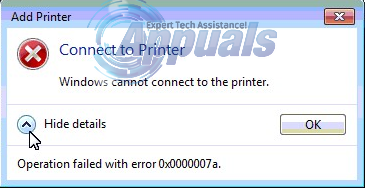
The error may have a different message then the one in the picture of which the most common is “ Windows cannot connect to the printer 0x0000007e ”
Solution 1: Create A New Local Port
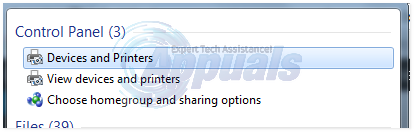
Click Start and search for “ Devices and Printers “.
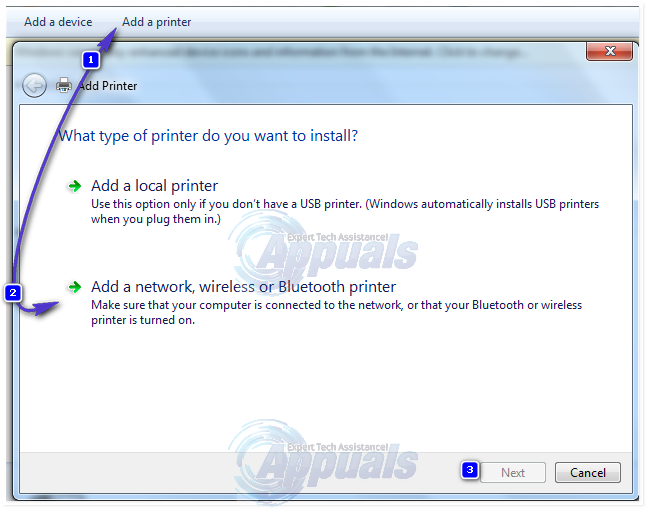
Open Devices and Printers and then Click the Add a printer on top of the window. Make sure you have Administration rights for this step on the computer.
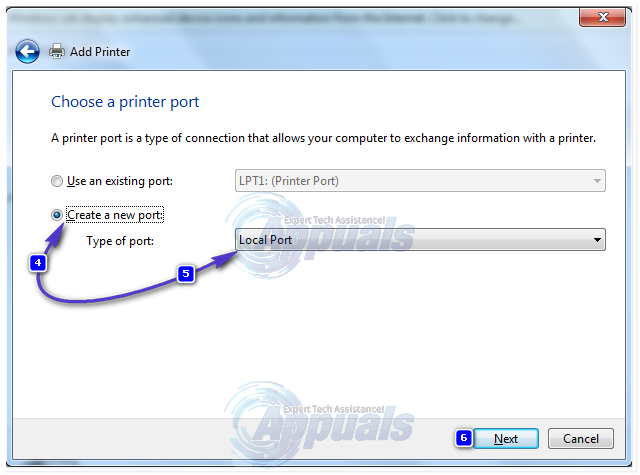
Select “ Add a local printer” by clicking on it. Select “ Create a new port” and make sure there is “ Local Port” selected for “ Type of port:”
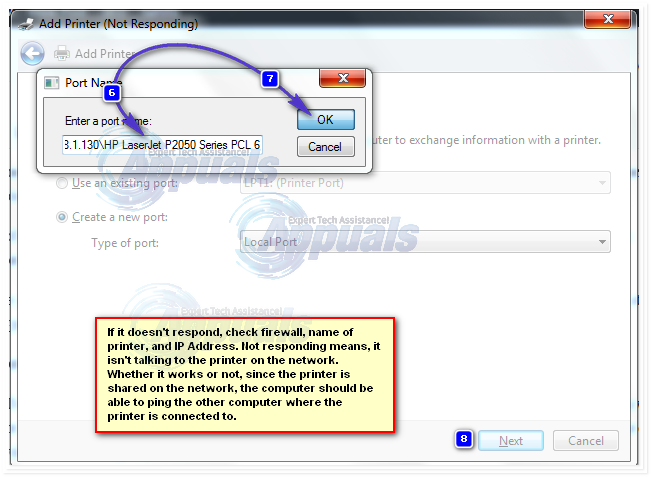
You will be asked for a port name in a new window. Type the printer’s address in the following format: \IP address or the Computer Name\Printer’s Name
For example, the printer’s name is HP LaserJet P2050 Series PCL 6, and IP address of the computer it’s attached with 192.168.1.130 so the port name will be
\\192.168.1.130\HP LaserJet P2050 Series PCL 6
Now click OK and Next .
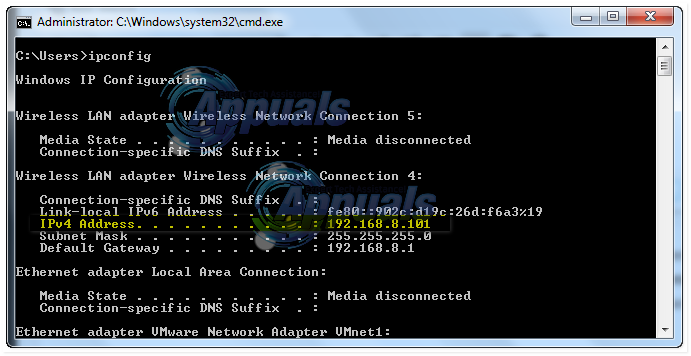
If you don’t know the IP Address of the computer where the printer is physically connected to and shared from, Hold Windows Key and Press R. Now type cmd in the run dialog and press enter . Type ipconfig in the black window and press enter . Look for IPv4 Address for the computer’s IP in the black window. Scroll up if you have to.
Select your printer model from the directory to install its drivers. Click Next . If you have a disk, insert the disk, click “Have Disk” and browse to the driver’s location in the disk. Click OK . Type in a name for your new printer. Click Next . Print a test page to check its connection. And click Finish. If it still won’t work, then run the hotfix from here before proceeding to Solution 2 and giving Solution 1 a try after applying the hotfix.
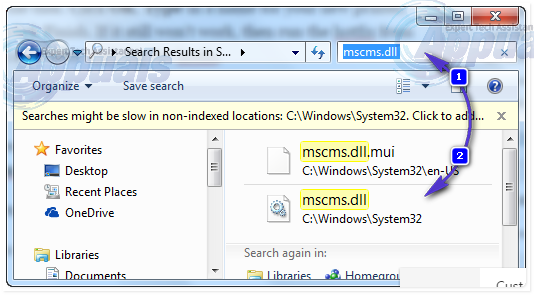
Solution 2: Copy mscms.dll manually
This mscms.dll is a color module which maybe failing to reach its destination folder. To copy it manually, press Windows Key + R . In the run dialog, type: Type system32 and press enter to open System32 folder.
Now type mscms.dll in the search bar . Copy the file exactly matching the name mscms.dll . (CTRL + C) to copy / (CTRL + V) to paste.
Now, if you have a 32 bit Windows installed, navigate to the following folder and paste the previously copied mscms.dll file in it:
C:\windows\system32\spool\drivers\w32x86\3\
And, If you have a 64 bit Windows installed, navigate to the following folder and paste the previously copied file in it:
C:\windows\system32\spool\drivers\x64\3\
Now try connecting to the printer. If it doesn’t connect, re-add the printer and test.
Solution 3: If this is an HP Printer
On the source maching where the printer is shared from, open Registry Editor and browse to the following registry path.
HKEY_LOCAL_MACHINE\SYSTEM\CurrentControlSet\Control\Print\Printers\PRINTERNAME\CopyFiles\BIDI
Locate the entry for
spool\DRIVERS\W32X86\3\hpcpn6de.dll
and delete it. Then, re-try connecting.
Solution 4: Remove Unnecessary Printer Drivers
An installation of previous printer can prevent the printer spooler from adding new printers. To remove them, press Windows Key + R . Make sure you have Administration rights for this step on the computer. In the run window type printmanagement.msc and press enter .
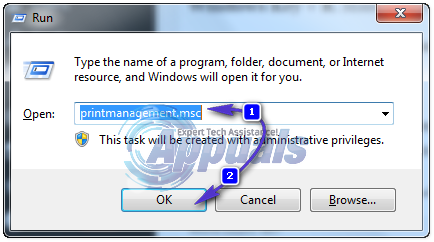
Double click on “All Drivers” . Now delete any printer’s driver that is unnecessary or questionable. To delete, right click on the driver and click on delete in the pop up menu.

After removing the drivers for the printer in question, re-add it normally, and if it still doesn’t work then re-add it using Solution 1. If it still won’t work, move to Solution 3.
Solution 5: Delete Pre-existing Driver Files From Registry
An already existing but corrupted driver file can be stopping the windows from connecting to the printer.
Press Windows Key + R . Type regedit and press enter . Make sure you have Administration rights for this step on the computer. Registry editor’s new window will appear . In the left pane , navigate to the following location by double clicking on the folders:
HKEY_LOCAL_MACHINE\SYSTEM\ControlSet001\Control\Print\Printers\*YOUR PRINTER’S NAME*\CopyFiles
Delete the “ICM” folder which is under the “CopyFiles” folder .
Now try connecting to the printer.
Solution 6: Run Microsoft’s Automated Printer Troubleshooter
Download the file from this link. Open the file with troubleshooting wizard .
Let the troubleshooter detect and fix the issues. Test it by clicking the Add new printer button. After the troubleshooting has finished, try re-adding the printer normally and if it still won’t work, then use Solution 1 again.
Solution 7: Resetting Printer Spooler
Follow the guide here to reset print spooler.
The error “Windows cannot locate a suitable print driver” is usually encountered when users try to install a wireless/wired printer for the first time or they are trying to share it over a local network. As it turns out, this particular issue is quite common when trying to share a printer between two or more computers that have different Windows bit versions (x86 vs x64 or vice versa).

Note: This error can be accompanied by a lot of different error codes.
If you’re currently struggling with this issue, we have a few potential fixes that might just solve the problem. Below you have a collection of steps that have successfully helped some users to resolve the issue. We are going to start by making sure you’re using the correct printer driver, then change the share permissions of the guest PCs (if necessary). At last, we’re going to share the printer over a local network – this last step has a difference in procedure, depending on the Windows architecture version of the host. Please follow each step in order for the best results.
Note: This article is tailored towards helping those looking to share a printer from a host computer to other computers connected to the same local network. If you are recieving this error when installing your printer for the first time on one computer, following Step 3 will not resolve your issue. If the first two methods aren’t helpful, continue troubleshooting with the other in-depth articles about printer installation ( 0x00000057 , 0x000003eb and printer driver package cannot be installed ).
Step 1: Installing the latest printer driver
Windows Update (WU) is not that efficient when it has to download the latest driver version available. The error “Windows cannot locate a suitable print driver” can sometimes be displayed because the printer driver that is currently installed is not compatible with your Windows version or it’s simply outdated. This creates compatibility problems down the line if you ever try to share the printer over a network.
Follow the steps down below to uninstall your current printer (if you have one) driver from Device and Printers and download the latest version from the manufacturer’s website:
Note: The vast majority of printers will not show up in Device Manager , so don’t try to uninstall the driver from there. If you didn’t install a driver for your printer, skip the uninstallation part and start this method straight with step 3.
- Press Windows key + R to open a Run window. Type “ control /name Microsoft.DevicesAndPrinters ” and hit Enter to open Device and Printers.
- Once there, simply right-click your driver and choose Remove device (under Printers ) . Only when the driver is uninstalled, move to the step below.
- Navigate to your manufacturer’s website and download the latest driver version related to your Windows version. Note: Do not worry too much if you don’t manage to find a driver version tailored for your Windows version. Simply download the most recent version and refer to the next Note paragraph for instructions.
- Install the driver from the installation package you’ve just downloaded and reboot your PC. Note: If your printer is quite old, chances are you’ll receive the “ Driver is not compatible with your Windows version ” or something similar when trying to open the installation packages. If this happens, right-click the executable, go to Compatibility , check the box next to Run this program in compatibility mode and select an older Windows version (preferably a compatible version mentioned in the driver’s description). Keep in mind that this is not guaranteed to work with all printers.
Once you’re certain you have the latest printer version, move to Step 2.
Step 2: Making the necessary share permissions changes
Now that we’ve eliminated the possibility of a faulty driver, let’s see if you have the necessary share permissions. One of the most common culprits that will trigger the “Windows cannot locate a suitable print driver” error is when your printer is not shared correctly on the local area network. If you get the error message while configuring your printer to be shared in your local network connection, the steps below will help.
To make sure the error is not happening because of a technicality, we’ll need to make some mandatory share permissions changes on the computer that is hosting the printer. Once we got that going, we’ll need to enable network discovery and turn on file and printer sharing . Here’s a quick guide through the whole thing:
- Press Windows key + R to open a Run window. Type “ control /name Microsoft.DevicesAndPrinters ” and hit Enter to open Device and Printers.
- Right-click on your printer and choose Properties (Printer Properties) .
- In Printers Properties , navigate to the Sharing tab and click on Change Sharing Options . Then check the box next to Share this printer and give it a suggestive name (preferably short). Hit Apply to confirm the changes and close the printer’s Properties window.
- Press Windows key + R again to open another Run window. Type or paste “ control /name Microsoft.NetworkAndSharingCenter ” in the Run box and hit Enter to open Network and Sharing Center.
- In the Network and Sharing Center , click on Change advanced sharing settings .
- In Advanced sharing settings, enable Turn on network discovery and make sure the box next to Turn on automatic setup of network connected devices is checked. Then, scroll down to File and printer sharing and enable Turn on file and printer sharing. Finally, make sure you save the changes by clicking the Save changes button.
Note: If you’re trying to share the printer on a local network, you’ll need to repeat this step on every computer that is supposed to access the printer.
Now that you have correctly configured the share permissions, check to see if the issue has been resolved. If you’re still prevented to install it by the same ” “Windows cannot locate a suitable print driver” error, move down to Step 3.
Step 3: Sharing the printer over a local network
Once you’ve successfully followed the first two steps, reboot your computer, unplug your printer and see whether you’re still greeted by the “Windows cannot locate a suitable print driver” error when trying to share a printer. If it still appears, continue with the instructions below.
Sharing a network printer that is being hosted by a 32-bit computer with other 32-bit computers is fairly easy. The same goes for two or more 64-bit computers. To do this, recreate the following procedure on the computers that benefit from the shared printer – Open a Run command ( Windows key + R ), type “ control /name Microsoft.DevicesAndPrinters” and hit Enter to open Devices and Printers .

Once there, simply click on Add a printer > Add a network printer and follow the on-screen prompts to make the printer available on the guest computer/s. Once the installation is complete, the printer should become available for the guest PC.

But despite this apparent simplicity, sharing a printer hosted by a 32-bit PC with another or more 64-bit PC is counter-intuitive. The same goes for 64-bit host shared with 32-bit PC/s. As you can imagine, using the method above will not work. If you are in a situation like this, follow the steps below to retrieve and use the name of your host computer and the name of your printer:
Note: The first 5 steps of this method are performed on the computer that is acting as the printer’s host.
- Press Windows key + R to open a Run window. Type “ sysdm.cpl ” and hit Enter to open System Properties.
- In System Properties , go to the Computer Name tab and click the Change (Change name) button. Now write down or copy your Computer Name and close the System Properties window.
- Press Windows key + R to open a Run window. Then, type “ control /name Microsoft.DevicesAndPrinters ” and hit Enter to open Device and Printers.
- In the Devices and Printers window, right-click on your printer and choose Properties. Then, navigate to the Sharing tab and write down or copy your printer’s name next to Share name. Note: Once you retrieved both the PC and the printer’s name, move to the computer that is on the receiving end.
- Press Windows key + R to open a Run window. Type “ control /name Microsoft.DevicesAndPrinters ” and hit Enter to open Device and Printers.
- In Devices and Printers, click on Add a Printer , then click on Add a local printer .
- When prompted to choose a printer port, click on Create a new port and select Local Port as Type of port. Then, hit Next to advance.
- When prompted to find a printer by name or TCP/IP address, choose to Select a shared printer by name . Then, enter the correct names in the box below – the syntax should look like this: \Computer name\printer name. Use the names that we previously retrieved while paying attention to use the correct format and hit Ok.
- After a few brief moments, you will be presented with a new Add New hardware process. Follow the next on-screen prompts to complete your printer installation on the second computer. Note: If you have multiple computers that will use the printer, repeat steps 5 to 9 on each of them.
Canon MG682x series is an all-in-one solution to print, scan, and copy your documents in your home or office. Like many other Canon Pixma all-in-one solutions, MG682x series lets you connect wirelessly, and you can use it to print, scan, and copy without physically attaching it to your computer or mobile device. However, you need to connect and configure it before you can use it wirelessly. Please follow this procedure to connect it to your wireless Wi-Fi router.
Before you start connecting your printer, please make sure you meet the following requirements.
You have a Wi-Fi wireless network available.
You know the name of your Wi-Fi network.
You have the password (network key) of your Wi-Fi network.
Setup MG682x Wirelessly Using the Printer’s Control Panel
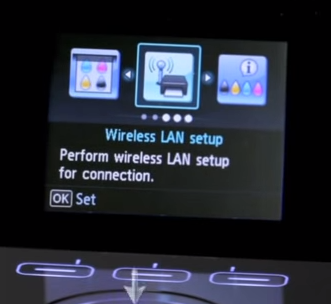
Turn on MG682x and tap the Setup
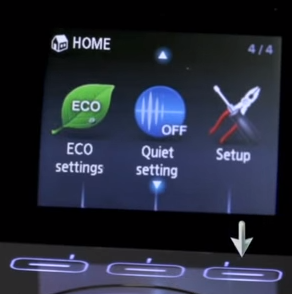
Tap Wireless LAN setup .
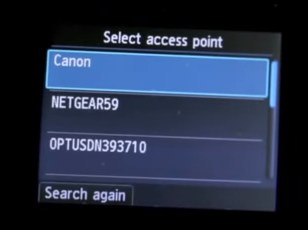
A screen will appear with a list of detected wireless networks. Choose your desired wireless network.
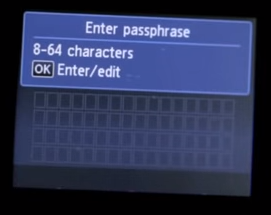
A password (network key) screen will appear. Enter your Wi-Fi password and press OK . You can enter uppercase, lowercase, numeric, and special characters. Please note that the password is case sensitive.
Press OK to end the connection setup. You will see a Wi-Fi icon flashing on your MG682x. It means that it is establishing a connection with your wireless Wi-Fi router. Once connected, it will go solid. Now you can move on to install the drivers and bundled software for your MG682x.
Install the Drivers and Bundled Software for MG682x
Insert the CD that came with your MG682x. Setup will start automatically. If it doesn’t, browse to your CD-ROM drive and run the setup utility.
Click Next on the welcome screen.
Setup will detect network printer. When detection process finishes, click Next .
Select your place of residence and click Next .
Click the name of your country, or the nearest country if it is not on the list, and click Next .
A software Installation List will appear. Check the MP Drivers checkbox. Additionally, check any additional software packages that you want to install and click Next .
License Agreement screen will appear. You need to accept the license agreement in order to continue. Click Yes .
A screen will appear prompting you to allow all install wizard processes. Click Next . If you see any prompts by Windows, your firewall, or antivirus, allow the installation.
Setup will install your required drivers and applications. When the setup completes the installation, click Complete .
Click Next and Exit on the following screens.
Now you can use your MG682x wirelessly. To use this printer on more than one computers, repeat the driver and bundled installation process for each computer.
Note: The procedure may differ slightly depending on your printer model and region of purchase.
