Some Windows users report that they can no longer use specific plugins after getting the ‘Plugins Failed to Load’ error every time they open OBS Studio. This problem is typically reported after an update for OBS Studio was installed on Windows 10 or 11.
Fix Plugins Failed to Load Obs
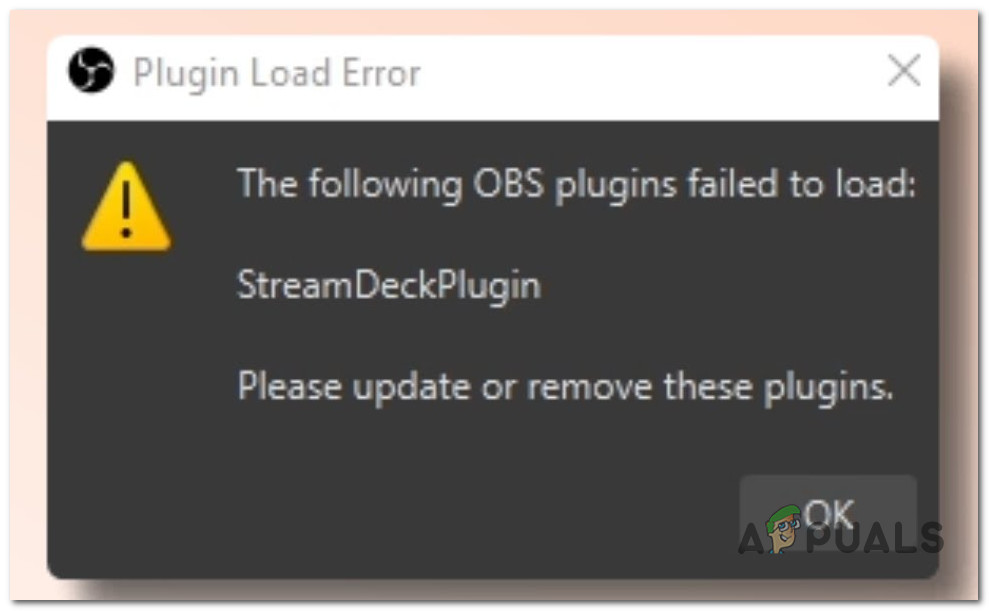
Note: Most commonly, you can expect to see this error immediately after you update your OBS software from version 27.2.4 to 28.0. The most frequent plugins that fail with this error are obs-websocket, SteamFX, and SteamDeckPlugin.
After we’ve investigated this particular issue, it turns out there are several different underlying causes of why you can expect to deal with it. Here’s a shortlist of potential causes that you should be aware of:
- Plugins are not compatible with the OBS version – The most frequent reason why you can expect this error to occur is a scenario in which a plugin that is loaded into OBS is not compatible with the current version. In this case, you should check if the failing plugin is featured in the list of OBS-compatible plugins.
- Missing VC runtimes – Another reason you can expect to deal with this error is a scenario in which the plugin you are attempting to load into OBS is missing the VC runtimes. To fix this issue, simply install every piece of missing VC runtime to ensure that every. DLL dependency is accessible by your OBS plugins.
- The plugin is incompatible with OBS Studio – One approach to fix the problem is to downgrade your OBS version if your plugin fleet includes plugins incompatible with your OBS version. If you choose this course, you must go via GitHub for a version that works with your plugin fleet. Additionally, if you don’t use this plugin, you can make the error message disappear by removing the unsupported plugin from the plugin folder.
- The plugin is outdated – If you don’t wish to downgrade your OBS version, you must make sure that all of your plugins are running the most recent version to prevent having to downgrade OBS. Launching the installer with administrator access to manually update the available plugins. Restart your computer when the update has been installed, then open OBS again.
Now that we have gone over every potential reason you can expect to get the ‘Plugins Failed to Load’ error when opening OBS studio, here’s a list of verified fixes that other affected users have successfully used to fix the problem.
1. Check if the plugin is compatible with your version
As it turns out, the most plausible reason you are experiencing the ‘Plugins Failed to Load’ error every time they open OBS Studio is a scenario in which some of the plugins are prone to compatibility issues with the latest update.
If a plugin is labeled as “Not Available,” its creator has not yet updated the plugin’s compatibility. An update is being worked on by the plugin’s creator if you notice an “In Progress” status.
The Mac operating system is more prone to compatibility problems than the Windows. Consequently, the plugin may not work with OBS if you’re using Mac OS.
The most recent OBS version is incompatible with plugins like “OBS-RTSPServer,” “PTZ Controls,” “Instant Replay,” and others. You will get the “Plugin Load Error” if your plugins are incompatible.
Here’s a list of compatible plugins for the latest version of OBS Studio.
Note: Keep in mind that this list is not exhaustive.
If the list above doesn’t contain the failing plugin, you get the ‘Plugins Failed to Load’ error because of incompatibility.
2. Install missing VC runtime dependencies
According to several afflicted users, this problem can occur when a necessary OBS plugin VC dependency is missing (or corrupted). To fix this problem, install the required Microsoft C++ Visual Redist packages.
Keep in mind that only older games and programs still require these requirements. Therefore, Windows 11 doesn’t arrive with them configured.
Several customers encountering the “Plugins Failed to Load” error reported that the problem was ultimately fixed after installing both the x86 and x64 versions of the Visual Studio 2013 redist releases.
You may confirm by downloading and installing the latest packages from the Microsoft website.
The following procedures can be used to do this and install any missing Visual C++ system requirements:
- Visit the official Microsoft website and download the x86 and x64 versions of Visual C++ to get going. Download the missing V++ redist. packages Note: Please take note that you must confirm your want to permit the downloading of multiple files while downloading using Chrome.
- To start the installation process for the missing Visual C++ prerequisites, double-click either installer when they have finished downloading (in either order).
- Restart your computer after the installation is complete.
- Once the computer has restarted, wait to see if the problem has been resolved.
If the OBS plugins are still failing with the same error, move down to the next method below.
3. Downgrade OBS
If the first method in this article helped you realize that your plugin fleet contains plugins incompatible with your OBS version, one way to eliminate the error is to downgrade your OBS version.
Going this route means you must search GitHub for a version compatible with your plugin fleet.
As a best practice, we recommend taking the time to uninstall your current OBS version first before installing an older version (even if the installer allows a direct downgrade).
Follow the instructions below for step-by-step guidance on uninstalling the current OBS version before installing a downgraded version that fully supports your fleet of plugins:
- First, ensure that OBS Studio is closed and not running in the background.
- Press the Windows key + R to open up a Run dialog box. Next, type ‘appwiz.cpl’ inside the text box, then press Ctrl + Shift + Enter to open up the Programs and Features menu. Open up the Programs and Features menu.
- Click Yes to grant admin access when prompted by the User Account Control (UAC).
- Once inside the Programs and Features menu, scroll down through the list of installed programs and locate the entry associated with your OBS installation.
- After you locate it, right-click on it and choose Uninstall from the context menu that just appeared. Uninstall OBS studio
- Follow the on-screen prompts to complete the uninstallation of the OBS Studio installation.
- After the uninstallation is complete, reboot your PC and wait for the next startup to complete.
- Once your PC boots back up, go to this GitHub download link and download an older version of OBS Studio. Download the OBS installation executable Note: Make sure you download the executable by scrolling down to the Assets section and downloading the x64 or x86 executable (depending on your OS architecture).
- Once the executable is downloaded, double-click on it to run the installer and follow the on-screen instructions to complete the installation of the downgraded version of OBS Studio.
- Launch the downgraded version of OBS studio and see if the problem is now fixed.
If the same issue is still occurring, move to the next method below.
4. Manually update the plugins
If you decide against utilizing the method above, you must ensure that all of your plugins are running the most recent version to avoid downgrading OBS.
But keep in mind that you will need to update your plugins the majority of the time manually.
For instance, if you are utilizing the Elgato Stream Deck plugin, you will need to manually update it by following the official instructions .
Important: When manually updating the available plugins, you need to make sure that you open the installer with admin rights. After the update is installed, reboot your PC and relaunch OBS.
However, if the plugin doesn’t have an available update for the latest version of OBS, you don’t have anything else to do but wait for an update to be released by the developer.
If you want to explore a different fix for the ‘ Plugins Failed to Load ‘ error, move down to the next method below.
5. Delete incompatible plugins from the plugins folder
If you are in a situation where some of the plugins that you use inside OBS Studio don’t have an available update to make them compatible with the new version, you can either choose to wait until an update is available, or you can simply remove the incompatible plugins from the OBS plugins folder.
To remove an incompatible plugin correctly, you must delete both the .dll file and the .pdb file.
For example, if the incompatible plugin is SteamFX make sure you delete both the SteamFX.dll and the SteamFX.pdb from the plugins folder.
For step-by-step instructions on how to do this, follow the instructions below:
- Open File Explorer (Windows key + I) and navigate to the location of the OBS plugins. The default plugin location for OBS is: C:\Program Files\obs-studio\obs-plugins\64bit\ Note: If you’re on a 32-bit version of Windows, the default location is: C:\Program Files\obs-studio\obs-plugins\32bit\
- Once you arrive at the correct location, remove both the .dll and .pdb files of the incompatible plugin.
- After both plugin files are deleted, reboot your PC and launch OBS Studio once again to see if the problem is now fixed.
How to Fix “Printer is in an error state” Issue?
The error “ WinRAR Error: Next Volume Is Required ” usually appears when you’re extracting a multi-part RAR archive and WinRAR can’t find (or can’t correctly identify) the next file in the sequence . This often happens when a volume is missing , stored in a different folder , or renamed in a way that breaks the archive’s expected order .

In this guide, we’ll go over the most reliable fixes confirmed by affected users, along with what each method is doing behind the scenes so you can choose the right one for your situation.
Important: To extract multi-volume archives, you should always start extraction from the first file in the set. This is usually file.part1.rar , or (in older sets) the main .rar file that comes before .r01 , .r02 , and so on.
1. Download and Place the Missing RAR File
WinRAR needs all parts of a multi-volume archive to complete extraction. This error usually appears when one of the volumes in a set like .part2.rar , .r01 , .r02 , .001 , and similar naming formats is missing . Downloading the missing volume and placing it in the same folder as the other parts allows WinRAR to continue extracting normally .
- Look at the error message or review the list of archive parts in the folder.
- Identify which volume is missing (for example, part2.rar , .r02 , .001 , etc.).
- Go back to the website or source where you downloaded the archive.
- Locate and download the exact missing file using the same naming format as the others.
- Make sure the new file name matches the pattern of the rest. Example: If you have file.part1.rar and file.part3.rar , the missing one must be file.part2.rar .
- Move the downloaded missing volume into the same folder as the other archive parts.
- Confirm that all parts are in a single folder before extracting.
- Right-click the first file in the series (usually part1 or the main .rar file) and select Extract Here or Extract to Folder .
- WinRAR should now detect all volumes and continue extraction normally .
2. Manually Browse & Select the Next Volume
Use this method only if the next volume already exists , but WinRAR is failing to detect it automatically. This can happen due to incorrect naming , the file being in a different location , or a temporary file access issue. Manually browsing helps WinRAR locate the correct volume and resume extraction without interruption .
- Right-click the first file in the series (usually .rar or part1.rar ) and select Extract Here or Extract to Folder .
- When WinRAR cannot find the next volume, it will show the “ Next Volume Is Required ” message.
- A small window will appear, allowing you to manually select the next volume .
- Use the file explorer window to locate the folder where the other archive parts are saved.
- Select the next part based on the naming order (example: select file.part2.rar after file.part1.rar ).
- Make sure the selected file matches the naming format of the archive (no extra characters like (1) and no mismatched numbering).
- WinRAR will resume extraction using the selected volume .
- If additional volumes are missing or stored separately, WinRAR may prompt you again. Repeat the same process until extraction completes.
3. Rename the RAR files in Order
WinRAR relies on a proper naming sequence (such as file.part1.rar , file.part2.rar , file.part3.rar ) to extract multi-volume archives. If a file is named incorrectly, contains extra characters, or is out of order, WinRAR may fail to locate the next volume and show this error. Renaming the files correctly helps WinRAR follow the sequence and extract the archive without interruptions .
Note: Renaming only changes the file name , not the file contents. The goal is to restore the correct sequence so WinRAR can detect the next volume.
- Go to the folder where all the RAR files are saved.
- Make sure all parts of the archive are present and stored in the same folder .
- Check how the parts are currently named . Common patterns include:
file.part1.rar, file.part2.rar, file.part3.rar
file.rar, file.r01, file.r02, file.r03
- Look for files that don’t match the expected numbering pattern (for example, file.part01.rar , file.part1(1).rar , or unrelated names).
- Rename each file so it follows the same order without extra characters or mismatched numbering. Example:
Incorrect: file.part1.rar, file.part3.rar, file.part2(1).rar
Correct: file.part1.rar, file.part2.rar, file.part3.rar
- Make sure the text before the number is exactly the same for all files.
- Only the last part number should change.
- Right-click the first file in the series (usually part1.rar or the main .rar file) and select Extract Here .
- WinRAR should now recognize the sequence and continue extraction normally .
If you still get the same prompt: the archive set is likely incomplete (a part was never downloaded or was removed), or one of the volumes is corrupt and must be re-downloaded from the original source.
