Epson printer Filter failed error on Mac is quite frustrating as it holds down your printer from printing your important documents. The error generally shows up when there is a problem with your printer’s driver. This indicates that the particular part of your printer is not working properly.
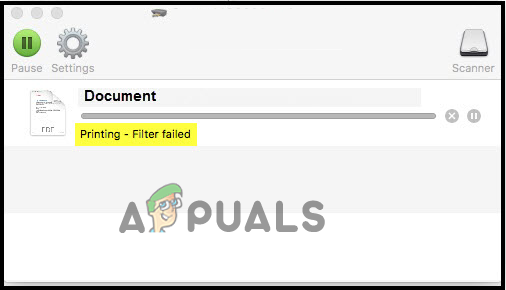
Epson printer Filter failed error
However, the error gives a tough time to the Mac user as it completely halts the printer from giving printing output or gives an incorrect print in case works. Well, the driver alone cannot be blamed for the other. Other causes also trigger such printer errors on your Mac devices. Therefore, after a few types of research, we have come up with this article that will not only let you know the possible culprits of this error but also get to know the effective fixes to solve the error.
So, let’s get started.
What Causes “Epson Printer Filter Failed” Error?
- Malfunctioned Printer’s Driver- As it has been highlighted earlier that the faulty printer’s driver is the main culprit causing the error. Therefore, if your printer drivers get outdated or malfunctioned due to corruption then it will show you this error on the Epson printer. So, updating or reinstalling the driver can fix the problem in this case.
- Compatibility Issue- When the Epson printer doesn’t meet the minimum requirements of your Mac OS then it results in giving such errors. It means that compatibility issues between the printer and your Mac’s OS can also be blamed for this error. Therefore, installing a compatible driver can get you out of the situation.
- Disabled Sharing Option on Epson printer- If the sharing option is disabled on your Epson printer then it might become the cause for this error. So here you need to enable the sharing option to get rid of the problem.
- Incorrect Paper settings- If somehow your paper settings have been done improperly then there is a good chance that you may encounter this issue on your Epson printer . So you need to modify your paper settings to get rid of this problematic situation.
- Faulty Printer Software- If there is an issue with the printer software then it may give you hard time by flashing this error on your Epson printer. Therefore, have to reinstall the software to get done with the problem.
Now being aware of the possible culprits, its time to follow the step-by-step instructions to fix the Epson Printer Filter failed Mac error
1. Remove the Printer from your Mac Device
There is a possibility that your printer is not connected properly to your Mac system and this is the reason you are seeing the error on your Mac device. So, in this case, removing the printer from your Mac device and then setting it again may work for you to solve the error and the Epson printer offline problem . For this you just need to follow the steps guide below:
- Turn off your Epson printer.
- Next, go to the System preferences tab on Mac PC.
- Then go for the Print & Fax section and choose your printer. Click on the Print & Fax option
- After that tap on the icon “_” (underscore) to eliminate the printer from the list.
- Now eliminate the Epson printer from the list when prompted for confirmation. Delete Epson Folder
- Lastly, tap on the icon “x” on the upper right side to exit the Print & Fax tab.
2. Update Printer Drivers
If the printer driver ae outdated then this won’t run in the dedicated manner as it gets incompatible with the Mac system and causes a problem when performing any action. So, first, it is suggested to update the Epson printer’s driver on your Mac system and solve the problem in your case.
Follow the steps to do so:
- Click on the Applications option and then on the Epson Software folder to launch it.
- However, if you are not having the Epson Software Updater then download it – https://epson.com/Support/wa00590
- After downloading the updater choose the Epson Firmware Update and click on the box and click on the Install Install the Epson Firmware Update software
- Now choose to Agree to continue
- And if required then type your username and password Type your username and password
- Double click on the Epson Firmware updaters icon in the appeared window and run the updater.
- Click on I Agree and hit on the Next button Click on I Agree for confimation
- Now click on the Start button and then click on the Ok button. Click on the Start button to begin the process
- Make sure the firmware update software gets completed.
- And once the process is completely finished, your printer will reboot automatically.
- Next, click the Finish button and exit the Epson software Updater utility. Click on Finish
Try printing on your Mac system and check if the problem is resolved or else head to the next solution.
3. Reinstall the Printer’s Drivers
If updating the printer’s driver won’t work for you to solve the problem then the error might be appearing due to some sort of internal issue or bugs of the driver or the driver malfunctioning. Therefore, reinstalling the driver will help you to get out of the problem in no time. To perform reinstallation, follow the steps below:
- Restart your Mac PC.
- Now visit the official website of Epson on your browser.
- Then on the supporting page, type the model of your printer and tap OK.
- Now on the printer’s support window, download the preferred driver.
- Once downloaded install the driver and add it to your Mac PC.
And your printer is all set now to print.
4. Deleting Leftover Files of Epson Printer
Sometimes due to the leftover files of the Epson printer, you start facing errors while printing. The leftover files of the Epson printer conflict with the latest printing process and stop it from printing as a result you start seeing errors.
Therefore, check and delete the leftover files of the Epson printer to fix the problem. To do this, follow the mentioned steps below.
- Look for the Printers on Finder.
- Next, delete the Epson folder there if any are found.
- Now go for PPDs on the same Printers folder. Click on the PPDs
- After that, select Contents and click on the Resources.
- Look for the name of your Epson printer model and delete all the related files for Epson.
- Now get back to Finder and look for the Cache folder.
- Then delete all folders with the name Epson on them.
- Finally, navigate to Trash on your desktop and clear all the files & folders permanently from there.
5. Enable Sharing Option on Epson Printer
In many cases, if the sharing option is disabled it stops the Epson printer from printing on your Mac device and as a result, start showing error. So, enabling the sharing option on the Epson printer will help you fix this problem. To do so follow the quick steps below:
- First, choose the Apple menu and then click on the System Preferences after that click on the Sharing .
- Then in Sharing option, choose the Printer Sharing checkbox.
- Now under the Printers section choose the Epson Printer you want to share.
- Next click on the Add button, under your Users list and then add the particular users you want.
6. Change the Paper Settings
Another reason causing this error on your Epson printer on Mac is the incorrect paper settings. So, try modifying your paper settings to get past the printer not printing problem . For this you just need to follow the quick steps below:
- From the PDF file dialogue box, go to the Main Menu.
- Next tap on the option Preview to open the PDF file.
- After that open the file by tapping on File and then click on the Save button.
- Now on the screen format dialogue box will appear, click the TIFF option.
- Then go for the Resolution and click on the option Pixels/inch.
- On the next step, in the blank field type 600.
- Now tap on the Save button to save the changes made.
- Next, go to the File menu and open it.
- Then on the main menu click on Export.
- After that click on TIFF again under the Format window.
- Now unmark the checkbox stating Alpha and save the changes by tapping on the Save button.
- Next, select the file and hit the Print button.
- Lastly, select the paper’s correct size and dimensions within Epson printer settings.
7. Reset the Printing System
If none of the above-listed fixes works for you then here it is suggested to reset the printing system. There is a possibility you have modified some of the settings and this is what stops the printer from printing properly. So, resetting the printer system setting will set the printer to its default state and may work for you to fix the Epson printer Filter failed Mac error.
Follow the below steps to do so:
- Go to the Apple icon and tap on System Preferences.
- Then tap on the Print & Fax option or you can also go for Print & Scan/Printers & Scanner. Click on the Print & Fax option
- Now right-click on the blank space within the list of printers and go for the Reset Printing System option.
- Next click on Reset on the confirmation window.
- Once the printing system gets done with the reset process and the printer list appears blank, reboot your Mac PC.
8. Reinstall Printer
Lastly, if none of the above fixes works for you then it is suggested to go for reinstallation. Reinstalling the printer will solve the temporary issues associated with the printer thereby getting you out of this annoying situation.
- First, turn off the printer, then go to the location: click on the System Preferences and then click on Print & Fax Click on the Print & Fax option
- And change the name of the printer and click on “-“ from the list and delete the name of the printer from your list.
- Then select your delete option for deleting the printer name from your list and exit the ‘ Print & Fax ’ window.
- Then head to the hard drive and click on the Library and then click on Printer and remove the Epson folder named. Delete Epson Folder
- Again, go to the location Library, click on printers , then in PPD and click on Contents, click on Resources Click on the PPDs
- And from the list locate the printing device name and as find the Epson printer name, eliminate it from your list.
- Now head to the Library and click on Cache , after that Delete the folder ‘Epson’ Click on the Cache folder
- And close the hard drive window and click the cross button at top of the window
- Next reboot your system and switch on the printing machine,
Hope the solutions given in the article work for you to fix the Epson printer filter failed Mac. If in case you still see the error then contact the Epson printer support center to create a ticket stating the problem. They will get back to you with the fixes to solve the error.
How to Fix “Printer is in an error state” Issue?
Epson is a Japanese company and is one of the world’s largest manufacturers of computer printers. It has numerous types of printers available and is known to be one of the ‘big’ players in the printing industry.
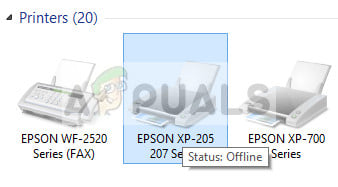
There have been numerous issues reported with Epson where the printer seems offline even if it is started up and is printing the test page just fine. This issue might occur on a number of different occasions and the cause of this issue might vary from system to system. We have listed down all the workarounds; start with the first one and work your way down accordingly.
Solution 1: Resetting Printer Spooler
The spooler service is a software program which is responsible for managing all print jobs being sent to the computer printer. The print spooler service is usually visible to users and they can also cancel a print job which is being processed. It also allows them to manage jobs which are currently on the waitlist. By resetting this service, we will make sure that all the configurations get reset.
We can try restarting this service and check if this solves the problem.
- Press Windows + R to launch the Run application. Type “ services. msc ” in the dialogue box and press Enter.
- Locate the service “ Print Spooler ” present in the list of services. Double-click it to open its properties. Click the “ Stop ” button present underneath system status and press “ Ok ” to save changes.
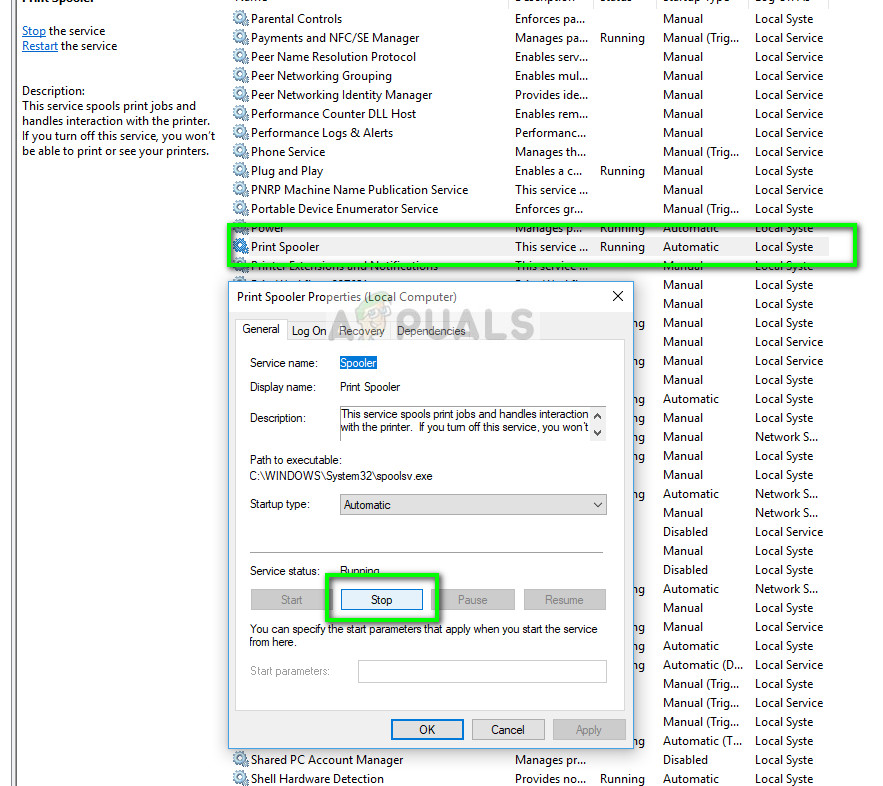
- Now open services again and start it once more and make sure that the startup type is set to automatic.
If this doesn’t fix the issue, access the printer using the login credentials and make sure that the printer is connected. If it isn’t connecting wirelessly, try plugging a wire and check again if this helps. Once this is done, navigate to printers, right-click on the device and select “ Connect ”.
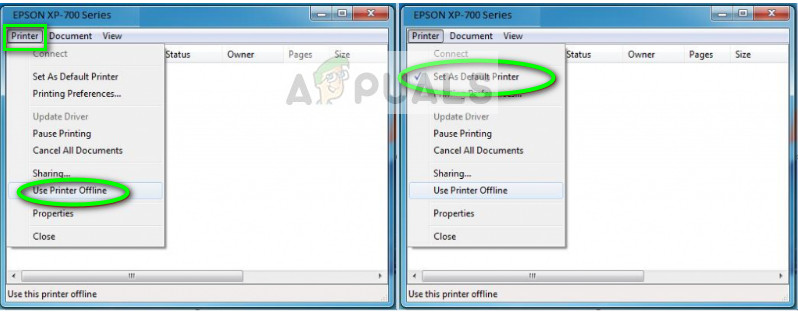
Note: Also make sure that the printer is set as the default printer and make sure that the setting “Use printer offline” is not checked.
Solution 2: Disabling SNMP Settings
SNMP stands for Simple Network Management Protocol and is used for a variety of different purposes on your computer. Almost every printer which uses a wireless connection to connect with your computer uses this protocol for some functionalities and tightening the security of the connection. There were several reports which indicated that disabling the SNMP protocol solved the problem for them. Take a look at the steps below.
- Open your control panel and click on Devices and printers. Once in the printers window, locate your device, right-click it and select Properties .
- Once in the settings, click on Ports , now with your IP highlighted, click on Configure ports and uncheck the option SNMP Status Enabled .
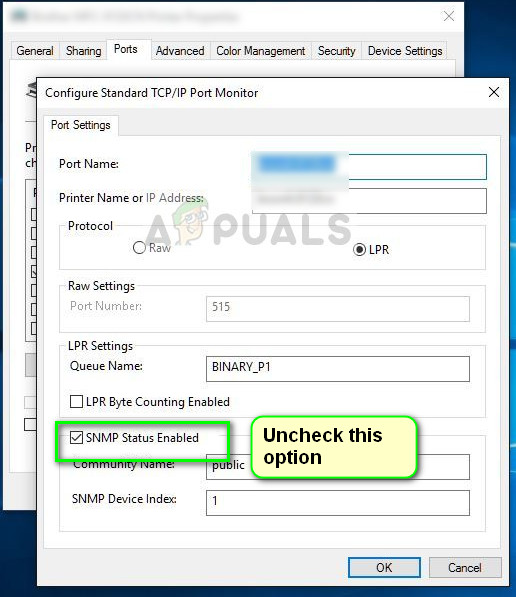
- Press OK to save changes and exit. Now right-click on the printer and try connecting. If possible, power cycle your printer properly before proceeding.
Solution 3: Adding the printer using IP address and port
Another thing you can try is adding the printer on your computer using its IP address and port number. There may be problems by the computer in adding the printer automatically. We will manually look up the addresses and try adding it to the computer.
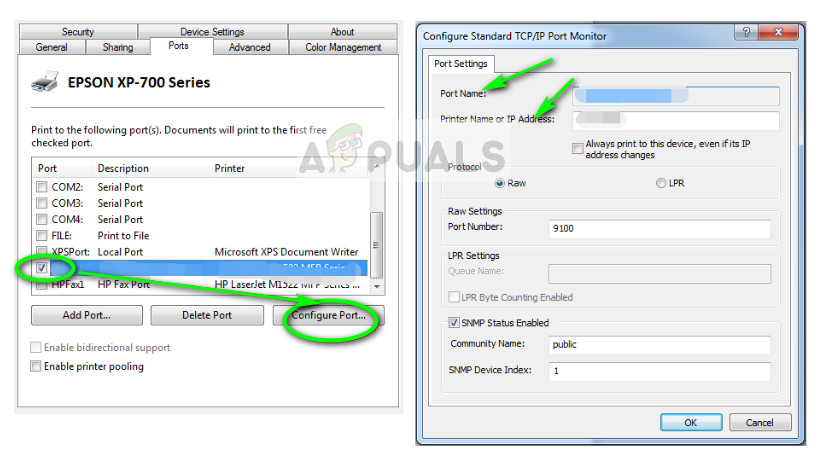
- Open the control panel and navigate to the printers section like we did earlier on. Select your device, right-click it and click Printer Properties .
- Now navigate to Ports , click on the checked entry and select Configure Port .
- A new window will pop up consisting of port name and IP address. Copy these so we can enter them later on.
- Now press Windows + R, type “control” in the dialogue box and press Enter. Once the control panel shows up, click on “Devices and printers” and select Add a printer .
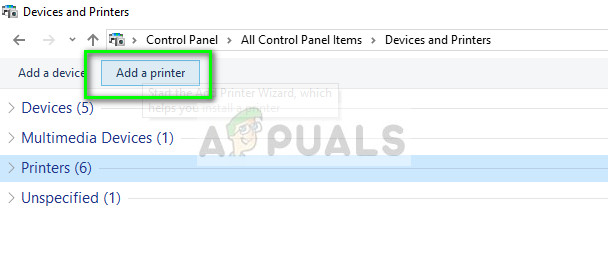
Note: You should delete the existing printer so we can add it again using the IP address.
- The printer will not be detected most probably. If it does, just click on it and the computer will connect. If it doesn’t show up, select “ The printer that I want isn’t listed ”.
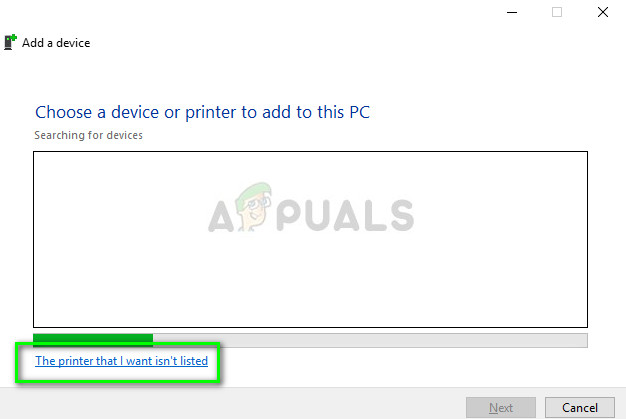
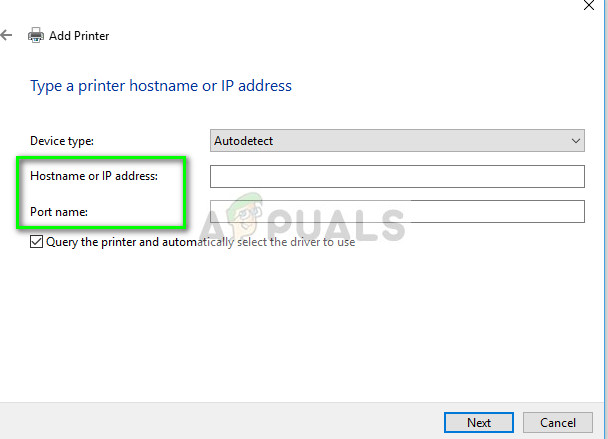
- Now select the option “ Add a printer using TCP/IP address or hostname ”.
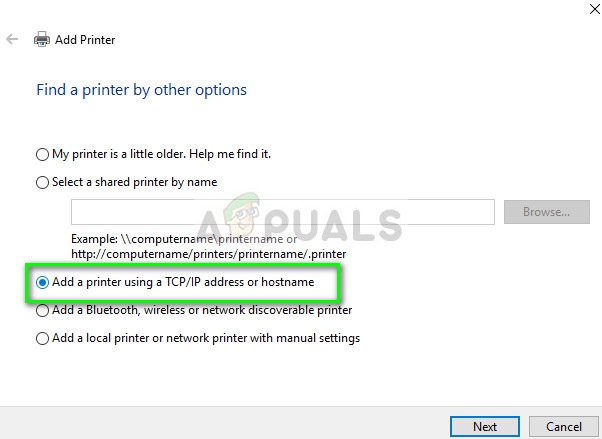
- Enter the IP address and Port name of the printer and wait for it to connect.
- Once the printer is connected, print out a test page and check if the problem is solved.
Note: This solution is meant to make sure that the IP address which your printer has obtained is the same which is inputted in the computer. If you are having trouble determining the IP address of the printer using the methods listed, you should check the printer manual and see if there is any way to confirm the IP and Port of the printer.
If this doesn’t work, you should allocate a static IP to the printer and try connecting to it again. Follow the steps mentioned in the article Fix: Canon Printer Offline .
Nothing is more terrifying than when a printer stops doing what it’s supposed to do, printing. And it gets worse if you have just installed a new cartridge. The time when you expect a shining print, all you get is a blank page. This issue can also occur in a printer that is using an old cartridge.
Mostly it is a hardware issue responsible for this. But hardware is only as good as the drivers or software you are using on your computer, so the issue can be caused by that end too.
Follow the guidelines stated below to troubleshoot the issue.
Inspect Cartridge
Incorrect installation of the cartridge can stop it from printing hence blank pages will be printed. In case this issue has started appearing after installing a new cartridge, a common mistake that you could have made is failing to remove the protective sheet or cover on the cartridge before inserting it into the printer. It is used to protect the sensitive part of the cartridge drum getting damaged or dirty. You have to remove it before you can use the cartridge.
Firstly, take your cartridge out . Based on your cartridge type, the protective tape (usually orange/yellow in color) can be of different types and in a different location.
In some printers, there is a colored tab on the new cartridge. Pull it and the protective sheet will be removed. In some, it a plastic little sheet placed on the contacts and ink nozzle. You just have to pull it off to remove it.

You will have to consult the manual for your exact printer’s model to know the location of the protective sheet. A user can easily miss this, so make sure you double-check it. Once done, firmly insert the cartridge(s) back into the printer.
Check Ink Levels
Make sure the ink cartridges are not completely empty. You can easily check that by printing out a report by using the menu buttons on your printer.
It will be mentioned as “ Ink Levels ” or “ Print Quality ” as it differs by your printer’s model. Or you can consult your printer’s manual to see the exact way to check Ink levels.
If there is no ink in the black cartridge, then, of course, you will be unable to print.
In the case of some color printers (Epson’s, for example), completely empty color cartridges can also cause your printer to print blank pages even if you are printing a black and white document. The reason behind this is that a little amount of colored ink is required to keep the heads of the printer clean.
Unclog Print Heads
If you have not used your printer for a long time, a heavy amount of ink can dry up and clog at the print heads on the cartridge. To unclog them, in most printers there is an option to clear print heads or print nozzles in the menu of the printer or in the software that came with the printer installed on your computer.
To manually unclog and clean the printer head , turn the printer on. Remove the cartridge from the printer.
The location of the print head varies by printer brand and location. It’s usually the place where the protective sheet is placed in a new cartridge. Once again you will have to consult its manual to know the exact location. Once you find it, clean it with a lint-free cloth and cotton swabs .
To stop this problem from happening in the future, make sure you print a page at least once every 3 days .
Use Another Software
Try different software to print your file. For example, if you are using Microsoft Word to print a document, then save it as a PDF and use Adobe Reader instead to open and print it.
Update Printers Drivers
An outdated driver can be messing up your print command. To install updates , visit your printer’s manufacturer’s website .
- Once there, type in your exact printer’s model and search for the Download or Support section of your model.
- In there, download the drivers that are specifically made for your operating system (e.g. Windows 7 x86, Windows 10 x64, Mac OS, etc.)
- Install them and check. If there are no drivers available for Windows 10, you can try Windows 8/8.1 drivers instead.
