OBS has made its way to the top professional streaming software over the years with support for both macOS and Windows operating system. OBS is praised for having multiple controls regarding the streaming service it provides with compatibility with multiple platforms such as Twitch etc.
Encoding Overloaded in OBS Studio
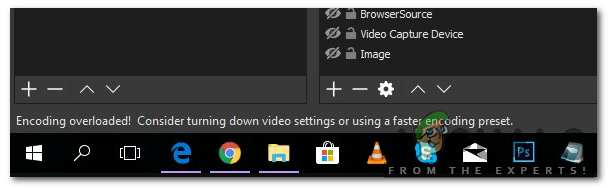
One of the most common issue which users face is where they see the message ‘Encoding Overloaded’ when they are streaming their screens/games. This issue primarily occurs when your computer is unable to process both the game and the streaming properly, hence falling short of the CPU power. It means that your computer can’t encode your video fast enough to maintain the settings you have set, which will cause the video to freeze after a few seconds, or cause periodic stuttering.
The full error message is as follows:
Encoding overloaded! Consider turning down video settings or using a faster encoding preset.
In this article, we will go through all the possible causes as to why this issue might occur on your computer and also the methods which you can use to circumvent the issue. Make sure that you start with the first solution and work your way down accordingly. The solutions are listed according to the efficiency and easiness of the user.
What causes Encoding to Overload in OBS?
After analyzing all the user cases and computers which faced similar issues, we came to the conclusion that this issue usually occurred due to several different reasons. Even though the error message signifies that the issue is primarily because of fewer CPU resources, the causes also include other elements. Some of them are listed below:
- CPU Bottleneck: This is the main reason why this error message occurs as explained earlier as well. When your CPU gets choked up by the encoding process, things start to get slow and this is where OBS prompts you with the error message.
- Low storage: OBS Studio requires that you have optimal storage available on your computer when you are using the software. In addition to using RAM, it also uses your hard drive for some operations which include writing temporary configurations and output files. If you don’t have enough space, you might experience the issue.
- Third-party streaming applications: If you are running other streaming/streaming related applications in the background, they might conflict with OBS to an extent where it fails to work properly or overloads. Disabling those applications usually solves the problem.
- High screen resolution: OBS will require more resources as you move from low screen resolution sizes to higher ones. If you don’t have enough CPU power, the higher resolution might be the culprit for causing issues.
- Priority level: OBS might be set to low priority in your task manager. This will cause its operations to have low priority and the CPU will not cater to its requests for processing and hence the error message will emerge.
Before we move on to the solutions, make sure that you are logged in as an administrator on your computer and have saved all the OBS recordings to an accessible location.
Solution 1: Changing Priority of the Process
The most popular fix in solving ‘Encoding Overloaded’ error is changing the priority of the OBS process from your task manager. Your processor works on the principle of priorities; processes with high priorities will be processed first as compared to other processes. In the case of OBS, the software needs to keep up with your gaming screen/streaming window in a 1:1 ratio. The rate of playing should match the rate at which the game is being broadcasted. When this is not true, you will experience the error message.
In this solution, we will launch both the game and OBS software and then change the priority using the task manager by alt-tabbing. There are two ways through which we change the priority i.e. lower the priority of the game or increase the priority of OBS.
- Launch the game and OBS studio and start playing the game while also streaming at the same time.
- Now press Windows + R, type “ taskmgr ” in the dialogue box, and press Enter.
- Once in the task manager, select the game, right-click on it and select Go to details . You can also do the same for opening the properties of OBS Studio.
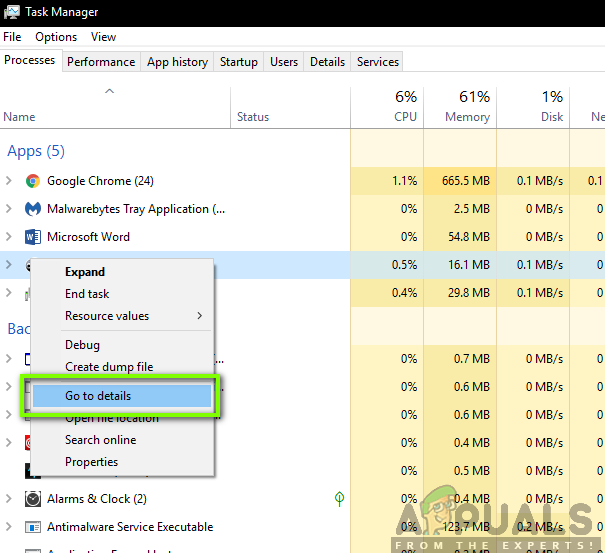
Opening Process Details
- Once in the details section, right-click on the specific game process and select Set priority > Below normal . In the case of OBS, select Set priority > Above normal .
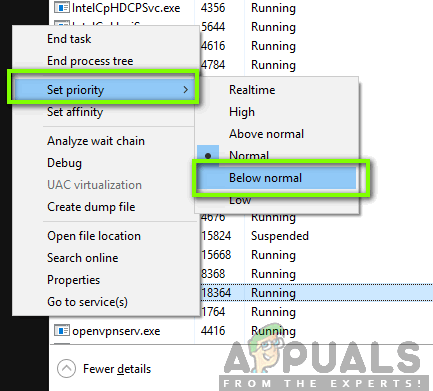
Changing priority of game and OBS
- Save changes and exit the task manager. Now alt-tab to the game and check if you can stream properly without any issues.
Solution 2: Reducing Output Resolution
Whenever you are streaming a game, the screen gets encoded in real-time and this is probably the most CPU extensive task that goes on. For example, in the case of 1080p encoding, the process takes twice as many pixels which are created for each frame in 720p. The workaround to reduce the CPU strain is to tell OBS to downscale your output resolution. If you reduce the output resolution, the software automatically reduces shrinks the frames before passing them on to the encoder.
- Launch OBS Studio and click on the Settings button present at the bottom-right side of the screen.
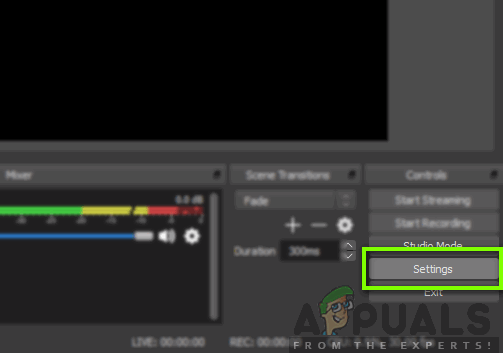
Settings – OBS Studio
- Once a new window pops up, select the category of Video and then click on Output (Scaled) Resolution . Now try to lower your resolution. If it was 1080, try to reduce to it 720.
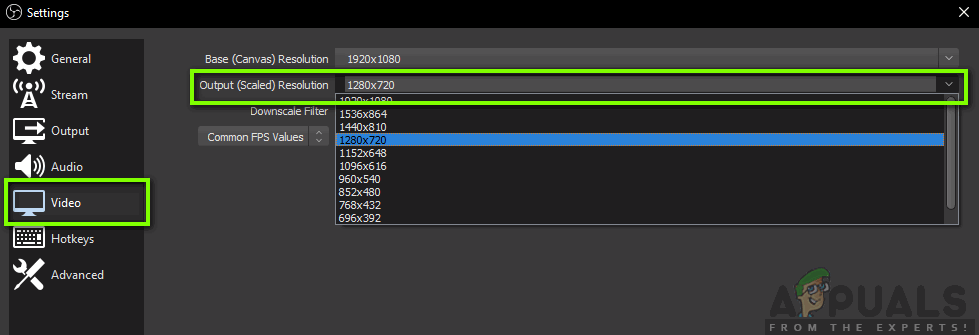
Changing Output Resolution – OBS
- Save changes and exit the software. Restart your computer and try streaming again. Check if the error message is resolved.
Solution 3: Lowering Frame Rate
Frame rate corresponds to the number of frames which are being captured from the video. If you are a gamer, you would understand that frame rates are the main benchmarks for gaming engines and other graphical processing elements. If you are capturing the game in high frame rates, chances are that you will experience several problems and a laggy computer. In this solution, we will navigate to your OBS settings and lower the frame rate accordingly.
- Navigate back to OBS settings like we did in the previous settings and go to Video settings .
- Now select Common FPS Values and then select a lower value. If it was 30, consider going to 20, etc.
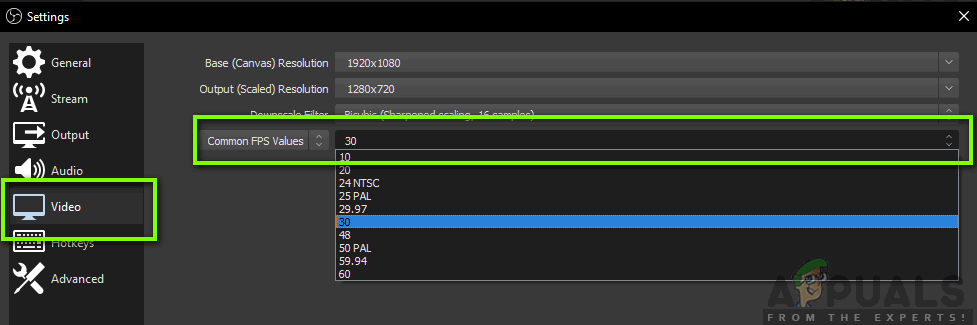
Changing Framerate – OBS
- Save changes and exit the software. Restart your computer and try streaming again. Check if the error message is resolved.
Solution 4: Changing x264 Preset
The video encoder used by default is x264. It has a number of different presets involved in its operation which finds the balance between the quality of the video and the load on the CPU. By default, the preset ‘very fast’ is used. This is the perfect balance (according to OBS) between the video quality and the CPU speed.
The methodology in presets is that faster presets indicate how ‘fast’ an encoder will run. When you select faster presets, the CPU will be used very less but the quality of the video will not be up to the mark. Here ‘fast’ means that the video will be encoded very quickly without performing many calculations. You can try changing the presets and see if any faster preset solves the issue for you.
- Launch OBS studio and click on Settings present at the bottom-right side of the screen.
- Select Output from the left navigation pane and then click on Advanced as the output mode.
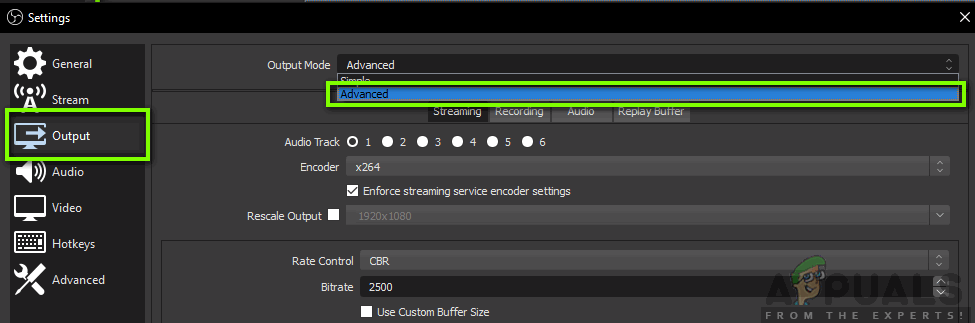
Switching to Advanced Settings
- Now attempt at changing the preset modes and see if selecting any faster one solves the issue for you.
You can always experiment with different preset settings according to your own requirements.
Solution 5: Using Hardware Encoding
If all the above methods don’t work out, we can consider using hardware encoding. The hardware encoders namely AMF, Quicksync, and NVENC are mostly supported in Intel stock GPU’s and in newer AMD/NVIDIA GPU’s as well. Every user has the option to direct some of the encoding load to the hardware encoders with a slight cost of decreased quality.
To sum up, the GPU encoders don’t provide that much quality as of default x264 but they help a lot if you have limited CPU resources.
First, we will check whether the option of hardware encoding is already enabled in your OBS software. If it isn’t, we will go through additional steps and attempt to solve the problem.
- Launch your OBS Studio and navigate to Settings as we did earlier in the solutions.
- Now click on the Output tab using the left navigation pane, select Advanced output mode and check the option of Encoder .
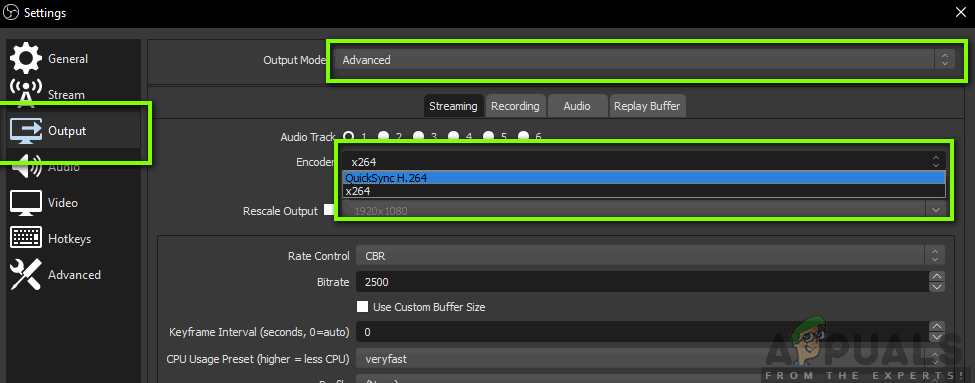
Changing Encoding Method – OBS
If you do not see the option of AMF, Quicksync, etc. you can attempt at enabling the option using the steps down below. If it is present as in the example above, simply enable it, save changes and restart your computer.
If you cannot see Quick sync in your encoding options, it probably means that your Integrated Graphics are not activated in your BIOS. Every Intel motherboard has integrated graphics and they are mostly enabled by default.
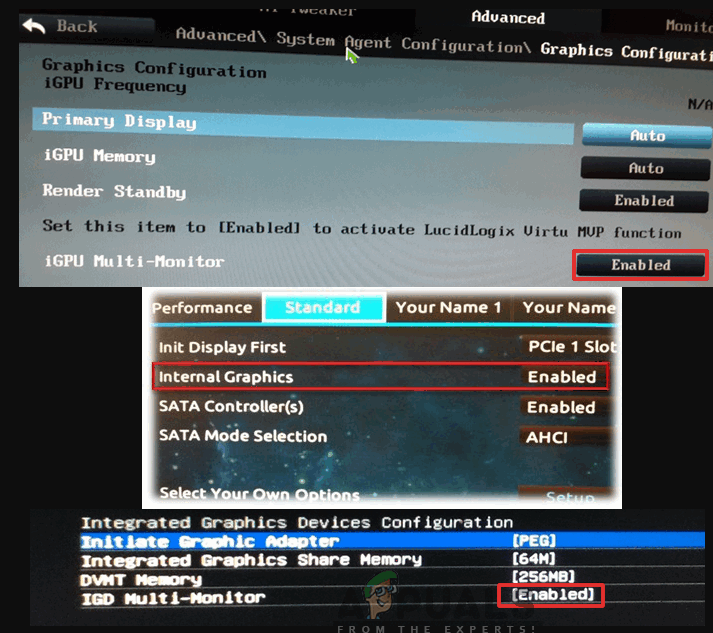
Enabling onboard graphics
You can navigate to your BIOS settings and check if the option of integrated graphics is enabled or not. Each BIOS will be different because of the change of manufacturer so you would have to look around a little. After enabling your Dedicated graphics, restart your computer and check if the issue is resolved.
Solution 6: Freeing Space in Drive
The most important reason why OBS generates error messages like these is problems with your local storage on your computer. Like mentioned before, OBS requires some space on its hard drive to keep its video streaming going. If you do not have any extra space, it will not stream any kind of video.
Full space in OBS Drive
In addition to cleaning freeable space on your drive, you can also perform disk cleanup. After cleaning your disk, restart your computer and try launching the platform again.
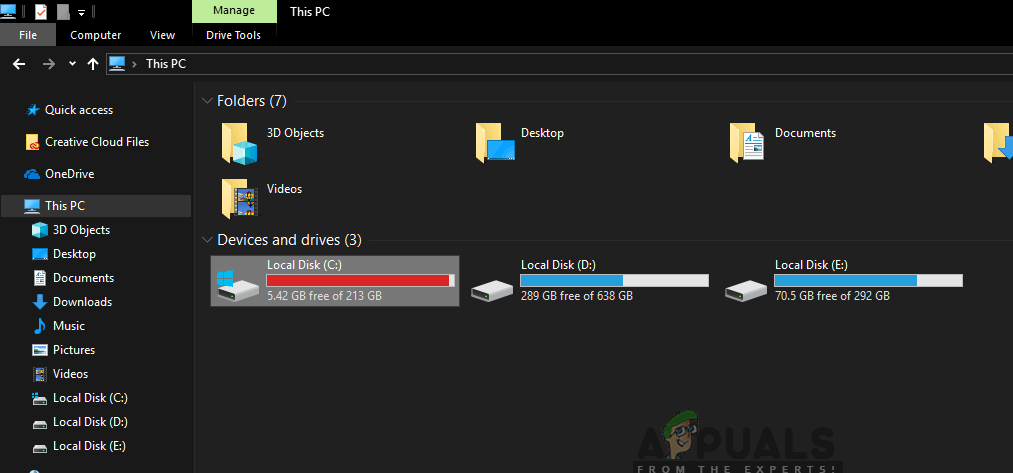
- Press Windows + E to open the file explorer, click on This-PC , and select the drive which you want to clean.
- Right-click it and select Properties .
- Once in properties, select the General tab and click Disk Cleanup .
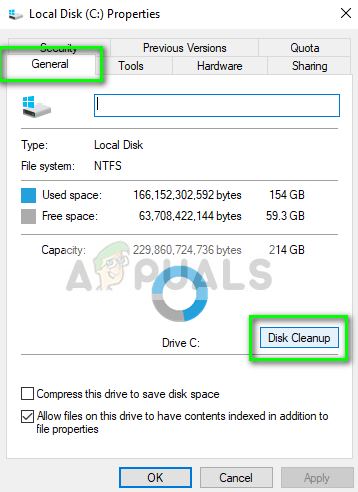
Disk cleanup – Windows Drive
- After cleaning the disk, restart your computer and check if the error message is solved. Make sure that you have at least 5-10 GB of space free on your drive.
Solution 7: Checking for Similar Recording Software
Like mentioned earlier in the causes, OBS studio seems to conflict with other recording software running on your computer. This includes NVIDIA Overlay, Discord, Windows game bar, etc. Here the only workaround is to disable the software from running on your computer or uninstall it completely. In this solution, we will navigate to the application manager and uninstall the software from your computer.
- Press Windows + R, type “ appwiz.cpl ” in the dialogue box, and press Enter.
- Once in the application manager, search for any recording software which you might have installed on your computer. Right-click on it and select Uninstall .

Uninstalling Similar Recording Software
- You should also check your taskbar for any extra applications running in the background. Right-click on each entry and exit the application.
- After you are absolutely sure that no program is running the background, run OBS again and check if the issue is resolved.
Solution 8: Closing Additional Programs in the Background
This solution is common sense but many users fail to notice this scenario. Whenever you are streaming using OBS Studio and playing a game side by side, it is important that all the extra applications running the background are closed so your CPU can solely focus on the two processes. You should also take into account the background processes running which might not be noticeable in the foreground.
- Press Windows + R, type “ taskmgr ” in the dialogue box, and press Enter.
- Once in the task manager, select any extra applications running the background. Right-click on them and select End task .
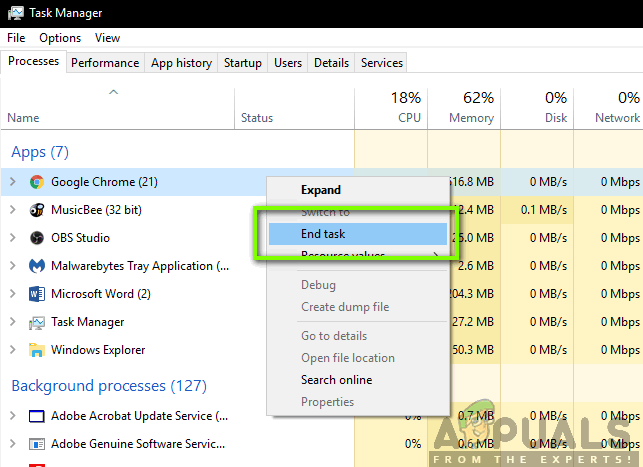
Ending task of background processes
- Now we will also check your tray. Look at the bottom-right side of your screen at your taskbar and locate any icons of software running. If you find any which are constantly running and consuming CPU, right-click on them and select Exit .
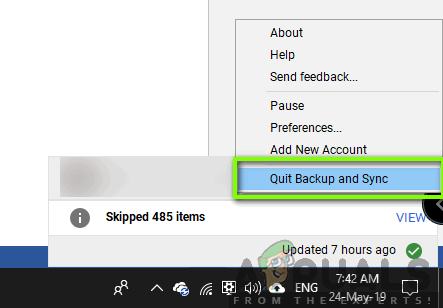
Quitting applications from taskbar
- After closing all the applications, try streaming and see if the issue is resolved.
Solution 9: Using Third-party Alternatives (BandiCam)
If all the above methods don’t work, you can try several different alternatives. The one which we saw resembled OBS Studio the most was BandiCam. It has several different features and allowed customization of the quality of streaming a lot more as compared to other conventional applications such as Screenshare/Discord etc.

Bandicam
You can navigate to the official website of BandiCam and download the free version to an accessible location. After downloading, right-click on it and select Run as administrator .
Note: You should also consider reinstalling the OBS display capture on your computer from scratch after deleting all the temporary files as well. Make sure that you download the latest version from the official website and delete the entries of OBS from the installation locations.
How to Fix “Printer is in an error state” Issue?
The error “ WinRAR Error: Next Volume Is Required ” usually appears when you’re extracting a multi-part RAR archive and WinRAR can’t find (or can’t correctly identify) the next file in the sequence . This often happens when a volume is missing , stored in a different folder , or renamed in a way that breaks the archive’s expected order .

In this guide, we’ll go over the most reliable fixes confirmed by affected users, along with what each method is doing behind the scenes so you can choose the right one for your situation.
Important: To extract multi-volume archives, you should always start extraction from the first file in the set. This is usually file.part1.rar , or (in older sets) the main .rar file that comes before .r01 , .r02 , and so on.
1. Download and Place the Missing RAR File
WinRAR needs all parts of a multi-volume archive to complete extraction. This error usually appears when one of the volumes in a set like .part2.rar , .r01 , .r02 , .001 , and similar naming formats is missing . Downloading the missing volume and placing it in the same folder as the other parts allows WinRAR to continue extracting normally .
- Look at the error message or review the list of archive parts in the folder.
- Identify which volume is missing (for example, part2.rar , .r02 , .001 , etc.).
- Go back to the website or source where you downloaded the archive.
- Locate and download the exact missing file using the same naming format as the others.
- Make sure the new file name matches the pattern of the rest. Example: If you have file.part1.rar and file.part3.rar , the missing one must be file.part2.rar .
- Move the downloaded missing volume into the same folder as the other archive parts.
- Confirm that all parts are in a single folder before extracting.
- Right-click the first file in the series (usually part1 or the main .rar file) and select Extract Here or Extract to Folder .
- WinRAR should now detect all volumes and continue extraction normally .
2. Manually Browse & Select the Next Volume
Use this method only if the next volume already exists , but WinRAR is failing to detect it automatically. This can happen due to incorrect naming , the file being in a different location , or a temporary file access issue. Manually browsing helps WinRAR locate the correct volume and resume extraction without interruption .
- Right-click the first file in the series (usually .rar or part1.rar ) and select Extract Here or Extract to Folder .
- When WinRAR cannot find the next volume, it will show the “ Next Volume Is Required ” message.
- A small window will appear, allowing you to manually select the next volume .
- Use the file explorer window to locate the folder where the other archive parts are saved.
- Select the next part based on the naming order (example: select file.part2.rar after file.part1.rar ).
- Make sure the selected file matches the naming format of the archive (no extra characters like (1) and no mismatched numbering).
- WinRAR will resume extraction using the selected volume .
- If additional volumes are missing or stored separately, WinRAR may prompt you again. Repeat the same process until extraction completes.
3. Rename the RAR files in Order
WinRAR relies on a proper naming sequence (such as file.part1.rar , file.part2.rar , file.part3.rar ) to extract multi-volume archives. If a file is named incorrectly, contains extra characters, or is out of order, WinRAR may fail to locate the next volume and show this error. Renaming the files correctly helps WinRAR follow the sequence and extract the archive without interruptions .
Note: Renaming only changes the file name , not the file contents. The goal is to restore the correct sequence so WinRAR can detect the next volume.
- Go to the folder where all the RAR files are saved.
- Make sure all parts of the archive are present and stored in the same folder .
- Check how the parts are currently named . Common patterns include:
file.part1.rar, file.part2.rar, file.part3.rar
file.rar, file.r01, file.r02, file.r03
- Look for files that don’t match the expected numbering pattern (for example, file.part01.rar , file.part1(1).rar , or unrelated names).
- Rename each file so it follows the same order without extra characters or mismatched numbering. Example:
Incorrect: file.part1.rar, file.part3.rar, file.part2(1).rar
Correct: file.part1.rar, file.part2.rar, file.part3.rar
- Make sure the text before the number is exactly the same for all files.
- Only the last part number should change.
- Right-click the first file in the series (usually part1.rar or the main .rar file) and select Extract Here .
- WinRAR should now recognize the sequence and continue extraction normally .
If you still get the same prompt: the archive set is likely incomplete (a part was never downloaded or was removed), or one of the volumes is corrupt and must be re-downloaded from the original source.
