When the Online Speech Recognition is turned ON, the users can use voice for dictation and talking to Cortana in Windows. It can also be used for other applications that use Windows cloud-based speech recognition. The voice of users can also be used to improve the speech services of Microsoft. When the Online Speech Recognition is turned OFF, then the users will be unable to use dictation or speak to Cortana. The Speech Recognition app and other speech services can still be used even when the Online Speech Recognition is turned OFF. In this article, we will show you methods through which you can easily turn ON or turn OFF the online Speech Recognition in Windows.
Online Speech Recognition
Method 1: During the Windows Setup
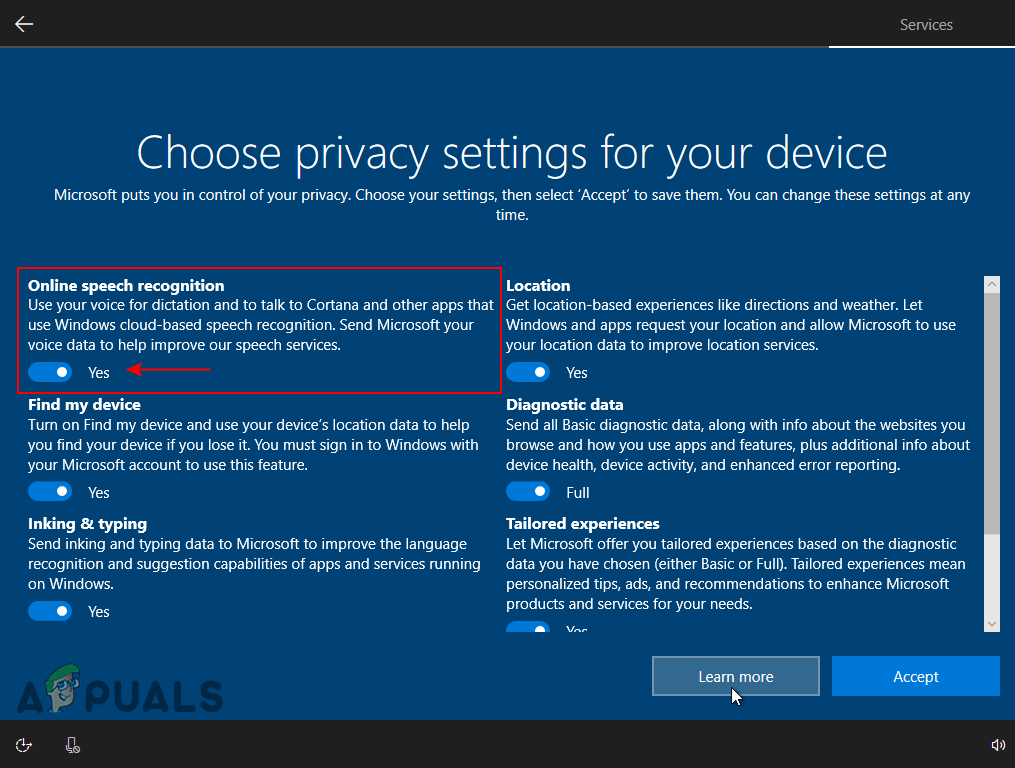
When you are installing a fresh Windows, you get the “ Choose privacy settings for your device “. This is where you can enable and disable many of the services for the system. The first option will be “ Online Speech Recognition “, you can change the toggle to enable or disable it. This only appears one time during the Windows operating system installation. However, you can still enable or disable these settings later on in the Settings app.
Windows setup
Method 2: Using the Settings App
The Settings app in Windows is the place you can customize many different settings for the operating system. You can easily find the Online Speech Recognition setting in the Settings app. This is listed under the privacy section of the Settings app. You just need to navigate to the setting and click on the toggle option to turn it ON or OFF as shown in the below steps:
- Press the Windows and I keys together on your keyboard to open the Windows Settings app . Now click on the Privacy settings icon. Opening Privacy Settings
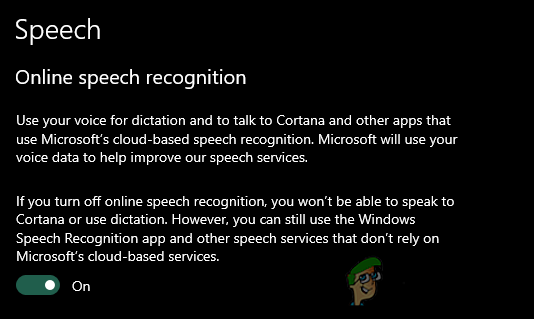
- Click on the Speech option in the left pane of the window. Now you can Turn ON or Turn OFF the toggle option for Online Speech Recognition . Turning ON the Online Speech Recognition
- Once you change the setting, close the Settings app window, and you are done.
Method 3: Using the Registry Editor
The Registry Editor is a hierarchical database that stores all the settings of the operating system. This is another method for turning ON or turning OFF the Online Speech Recognition in Windows 10. This method is a bit technical for normal users than the other methods. You must be signed in as an administrator to use this method. The Online Speech Recognition will already have value in the Registry Editor. If it does not have a value, then you need to create one as shown in the below steps.
- Hold the Windows key and press R to open the Run command box. Then you need to type “ regedit ” in the box and press the Enter key to open the Registry Editor . Note : If you get a UAC (User Account Control) prompt, then choose the Yes option. Opening the Registry Editor
- You can always create a registry backup before making any new changes. First, click on the File menu in the menu bar and choose the Export option from the list. Then name the file and select the location for the file. Lastly, click on the Save button to create a backup. Creating Registry Backup Note : You can always recover a backup by clicking on the File menu and then choosing the Import option. Then you need to select the backup file that you previously created.
- Now in the Registry Editor window, you need to go to the following location: HKEY_CURRENT_USER\Software\Microsoft\Speech_OneCore\Settings\OnlineSpeechPrivacy
- In the OnlineSpeechPrivacy key, right-click on the right pane and choose the New > DWORD (32-bit) Value option. Now rename this newly created value as “ HasAccepted ” and save it. If the value already exists, then skip this step. Creating a new value
- Double-click on the HasAccepted value to open it. Then change the value data to 1 . Note : Value data 1 is for enabling and value data 0 is for disabling . You can disable the Online Speech Recognition by setting the value data as 0 . Changing the value data
- Close the Registry Editor window and check if the changes are applied. If not, you need to restart the computer to apply the changes that you just made.
How to Fix “Printer is in an error state” Issue?
The “ Cannot change fingerprint or PIN ” problem in Windows 11 happens when the options to change these settings are greyed out in Settings → Accounts → Sign-in options. Even if you are the administrator, you can’t update your Windows Hello credentials. You might also see a message like “ This option is temporarily unavailable. ”
Can’t disable PIN or Fingerprint on Windows 11
This usually happens because Windows Hello’s stored data (in the Ngc folder) is damaged or not in sync. Other reasons include security rules set by your workplace or school, connected work accounts, or restrictions set in the registry or group policy.
Now that you’re aware of the potential causes, let’s go through some steps that have helped other users fix or work around this problem:
1. Change the PIN or Fingerprint the Conventional Way
If your goal is to remove the fingerprint or PIN without setting up another sign-in method, please note that this is not possible on Windows 11.
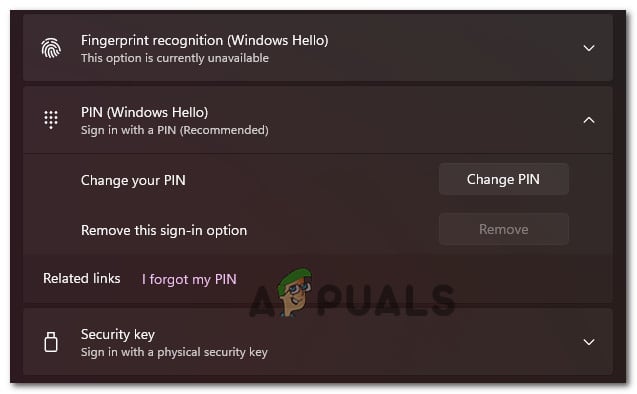
Windows 11 requires you to have at least one Sign-in option enabled. The Remove button will remain grayed out if you only have one active sign-in method.
Can’t disable PIN or Fingerprint on Windows 11
For example, the Remove button for your PIN will stay unavailable until you add a different sign-in option (like Facial Recognition, Fingerprint, or a Security Key).
If you want to stop using your PIN or Fingerprint, you’ll need to set up an additional way to sign in.
Below are step-by-step instructions to set up a new sign-in option and then remove your current one:
- Press Windows key + I to open the Settings menu in Windows 11.
- Inside the Settings menu, click on Accounts from the vertical menu on the left. Accessing the Accounts menu Note: If the left menu is hidden by default, click the menu button (top-left corner) to reveal it.
- Once in the Accounts menu, move to the right-hand section of the screen and select Sign-in options. Accessing the Sign In Options menu
- Now, choose which sign-in method you’d like to set as a fallback. Sign-in Options Note: Your available options depend on your device. If your PC doesn’t support facial recognition or you don’t have a security key, you can switch between PIN and fingerprint.
- After you pick your new sign-in method, follow the on-screen instructions to set it up.
- Once your second sign-in option is set, you’ll be able to click the Remove button to get rid of your previous sign-in method. You can also choose Change PIN or Change Fingerprint to update, rather than remove, your sign-in credentials. Modify the current PIN or remove one of the configured sign-in options
2. Remove PIN or Fingerprint Requirement by Using a Local Account
If you want to completely remove all sign-in options like PIN or Fingerprint, you will have to switch to a local account .
We generally don’t recommend this unless you really need to, as it can limit the functionality of some built-in Windows features (like Windows Update and the Microsoft Store).
If you still want to remove your PIN or Fingerprint sign-in, you’ll need to set up a local account with a password instead. Keep in mind, this means you’ll need to stop using your Microsoft account on your PC.
Important: This method isn’t available if you’re enrolled in the Windows Insider program.
To change from a Microsoft account with PIN or fingerprint to a local password, follow these steps:
- Press Windows + I to open the Settings menu in Windows 11.
- In the Settings menu, click on Accounts from the menu on the left. Accessing the Accounts menu Note: If you don’t see the left menu, click the menu icon (top-left corner).
- Inside Accounts , click on Family & other users on the right-hand side. Accessing the Family and other users tab
- In the Family & other users tab, check for any accounts listed under Other users. If you find any, remove them before moving on.
- Next, return to the main Accounts menu and click on Your info on the right. Accessing the Your Info tab
- Scroll down to Account Settings and click on Sign in with a local account instead . Sign in with a local account instead
- On the next screen, click Next .
- When prompted, enter your current PIN or use your fingerprint as requested. Inserting the PIN
- Then, you’ll be asked to create a username and password for your new local account, along with a password hint in case you forget. Configure the local account
- Finally, click Sign out and finish to complete the switch.
