Adobe Photoshop is an incredibly powerful tool widely used by many for a variety of reasons. We could talk about Photoshop’s awesomeness and it might just take up a whole day. But, that’s not what we’re here for. We have a very specific question in mind today. How can you make your own custom panel in Photoshop? Adobe Photoshop’s vast library of different tools that are put at your disposal can sometimes be overwhelming. These tools are categorized into different panels that you can move around, relocate, hide etc.
With all the tools that Photoshop offers, it is given that not always are you going to be using all of them. In this huge library and a plethora of different tools, there are some that you almost always are going to be using on a regular basis. Whether it is a complex project or a simple one, some tools are always going to be used. Having to navigate to them separately can be a tedious task, especially when you have to do it over and over again. By using Configurator Reloaded, you can customize and create your very own panel for Adobe Photoshop. You can arrange those panels and add whichever tool you like so that your most important and frequently used options always close to you.
Getting things started
Enabling Configurator Reloaded
First and foremost, you will need to download Configurator Reloaded from here . The downloadable file is a .zip one containing a setup for both Mac OS and Windows. After installing the one that you need, you will need to close all Adobe applications and restart them.
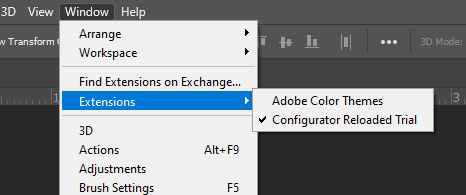
Next, navigate to Window > Extensions and enable Configurator Reloaded from there.
Once that’s done, you’ll immediately see a new panel pop up where by default, there may be a couple of containers. Now that we have all that set up, we can start customizing and building our own panels.
Building your own panel
Before you being dragging the tools onto your new panel, you must first create a container. To do that, click on the top right corner of the Configurator Reloaded panel and click “Add Container”. Adding a container will make a new space in the panel where you can drop your tools and have them arranged in a sorted and orderly manner.

Creating a container
Once you create a container, you can start dragging and dropping the tools that you want. As you can see, Configurator Reloaded already has categorized all the different tools that Photoshop has. You can navigate through them and find the ones that you want. Once you have them, click and drag them onto the container space which you have just now created.
You can create multiple containers onto the Configurator Reloaded panel. For simplicity and to keep things organized, rename the containers according to what kind of tools you have in them. This will allow you to remember where you need to look for when you’re trying to find one specific tool.
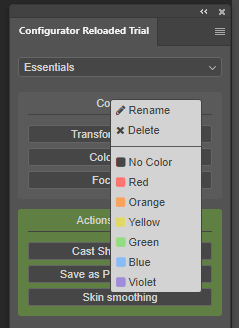
Colour coding the containers
To rename a container, right click on it and you’ll see an option for renaming. Along with that, Configurator Reloaded also lets you choose custom colours for the containers that you have built. These colours can serve as a visual aid for you as you can categorize the types of tools according to particular colours as well.
Creating a customized panel for your Photoshop is incredibly easy thanks to Configurator Reloaded. It is a simple tool that is going to come in handy when you need to have your Photoshop tools sorted out for improved efficiency. With this guide, you’ll have gotten it down and are now ready to make your own panel so that you can get right to business and spare as little time finding the tools as possible.
Verdict
Configurator Reloaded’s trial version lets you have all the accessibilities however, your panel is not saved when you exit Photoshop. This little app is worth investing in and will save you a lot of time when you’re working in Photoshop.
How to Fix “Printer is in an error state” Issue?
- Recognizing the importance of a printer’s duty cycle is crucial for choosing a device that matches your print volume needs. Staying within this limit ensures the printer operates efficiently and prolongs its lifespan, minimizing the risk of maintenance issues.
- Proper humidity, temperature, and cleanliness management can significantly enhance printer performance and maintain its duty cycle, preventing unnecessary wear.
- Enhancing a printer with upgrades like additional memory or better mechanical parts can improve its workload handling and extend its practical duty cycle, boosting overall durability and efficiency.
When choosing a new printer, you might come across the term “ duty cycle ” in the specifications. This guide will explain what a duty cycle is, why it matters, and how it can help you choose the right printer. We’ll keep things simple so you can easily understand how to use this information when shopping for a printer.
- Printer Duty Cycle: What It Means and Why It Matters?
- Why the Duty Cycle Is Key to Choosing the Right Printer?
- Duty Cycle vs. Recommended Monthly Print Volume: What’s the Difference?
- What Happens If You Ignore Printer Duty Cycle Recommendations? ↪ Real-World Scenarios: Why Exceeding the Duty Cycle Can Cost You
Printer Duty Cycle: What It Means and Why It Matters?

What is the meaning of Printer Duty Cycle?
The printer duty cycle represents the upper limit of a printer’s capacity—how many pages it can reliably process in a month before the risk of wear or malfunction increases. This figure is crucial for understanding printer performance limits and ensuring that your chosen printer can handle the expected work volume.
Manufacturers determine a printer’s duty cycle through stress testing, where the printer is pushed to its limit to identify how many pages it can produce each month before malfunctioning. These tests help set a reliable performance gateway for users.
A printer’s duty cycle is like a car’s speedometer—you wouldn’t drive a car at top speed all the time, and you shouldn’t push a printer to its maximum duty cycle. Doing so can lead to quicker wear and tear, more frequent maintenance, and a shorter lifespan.
If you’re unsure whether to choose an inkjet or laser printer, this detailed guide compares both options to help you make an informed decision.
Why the Duty Cycle Is Key to Choosing the Right Printer?

The Importance of Duty Cycle in printer selection
Knowing the duty cycle is essential when choosing a printer, as it determines how well the device can handle your monthly print volume without excessive wear or maintenance.
Here is why the duty cycle matters in printer selection:
- Fit for purpose: Selecting a printer with a suitable duty cycle ensures it can handle your monthly printing volume efficiently, reducing stress on its components.
- Longer lifespan and better performance: Staying within the duty cycle ensures optimal print quality and speed while prolonging the printer’s life, avoiding frequent breakdowns.
- Cost efficiency and reduced downtime: Operating within the duty cycle minimizes the need for repairs and reduces operational disruptions, managing long-term costs.
Duty Cycle vs. Recommended Monthly Print Volume: What’s the Difference?

Duty Cycle vs. recommended monthly print volume
The recommended monthly print volume is the optimal number of pages a printer should handle each month for the best performance and longevity. Unlike the maximum capacity indicated by the duty cycle, this number guides regular usage, ensuring the printer operates efficiently without excessive wear.
If your print volume regularly exceeds the recommended amount but stays within the duty cycle, the printer may operate safely in the short term, but it could still experience accelerated wear and reduced lifespan over time.
In such cases, consider upgrading to a higher-capacity printer or spreading print jobs across multiple devices to ensure long-term performance.
Here are the differences between the duty cycle and recommended monthly print volume:
- Duty cycle: Represents the maximum number of pages a printer can handle in a month without breaking down. It assesses the printer’s upper limit.
- Recommended monthly print volume: Suggests a practical, workable number of pages to print each month to keep the printer in good condition over its lifespan.
What Happens If You Ignore Printer Duty Cycle Recommendations?

Consequences of ignoring Duty Cycle recommendations |AndranikHakobyan via Canva
Ignoring the duty cycle limits poses more severe risks than exceeding the recommended monthly print volume, leading to serious long-term consequences.
While exceeding the recommended volume occasionally may result in additional wear and tear, consistently exceeding the duty cycle can lead to frequent breakdowns, reduced performance, and a shortened lifespan.
Ignoring duty cycle limits leads to frequent breakdowns, reduced performance, and increased maintenance, ultimately shortening the printer’s lifespan and causing more frequent operational downtime and higher repair costs. Long-term, pushing a printer beyond its limits leads to greater financial burdens due to premature replacements and inefficiencies.
↪ Real-World Scenarios: Why Exceeding the Duty Cycle Can Cost You
For example, in a busy law firm, overlooking duty cycle limits during a high-stakes period could cause a printer breakdown just before a critical deadline, delaying crucial legal filings and ultimately compromising client service.
For small businesses, consistently exceeding a printer’s duty cycle can lead to costly emergency repairs or premature equipment replacements, straining financial resources.
