Being a designer, you need to be very careful about the quality of your work, as if it gets printed, that is when the client will see whether your work is good or not. And to make sure that your final work looks perfect, whether it is an image in its softcopy or a printout, to make sure it is without any flaws, you need to adjust the DPI for that work. The higher the DPI, the better the quality of the work.
What Does DPI Stand For
DPI is a short form of ‘Dots Per Inch’. You set your pictures DPI, which is a way of setting the resolution for your image. To print a design , designers need to make sure that the design is in high resolution. If the DPI for an image is not set to a number good enough, then the printing outcome of your design or even the image will turn out in its worst form, and I don’t think anyone wants that. The higher the DPI, the better the printed product.
Reasons Why You Must Set Your DPI at a Good Resolution
- The foremost reason for choosing a higher DPI is that when your work gets printed, the dots per inch (dpi) is so high that the prints are clear and flawless.
- The size of your hardcopy that gets printed is also affected by the DPI that you choose. So choose wisely.
What is the Common DPI Used by Designers
For most of the designers, the work gets printed at 300 DPI. This has to be the best level of output for any sort of printing. This brings clarity to your work and makes it look professional. Look at the images below to see the difference between a 300 DPI work and 150 DPI work.
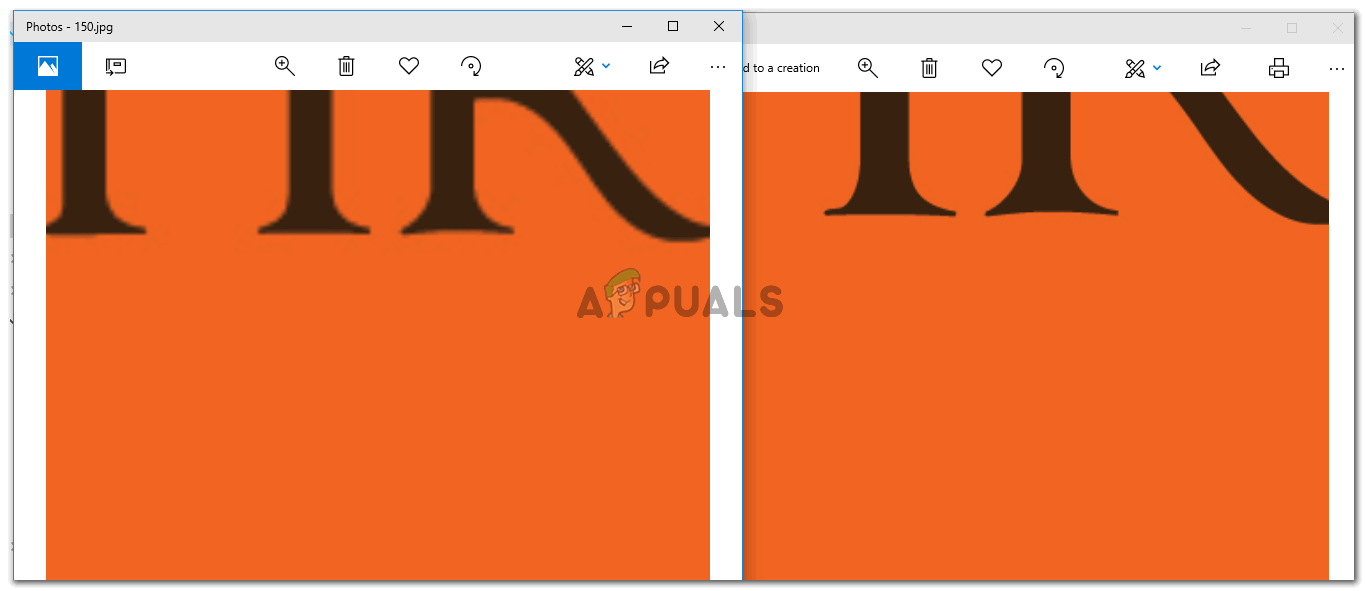
Notice the difference in the quality of the image.
The image above shows you an example of an image made in Adobe Photoshop at 150 DPI, that is the image on the left side, and 300 DPI, which is on the right side. There is a visible difference in quality. You can notice that the one on the left is more pixellated, and does not seem to be very smooth in comparison to the right image, which is less pixellated, is smoother and looks more clear. Clients on big forums like Fiverr or elsewhere, want their work to look as smooth as the right image, or even smoother if made in a higher DPI quality. This is why using the right DPI for your image is so important.
How To Check the DPI of Any Image
To check the DPI of an image, you will have to follow the steps as mentioned below.
- Right click on the image you want to check the DPI for. From the dropdown list that appears, click on the last option which says ‘Properties’. Properties: Anything you need to know about the image can be found here. All the details about the image will be present under this tab.
- Now after clicking on Properties, a box for settings will open. This will show you all the information about the image. Form the headings that you see, click on the one that says ‘Details’. This is where you can see the DPI of the image. And note, here the DPI will not be under a title as ‘DPI’, but instead, you will see it in front of the heading for Horizontal and Vertical Resolution. Horizontal and Vertical resolution for an image shows the DPI for that specific image.
How to Change the DPI of an Image on Adobe Photoshop
Adjusting the DPI for Adobe Photoshop is easy. It is a very simple process. You can follow the steps mentioned below.
- When you open Adobe Photoshop and press the tab for Create new, Adobe Photoshop asks you the details about your canvas. On this same page, you will find the space for Resolution. This is where you will enter the required resolution for your work, which usually is 300 DPI for most of the designers. It can be higher, but lowering the DPI will lower the quality of your final outcome. Adjust the resolution of your image from this tab. This can be accessed right at the beginning of your work before you commence with your designing. Note: Once you are done with your work, you obviously save it. But because you have to often show your client samples before you provide them the final product, you need to save this work in higher quality so that when they see the soft copy of the work, they are satisfied. I have experienced the quality of the work looking horrendous when the quality here in this option is anything below 7 or 8. So when you have a professional Project and need to show it to your client, make sure you save the image in higher quality.
How to Fix “Printer is in an error state” Issue?
Printing your own T-shirt at home is not only a fun and creative project but also a great way to express yourself and showcase your unique style. With the right materials and a bit of guidance, you can easily create a personalized T-shirt that perfectly fits your preferences. Imagine the satisfaction of seeing your own designs or slogans come to life on a shirt that you can wear and show off to the world.
Not to mention the countless possibilities of designing shirts for special events, gifts for loved ones, or even starting your own small business. With the help of a comprehensive guide and some practice, you’ll be on your way to creating a wardrobe that’s truly one-of-a-kind.
The Definitive Guide to T-Shirt Printing Step 1: Creating a Design Designing With a Software Designing by Hand Hiring a Graphic Designer Step 2: Transfer Your Design on Transfer Paper Types of Transfer Paper Step 3: Prepare Your Shirt Step 4: Transfer Your Design on Shirt Step 5: Final Touch Useful Tips and Tricks Conclusion
The Definitive Guide to T-Shirt Printing

T-shirt Printing |Startup.Info
Printing your own T-shirts at home is an excellent way to express your creativity and showcase your personal style. Whether you want to create a custom design for yourself or print shirts for your small business, it’s fun and affordable to do so using the following step-by-step guide.
Step 1: Creating a Design
Creating the right design is the first step in creating a great T-shirt. Your design should reflect your personality or brand, and it should be eye-catching and memorable. There are several ways to create your own design, including using graphic design software such as Photoshop , drawing your own design by hand, or hiring a professional designer.
Designing With a Software
If you’re new to graphic design, there are several online resources that can help you create a professional-looking design. Canva is a popular design platform that offers a range of design templates and graphics that you can use to create your own unique T-shirt design. It is the easiest tool one can use and is highly recommended for beginners.
Adobe Illustrator is another powerful design program that is commonly used in the industry. However, it is recommended for those that are far more professional and experts in photo editing.
Designing by Hand

A Woman Designing By Hand | Pexels
If you’re more comfortable drawing your own designs by hand, there are a few things to keep in mind. First, make sure your design is simple and easy to reproduce. Intricate designs may be difficult to transfer onto your shirt, and they may not be as visually appealing as simpler designs.
Second, choose colors that will stand out against the color of your shirt. For example, if you’re using a black shirt, consider using bright colors like white, red, or yellow for your design.
After creating your t-shirt design, you can use various scanning applications like CamScanner (yes, it can do more than just scan documents ) on your phone to capture it and transfer it to your computer. Unlike the regular camera, these apps offer more advanced features such as precise bordering and shape orientation, ensuring your design is properly aligned and in the correct format.
Hiring a Graphic Designer
If you’re not confident in your design skills, consider hiring a professional designer to create your T-shirt design.
Freelance graphic designers can be found on platforms like Fiverr and Upwork , and they can create a custom design that perfectly reflects your personality or brand. However, this option can cost you somewhere between $10 – $100 depending upon your requirements and complexity of the design.
Step 2: Transfer Your Design on Transfer Paper

Transfer Paper |Pinterest
Transferring your design onto transfer paper is the next step in the process of printing your own T-shirts at home. You will need a Transfer paper for this purpose. This is a type of paper that is specially designed to transfer your design onto fabric.
Types of Transfer Paper
There are different types of transfer paper available in the market, and it’s essential to choose the right one for your specific needs.
- Light-colored fabric transfer paper: This type of transfer paper is used on light-colored fabrics such as white or pastel shades. These transfer papers work by transferring the design onto the fabric through a heat transfer process.
- Dark-colored fabric transfer paper : This type of transfer paper is used on dark-colored fabrics such as black or dark blue. These transfer papers have a white background that allows the design to be visible on dark fabrics.
- Inkjet transfer paper : This type of transfer paper is designed to be used with an inkjet printer . It works by transferring the design onto the fabric through a heat transfer process.
- Laser transfer paper : This type of transfer paper is used with a laser printer and works similarly to the inkjet printer.
- Glitter transfer paper : This type of transfer paper is designed to add glitter to your design. It is available in both light-colored and dark-colored fabric options.
- Stretchable transfer paper : This type of transfer paper is used on stretchable fabrics such as spandex or lycra. It allows the design to stretch with the fabric without cracking or peeling.

Applying Design via Transfer Paper |Direct T-Shirt
Once you have your transfer paper, it’s time to transfer your design onto it. Start by resizing your design to fit the size of your T-shirt. Use a graphic design program like Adobe Illustrator or Canva to resize your design to the correct dimensions. Then, print your design onto the transfer paper, making sure to print it in a mirror image .
After printing, carefully cut out your design, leaving a small margin around the edges. This margin will help prevent any unwanted transfer of ink onto your shirt. Make sure to remove any excess paper around the design.
Step 3: Prepare Your Shirt
Preparing your shirt is an essential step to ensure that your T-shirt design looks professional and lasts for a long time. Before transferring your design onto your shirt, you must ensure that your shirt is clean and free of any wrinkles. Any dirt or debris on your shirt can affect the transfer process, so it’s crucial to clean your shirt thoroughly before printing your design.

A White T-Shirt | Pixabay
Wash your shirt in cold water and dry it in the dryer or air dry it to remove any dust or debris. Make sure to iron your shirt to remove any wrinkles or creases before transferring your design. A flat and smooth surface is essential for the transfer process to work correctly, so ironing your shirt is a crucial step.
Additionally, it’s important to consider the color of your shirt when preparing it for printing. If you’re using transfer paper for light-colored fabrics, make sure that your shirt is also a light color.
For dark-colored shirts, you’ll need to use transfer paper that is designed specifically for dark-colored fabrics.
Step 4: Transfer Your Design on Shirt
After preparing your shirt, it’s time to transfer your design onto it. This step involves carefully placing the transfer paper with your design onto the shirt and using heat to transfer the design onto the fabric.
When transferring your design onto your T-shirt, ensure that your shirt is clean and dry. Place the transfer paper face down onto the shirt, with the design facing the fabric.
Use a hot iron to transfer the design onto your shirt. It’s crucial to follow the instructions on the transfer paper packaging for the correct temperature and duration. Be sure to apply even pressure with the iron to ensure that the design transfers evenly.

Transferring Design on T-Shirt |3D Insider
Start by placing your shirt on a flat and even surface. Then, carefully peel the backing paper off the transfer paper and position the design onto the shirt. Make sure that the design is centered and aligned correctly on the shirt. Once the design is in place, use a hot iron to transfer the design onto the fabric.
It’s important to follow the instructions on the transfer paper packaging for the correct temperature and duration to transfer the design onto the fabric correctly. Typically, the transfer process involves applying heat and pressure to the design for several seconds and then allowing it to cool before carefully peeling off the transfer paper.

Transferring Design on Shirt via Iron |Screen Printing Support
If you’re using a heat press machine, follow the manufacturer’s instructions for the correct temperature, pressure, and duration to transfer the design onto your shirt correctly. A heat press machine can help to ensure that the design is evenly transferred onto the fabric and can be a more efficient method if you’re printing a large number of T-shirts.
Once you’ve transferred your design onto your shirt, allow your shirt to cool for a few minutes, then carefully peel off the transfer paper. If any parts of your design didn’t transfer correctly, you can touch them up with a fabric marker.
Step 5: Final Touch
Finally, wash and dry your shirt according to the transfer paper instructions to set the design. You may want to turn your shirt inside out to protect the design during washing.

Shirt Ready After Design Transfer |Col Desi
Useful Tips and Tricks
Printing a T-shirt at home can be challenging, but it’s doable if you have the know-how. Here are a few tips and tricks to help you get the best results when printing your own T-shirts at home:
- Use high-quality transfer paper for best results.
- Test your design on a scrap piece of fabric before transferring it onto your shirt.
- Avoid using too much heat when transferring your design, as this can cause the design to crack or fade over time.
- Use a lint roller to remove any stray fibers or debris from your shirt before transferring your design.
- Use a hard surface, like an ironing board or countertop, when transferring your design to ensure even pressure.
Conclusion
Printing your own T-shirts at home is a fun and easy way to express your creativity and showcase your personal style. With just a few supplies and a little bit of know-how, you can create custom T-shirts for yourself or your small business. So why not give it a try? With a little practice, you’ll be printing professional-looking T-shirts in no time!
- Recognizing the importance of a printer’s duty cycle is crucial for choosing a device that matches your print volume needs. Staying within this limit ensures the printer operates efficiently and prolongs its lifespan, minimizing the risk of maintenance issues.
- Proper humidity, temperature, and cleanliness management can significantly enhance printer performance and maintain its duty cycle, preventing unnecessary wear.
- Enhancing a printer with upgrades like additional memory or better mechanical parts can improve its workload handling and extend its practical duty cycle, boosting overall durability and efficiency.
When choosing a new printer, you might come across the term “ duty cycle ” in the specifications. This guide will explain what a duty cycle is, why it matters, and how it can help you choose the right printer. We’ll keep things simple so you can easily understand how to use this information when shopping for a printer.
- Printer Duty Cycle: What It Means and Why It Matters?
- Why the Duty Cycle Is Key to Choosing the Right Printer?
- Duty Cycle vs. Recommended Monthly Print Volume: What’s the Difference?
- What Happens If You Ignore Printer Duty Cycle Recommendations? ↪ Real-World Scenarios: Why Exceeding the Duty Cycle Can Cost You
Printer Duty Cycle: What It Means and Why It Matters?

What is the meaning of Printer Duty Cycle?
The printer duty cycle represents the upper limit of a printer’s capacity—how many pages it can reliably process in a month before the risk of wear or malfunction increases. This figure is crucial for understanding printer performance limits and ensuring that your chosen printer can handle the expected work volume.
Manufacturers determine a printer’s duty cycle through stress testing, where the printer is pushed to its limit to identify how many pages it can produce each month before malfunctioning. These tests help set a reliable performance gateway for users.
A printer’s duty cycle is like a car’s speedometer—you wouldn’t drive a car at top speed all the time, and you shouldn’t push a printer to its maximum duty cycle. Doing so can lead to quicker wear and tear, more frequent maintenance, and a shorter lifespan.
If you’re unsure whether to choose an inkjet or laser printer, this detailed guide compares both options to help you make an informed decision.
Why the Duty Cycle Is Key to Choosing the Right Printer?

The Importance of Duty Cycle in printer selection
Knowing the duty cycle is essential when choosing a printer, as it determines how well the device can handle your monthly print volume without excessive wear or maintenance.
Here is why the duty cycle matters in printer selection:
- Fit for purpose: Selecting a printer with a suitable duty cycle ensures it can handle your monthly printing volume efficiently, reducing stress on its components.
- Longer lifespan and better performance: Staying within the duty cycle ensures optimal print quality and speed while prolonging the printer’s life, avoiding frequent breakdowns.
- Cost efficiency and reduced downtime: Operating within the duty cycle minimizes the need for repairs and reduces operational disruptions, managing long-term costs.
Duty Cycle vs. Recommended Monthly Print Volume: What’s the Difference?

Duty Cycle vs. recommended monthly print volume
The recommended monthly print volume is the optimal number of pages a printer should handle each month for the best performance and longevity. Unlike the maximum capacity indicated by the duty cycle, this number guides regular usage, ensuring the printer operates efficiently without excessive wear.
If your print volume regularly exceeds the recommended amount but stays within the duty cycle, the printer may operate safely in the short term, but it could still experience accelerated wear and reduced lifespan over time.
In such cases, consider upgrading to a higher-capacity printer or spreading print jobs across multiple devices to ensure long-term performance.
Here are the differences between the duty cycle and recommended monthly print volume:
- Duty cycle: Represents the maximum number of pages a printer can handle in a month without breaking down. It assesses the printer’s upper limit.
- Recommended monthly print volume: Suggests a practical, workable number of pages to print each month to keep the printer in good condition over its lifespan.
What Happens If You Ignore Printer Duty Cycle Recommendations?

Consequences of ignoring Duty Cycle recommendations |AndranikHakobyan via Canva
Ignoring the duty cycle limits poses more severe risks than exceeding the recommended monthly print volume, leading to serious long-term consequences.
While exceeding the recommended volume occasionally may result in additional wear and tear, consistently exceeding the duty cycle can lead to frequent breakdowns, reduced performance, and a shortened lifespan.
Ignoring duty cycle limits leads to frequent breakdowns, reduced performance, and increased maintenance, ultimately shortening the printer’s lifespan and causing more frequent operational downtime and higher repair costs. Long-term, pushing a printer beyond its limits leads to greater financial burdens due to premature replacements and inefficiencies.
↪ Real-World Scenarios: Why Exceeding the Duty Cycle Can Cost You
For example, in a busy law firm, overlooking duty cycle limits during a high-stakes period could cause a printer breakdown just before a critical deadline, delaying crucial legal filings and ultimately compromising client service.
For small businesses, consistently exceeding a printer’s duty cycle can lead to costly emergency repairs or premature equipment replacements, straining financial resources.
