One of the more convenient innovations of Android as an operating system is the ability to add app widgets to the home screen. From Google Calendar to the latest headlines, you can have important information displayed right on your home screen. In fact, widgets became so omnipresent that eventually, Apple had to add them to iOS as well. Surprisingly, the same widget trend has not caught on to desktop operating systems. If you’re on a Chromebook, though, there might be a way to change that.
Now, there are two ways we can go about setting up widgets for a Chromebook. One is just to install widgets directly from the Chrome Web Store. These are not android widgets but have been developed specifically for Chrome. The second route is to make Android widgets work on Chrome OS. For that, though, you need to make sure that your Chromebook is compatible with Android apps. Here’s the list of compatible Chromebooks. And also, the method only works on Android Pie, so make sure you’re running Pie.
In case your Chromebook is not on the list, or you’re not able to run the latest version of Android, we will walk through installing simple Chrome widgets on the Chromebook first. If you do have a Chromebook with Android Pie, you can jump directly to the second half of the article. Chrome Widgets for Chromebooks Without Android Pie
For Chromebooks without Android Pie, basic widgets like the clock, weather, calendar and sticky notes can still be installed. This is because developers have made available widgets apps for Chromebooks on the Chrome store. Here’s an example of how your desktop could look once these apps are set-up –
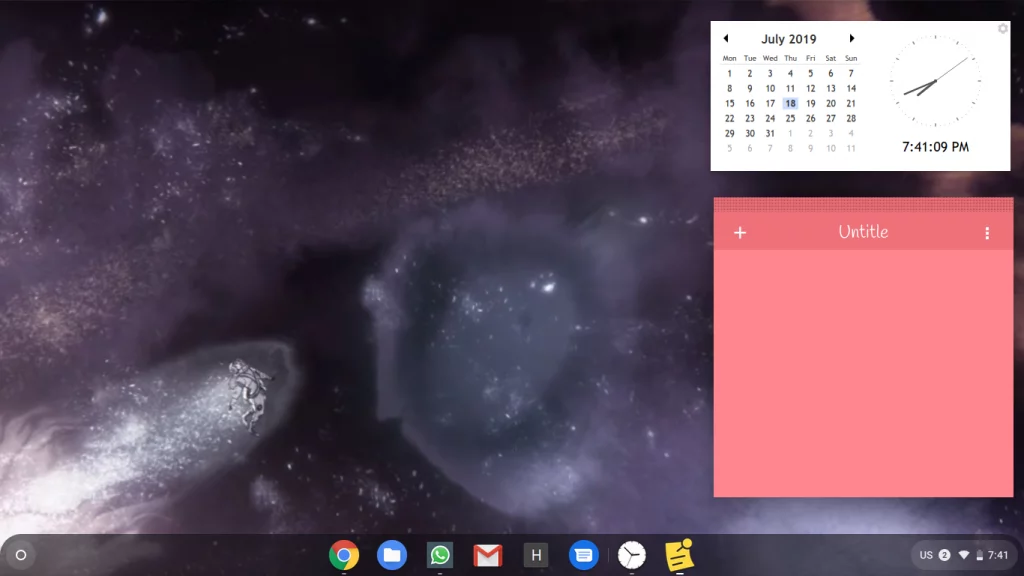
Chrome OS Dekstop with Calendar and Sticky Notes
First, we will install the separate apps for these widgets from the Chrome Web Store. Note that this isn’t an exclusive list, but they’re the widgets I use and find reliable.
- Calendar Clock – The Clock and Calendar widget
- Sticky Notes – For Note-taking on your desktop
- Rift Weather – The Weather Widget
Once you’ve downloaded these apps from the Chrome Web Store, you will need to open them from the Apps menu. You can either search for them using the search button on your Chromebook’s keyboard, or browse the App drawer from the desktop.
When these apps are open, the widgets will show up on the desktop, and stay there. They won’t automatically overlay over other apps, like the Chrome browser, but if you want them up, you can just press Alt+Tab to get them to the foreground.
Android Widgets for Chromebooks Running Android Pie
For Chromebooks that run Android Pie, the potential for widgets increases significantly. There’s no straightforward way to get Android widgets on Chrome OS, but there is a workaround. Here are the steps to follow –
Install Taskbar
Download and install the Taskbar app from the Play Store on your Chromebook. Open the app, and navigate to Advanced Features under Settings. Here, make sure the boxes ‘Replace home screen’ and ‘Enable Widget Support’ are ticked.
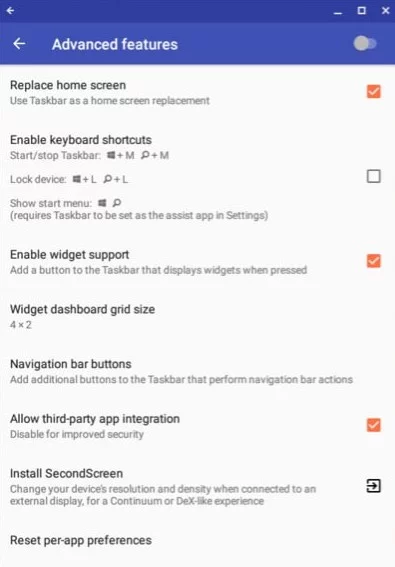
Taskbar’s Advanced Features Page
When you tick ‘Replace home screen’, a pop-up window will ask you to give Taskbar permission to draw over other apps. Make sure you give this permission because it’s essential for the widgets to show up.
Then, an additional taskbar will show up on the desktop. On the taskbar, you will see a widgets button. Click on that button, and then click anywhere on your screen. A pop-up will show up with a list of app widgets you can choose from. As long as the app is installed on your Chromebook, the corresponding widget should be on the list. You can then set up widgets like Google Calendar, the Android clock, Spotify, from news apps, etc.
In case you don’t want the taskbar to show up on the bottom of the screen (which is where the Chrome OS taskbar already is) you can move it up to the top of the screen too.
That’s all there is to it. You can now experiment with all kinds of widgets, and give your Chromebook desktop the look and functionality you want.
How to Fix “Printer is in an error state” Issue?
- Common Chromebook printing issues include printer incompatibility, network connection problems, and outdated software or firmware.
- Solutions involve checking printer compatibility, ensuring both devices are on the same network, adding the printer manually, updating software, or using a USB connection.
- If issues persist, restart devices, troubleshoot the wireless connection, and update printer firmware; contacting support may be necessary for unresolved problems.
We’ve all been there—you need to print something important, and your Chromebook isn’t cooperating. Don’t worry; you’re not alone. Printing issues with Chromebooks are common but usually easy to fix.

Samsung Chromebook | Unsplash
- Check Printer Compatibility
- Connect Both Devices to the Same Network
- Select Your Printer
- Add Your Printer Manually
- Restart Devices
- Check Printer Settings
- Update Chrome OS
- Update Printer Firmware
- Use a USB Connection (if applicable)
- Troubleshoot Wireless Connection
- Check for Print Quality Issues
- Contact Support
In this guide, we’ll take you through straightforward steps to get your Chromebook working with your printer again. Let’s tackle this together, one step at a time.
But before we get into the solutions, let’s identify some common causes of printing issues on Chromebooks.
- Printer Incompatibility: Chromebooks have built-in drivers that may not be compatible with all printer models. Older printers or those requiring specific drivers may not work.
- Network Connection Problems: Both the Chromebook and printer must be connected to the same Wi-Fi network for wireless printing to work. Issues with the network configuration can prevent successful connections.
- USB Connection Issues: Problems with the USB cable or the USB ports on either device can cause printing failures when using a USB cable.
- Outdated Chrome OS: Running an outdated version of Chrome OS can lead to compatibility issues with printers.
- Outdated Printer Firmware: Older printer firmware may not work well with the latest Chrome OS versions, causing printing problems.

Chromebook Supported Printers by Epson
Now that you know the probable causes, check out the solutions below to fix the issue:
1. Check Printer Compatibility
Before attempting any fixes, ensure your printer is compatible with Chrome OS . Visit your printer manufacturer’s website to find information about your specific printer model and its compatibility with Chrome OS or Chromebook.
You can also check the list of ‘Certified “Works with Chromebook” printers’ on the Chromebook Help forum by Google . If your printer is listed, proceed to the next step. If not, you might need a compatible printer .

List of Printers Compatible with Chromebooks by Google | See Full List onChromebook Help
How This Helps: Ensuring printer compatibility with Chrome OS is crucial, as not all printers work seamlessly with Chromebooks. If incompatible, consider purchasing a different model verified to work with Chrome OS.
2. Connect Both Devices to the Same Network
- Turn on your printer and connect it to your Wi-Fi network. Refer to your printer’s manual for instructions. Connect Your Printer to Wi-Fi | WikiHow
- On your Chromebook, click the time in the bottom right corner to open the quick settings menu. Opening the quick settings menu on your Chromebook by clicking the time in the bottom right corner
- Ensure your Chromebook is connected to the same Wi-Fi network as your printer. If not, click the Wi-Fi icon and select your network. Ensure the Wi-Fi toggle is on and connected to the same network as your printer
How This Helps: Both devices need to be on the same network to communicate effectively. If they’re not, the Chromebook won’t find the printer, leading to printing failures.
3. Select Your Printer
- Press Ctrl + P on your Chromebook to open the print dialog. Press Ctrl + P to open the print dialog on your Chromebook
- In the print dialog, click the “Destination” dropdown and find your printer in the list. Select it and proceed to print. In the print dialog, select your printer from the ‘Destination’ dropdown
- If your printer is not listed, click “See more” at the bottom. If your printer isn’t listed, click ‘See more’ at the bottom
How This Helps: Selecting the correct printer is essential for printing. If the wrong printer is selected, or if the printer is not visible, the print job won’t proceed. This step ensures the Chromebook recognizes and is set to use the correct printer.
4. Add Your Printer Manually
- If your printer is not showing up, click on the time in the bottom right corner to open the quick settings menu. Opening the quick settings menu on your Chromebook by clicking the time in the bottom right corner
- Click the gear icon ⚙️ to open Settings . Open the Settings Menu
- Scroll down and click “Advanced” to expand advanced settings. Click on Advanced
- Under “Printing” , click “Printers” . Click on Printers
- Click on Add Printer icon Click Add Printer Icon
- Enter the following information about your printer: Name: Give your printer a recognizable name. Address: Enter your printer’s IP address. Print a network configuration page from your printer to find this. Protocol: Select “Internet Printing Protocol (IPP)” . Fill in Your Printer Details
- Click “Add” to save the printer settings. Click Add to Save the Printer
How This Helps: Manually adding your printer can resolve issues where automatic detection fails, allowing the Chromebook to communicate with the printer directly using its IP address.
5. Restart Devices
- Turn off your printer and wait for about 30 seconds.
- Turn your printer back on and wait for it to fully power up. Turn off your printer, wait 30 seconds, then turn it back on and wait for it to fully power up | WikiHow
- On your Chromebook, click the time in the bottom right corner and select “Sign out” . Click the time and select ‘Sign out’
- Sign back in to your Chromebook and check if the printer is now recognized.
How This Helps: Restarting both devices can clear temporary glitches or connectivity issues. This simple step often resolves many common problems.
6. Check Printer Settings
- Click the time in the bottom right corner and select the gear icon ⚙️ to open Settings . Open the Settings Menu
- Scroll down and click “Advanced” to expand advanced settings. Click on Advanced
- Under “Printing” , click “Printers” . Click on Printers
- Ensure that your printer is listed correctly with the right name and IP address.
- If necessary, remove the printer by clicking on the three-dot menu next to it and selecting “Remove” .
- Add the printer again manually using the steps in Section 4 .
How This Helps: Verifying and correcting printer settings ensures that the Chromebook is properly configured to communicate with the printer. Discrepancies in the printer name or IP address can lead to connection issues.
7. Update Chrome OS
- Click the time in the bottom right corner and select the gear icon ⚙️ to open Settings . Open the Settings Menu
- Scroll down and click “About Chrome OS” . Click ‘About Chrome OS’
- Click “Check for updates” . Click on ‘Check for Updates’
- If an update is available, it will start downloading automatically. Once downloaded, click “Restart” to install the update.
How This Helps: Keeping Chrome OS updated ensures you have the latest features, bug fixes, and compatibility improvements. Updates can resolve issues affecting printing functionality.
8. Update Printer Firmware
- Visit your printer manufacturer’s website and search for your specific printer model.
- Look for a “Support” or “Downloads” section and find the latest firmware update for your printer.
- Follow the instructions provided by the manufacturer to download and install the firmware update on your printer.

Canon G1330 Support Page
How This Helps: Printer firmware updates can fix bugs and improve compatibility with newer operating systems, including Chrome OS. This is essential for ensuring that your printer functions correctly with your Chromebook.
9. Use a USB Connection (if applicable)
- Ensure your printer is turned on and ready to print.
- Connect your printer to your Chromebook using a USB cable.
- A notification should appear on your Chromebook, asking if you want to set up the printer. Click “Set up” to proceed.
- Follow the on-screen instructions to complete the USB printer setup.

Connect your Chromebook to the printer via USB | WikiHow
How This Helps: Using a USB connection can bypass network issues entirely, allowing you to print directly from your Chromebook. This method is often more reliable when wireless connections fail .
10. Troubleshoot Wireless Connection
- On your printer, ensure Wi-Fi is enabled and connected to the correct Wi-Fi network.
- Power cycle your printer by turning it off, waiting for 30 seconds , and then turning it back on.
- Power cycle your Wi-Fi router by unplugging it from the power source, waiting for 30 seconds , and then plugging it back in.
- Wait for the router to fully power up and reconnect your Chromebook and printer to the Wi-Fi network.

Power Cycle Your Wi-Fi Router
How This Helps: Troubleshooting the wireless connection ensures that both devices are properly connected to the network. This can resolve issues caused by network interruptions or misconfigurations.
11. Check for Print Quality Issues
- Check the ink or toner levels in your printer. Replace any cartridges that are low or empty.
- Clean the printer heads by following the instructions in your printer’s manual. This can help resolve issues with blurry or faded prints.
- Run a test print from your printer to ensure that the print quality is satisfactory.

Check your printer’s ink or toner levels
How This Helps: Addressing print quality issues ensures that your documents print clearly and correctly. Low ink or clogged print heads can lead to poor print results, which may be mistaken for connectivity problems .
12. Contact Support
If the steps above didn’t fix the printing issue on your Chromebook, don’t stress. You can always reach out to your printer’s customer support—they might have more specific tips based on your printer model. If you’re still stuck, try posting your problem on the Chromebook Help Forum or contact Google support for extra help.

Chromebook Help
Follow these solutions, and you should fix most printing problems on your Chromebook. Ensure your printer and Chromebook are compatible, double-check that everything’s connected to the same network, keep your software updated , and if all else fails, try connecting in a different way. You’ve got this!
If your printer shows as “offline,” first check if it is powered on and connected to the same network as your Chromebook. Restart both the printer and Chromebook. If it’s still offline, try unplugging the printer for a minute, then plug it back in. Also, check the printer’s network settings to ensure it is connected to the correct Wi-Fi network.
If you can print some documents but not others, the issue may be related to the specific file type or format. For example, PDFs can sometimes have compatibility issues. Try opening the document in a different application or converting it to another format. Other than that, check the printer settings to ensure they are configured correctly for the document type.
To clear the print queue, open the Chrome browser and type chrome://devices in the address bar. Under the “Printers” section, find your printer and click “Manage.” From there, you can clear the print queue by selecting “Clear spooler.” This can help resolve issues with stuck print jobs.
If your printer is connected but won’t print, check for any error messages on the printer itself. Ensure that there are no paper jams, and that ink or toner levels are sufficient. Restart both the printer and Chromebook, and verify that the correct printer is selected in the print dialog. If the problem persists, consider updating your printer firmware.
Yes, you can print from a Chromebook without a Wi-Fi connection by using a USB cable to connect the printer directly to the Chromebook. This method allows you to bypass network issues and print directly from your device.
