Raspberry Pi is an economical, credit-card sized computer that requires some basic hardware components for making interesting projects that can be used in our daily life to make our life easier. Simple to begin with, this modest yet incredible electronic gadget accompanies extra assets including screen, console, and mouse. Latest Raspberry Pi models have usually three to four Universal Serial Bus (USB) ports, one ethernet port, and one High Definition Multimedia Interface (HDMI). It can do all that you would anticipate that a work station should do, like playing a superior quality video, making spreadsheets, FM radio stations and gaming, etc. The setup given in this article gives you a chance to set up a connection between the Raspberry Pi board and a laptop. It is a basic and helpful method to access Raspberry Pi remotely. Now, Let’s move towards setting up the Raspberry Pi, installing necessary packages on it and making certain hardware changes!

Accessing Raspberry From Laptop
How To Setup Raspberry Pi And Other Hardware Components?
The best approach to start any project is to make a list of components and going through a brief study of these components because no one will want to stick in the middle of a project just because of a missing component.
Step 1: Components Required
- Raspberry Pi 3B+
- No products found.
- No products found.
- Wired Mouse
- Micro SD Card Reader
- 32 GB SD Card
- Raspberry Pi Adapter
- RJ45 Ethernet Cable
- Laptop
Step 2: Selecting the Raspberry Pi Model
Several models of raspberry pi are available in the market. Except for raspberry pi zero, any model can be preferred. This is because on Pi zero setting up a network is a very tiring job. The latest models like 3A+, 3B+ can be purchased. The Raspberry Pi 4 is the quickest and most dominant gadget the Raspberry Pi Foundation has released to date but the Raspberry Pi team hasn’t shared it’s hardware issues after release. It doesn’t boot well because it’s USB-C port doesn’t provide enough power for booting. So, in this project, we will use the Raspberry Pi 3B+.

Raspberry Pi 3B+
Step 3: Installing the SD Card Formatter On Laptop
The SD Card formatter needs to be installed on the laptop because we would need this software to format the SD Card before putting the Operating System files into it. It can be downloaded from here Here . Extract all of the files into a folder and start installing it.

Installing SD Card Formatter
Step 4: Installing the Win32 Disk Imager On Laptop
The Win32 Disk Imager needs to be installed on the laptop because we would need this software to Write our Operating System imager file into the SD Card. This software can be easily found out on the internet and it can also be downloaded from Here

Installing Win32 Disk Imager
Step 5: Installing VNC Viewer On Laptop
VNC is a graphical desktop sharing framework that enables you to remotely control the desktop interface of one PC (running VNC Server) from another PC or cell phone (running VNC Viewer). There are several types of VNC Viewer for example. TigerVNC, TeamViewer, Real VNC, etc. Our requirement is RealVNC and it is easily available on the internet and can be downloaded from Here. The latest Raspbian comprises VNC Server that enables us to control our Pi remotely and VNC Viewer that allows us to control other systems from Pi. After opening the link mentioned above click on Raspberry Pi icon and then start downloading because we need VNC Viewer for Raspberry Pi.

VNC Viewer
Step 6: Formatting The SD Card
After installing both software format the SD Card so that the unnecessary files can be removed that were installed initially in the card. As we have formatted the SD card, we are now ready to install the Operating System in it.

Formatting
Step 7: Downloading The Latest Operating System
The latest Operating system needs to be downloaded from the official site of the raspberry pi. The latest version of Raspbian is “Raspbian Buster”. It includes the latest programming features for wiring the hardware gadgets like NodeRed etc. An alternate method is also available for installing the Raspbian onto the Pi. Firstly, download the Noobs that is the Operating System Installer and contains the latest Raspbian but it is a time taking process hence we would directly download the “Raspbian Buster With Desktop And Recommended Software” for our Raspberry Pi. Raspbian can be downloaded from Here

Raspbian
Step 8: Writing The Operating System Onto The SD Card
As we have downloaded the Operating System for our Raspberry Pi we are ready to write the img file onto SD Card. After selecting the img file click on the write icon and wait until the whole img file is written to the SD Card. Before clicking on the Write button select the MD5 option from the dropdown arrow in Hash.

Writing Operating System On SD Card
Step 9: Configuring Wifi On Pi
After writing the Operating System on SD Card unplug the SD Card from the Card Reader. Connect the Keyboard and the Mouse with the Raspberry Pi. Connect the one side of HDMI cable with the television and the other side with the Raspberry Pi. Power the Pi using the adapter and wait until the Raspberry Pi is booted. After booting, set up the password of Wifi by clicking the Wifi icon on the top right corner of Raspbian. An IP Address would be assigned to the Raspberry Pi and in my case, the IP Address was: “ 192.168.1.15 “. Note this IP address because it will be needed in further configurations. The Ethernet cable can also be used to share the laptop’s wifi connection with the Raspberry Pi but we have to change some Internet settings. It is a bit tough task hence connecting Pi through Wifi is recommended. Note: Each individual will be assigned a different IP address depending upon the Wifi router.
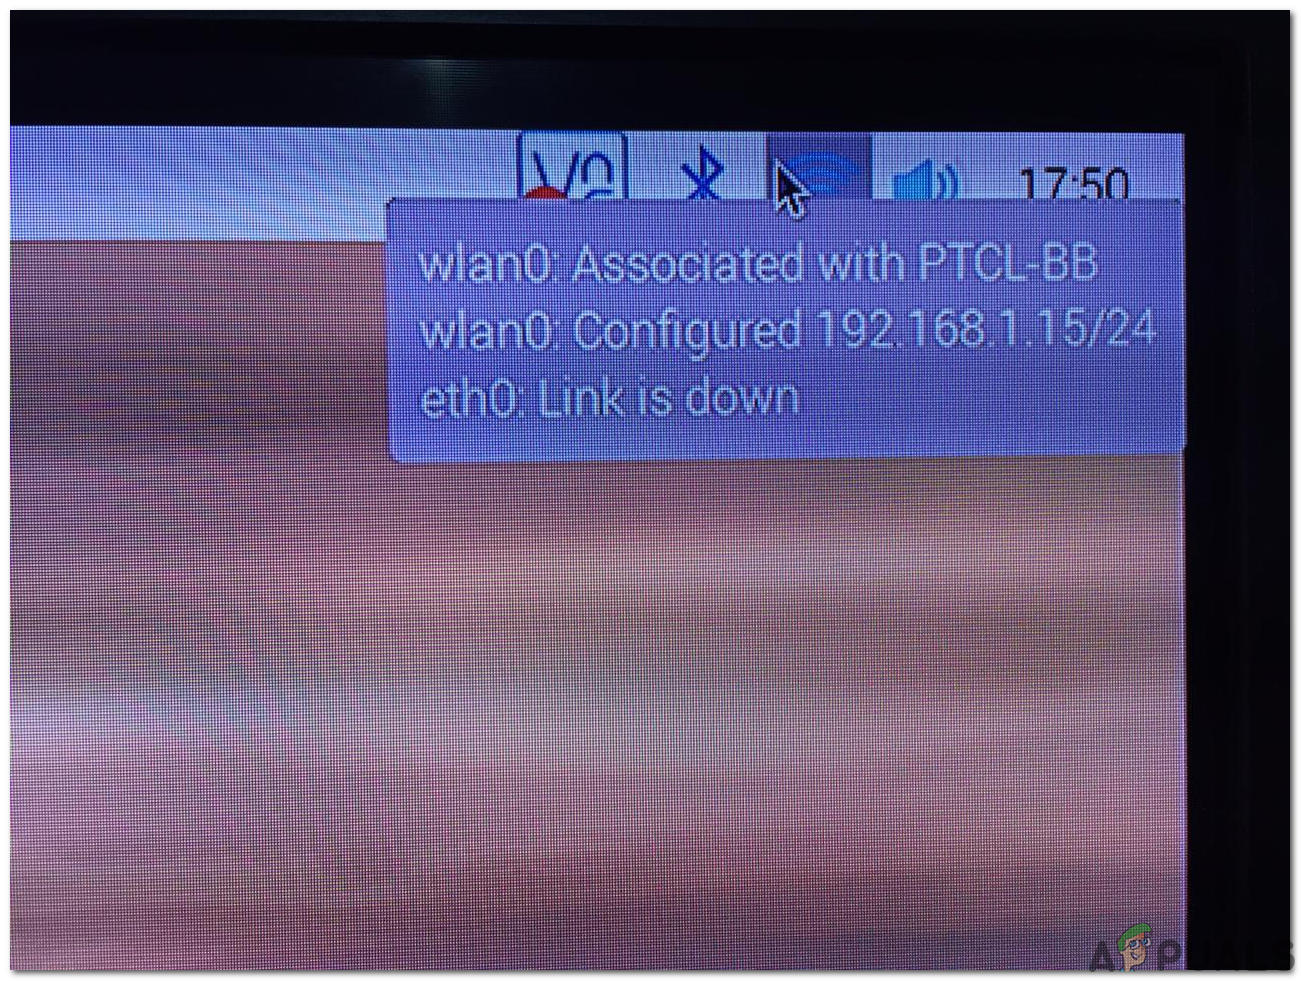
Configuring Wifi
We can also find the assigned IP by navigating to the Lx Terminal/command window and typing the following command:
ifconfig

IP Configured
Step 10: Enabling SSH Client And VNC On Raspberry Pi
For accessing the Raspberry Pi remotely SSH needs to be enabled. It is a remote login protocol that used Port 22 by default. In the older version of Raspbian, the ssh was enabled by default but after the November 2016 release of Raspbian, the ssh server was disabled by default and it needs to be enabled manually. After finding out the IP Address of Pi click on the Raspberry icon on the top left corner.

Raspberry Pi Configuration
Navigate to Preferences and from there select Raspberry Pi Configuration and finally click on Interfaces. From the list of buttons, you have to click on two Enable buttons only. The first one is SSH and the second one VNC .

Enabling SSH And VNC
Step 11: Alternate Way Of Enabling SSH Client On Windows
There is an alternative to enable the SSH client too. After you have written the Raspbian onto the SD Card open the SD card, right-click anywhere and create a new text file. After creating the txt file you would see that it is named “New Text Document.txt”. Remove all of this and instead of this write “ssh” . After creating this file remove the SD Card and plug it into the Raspberry Pi. Now, the ssh would be automatically enabled.

ssh
Step 12: Installing Putty On Laptop
PuTTY is an extremely flexible tool used for remote access to another PC. It works as an SSH client and it is famous for its strong firewall and versatility. We will install Putty on our laptop because it supports SSH protocol. SSH via PuTTY offers an easy way to securely access a Raspberry Pi from a Windows system. Putty for windows can be found easily from the internet and it can also be downloaded from Here

Putty
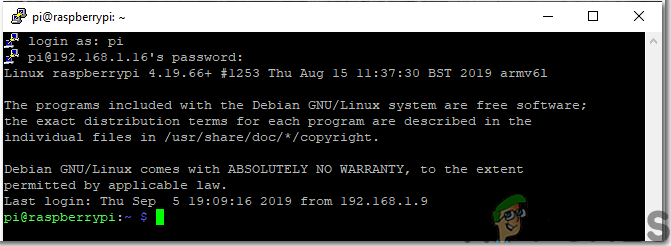
Step 13: Logging Into Raspberry Pi Through Putty
Enter the IP Address that was assigned to our Raspberry Pi by the Wifi router. In my case the IP address assigned was “192.168.1.15”.

Entering IP Address
After entering the IP address the screen will appear and it will ask for username and password. The default username is “ pi ” and password is “ raspberry “. We can change login details too if we want.
Logged In
Step 14: Checking For VNC Viewer Version
Run the following commands to make sure that we have the latest version of VNC Viewer.
sudo apt update
sudo apt install realvnc-vnc-server realvnc-vnc-viewer
Step 15: Connecting Pi With VNC Viewer
Open the VNC Viewer and enter the IP address that was entered previously in Putty. In my case, the IP address that would be used is “192.168.1.15”. After entering the IP Address the server would ask for username and password. The default username is “pi” and the password is “raspberry”. Click on the OK button.

Connecting To VNC
After logging in we have gained the remote access to our Pi and now we are able to use our Pi. Now, we can make several interesting projects like home automation, airplay servers, etc using our Pi.

Graphical User Interface
How to Fix “Printer is in an error state” Issue?
The error “ WinRAR Error: Next Volume Is Required ” usually appears when you’re extracting a multi-part RAR archive and WinRAR can’t find (or can’t correctly identify) the next file in the sequence . This often happens when a volume is missing , stored in a different folder , or renamed in a way that breaks the archive’s expected order .

In this guide, we’ll go over the most reliable fixes confirmed by affected users, along with what each method is doing behind the scenes so you can choose the right one for your situation.
Important: To extract multi-volume archives, you should always start extraction from the first file in the set. This is usually file.part1.rar , or (in older sets) the main .rar file that comes before .r01 , .r02 , and so on.
1. Download and Place the Missing RAR File
WinRAR needs all parts of a multi-volume archive to complete extraction. This error usually appears when one of the volumes in a set like .part2.rar , .r01 , .r02 , .001 , and similar naming formats is missing . Downloading the missing volume and placing it in the same folder as the other parts allows WinRAR to continue extracting normally .
- Look at the error message or review the list of archive parts in the folder.
- Identify which volume is missing (for example, part2.rar , .r02 , .001 , etc.).
- Go back to the website or source where you downloaded the archive.
- Locate and download the exact missing file using the same naming format as the others.
- Make sure the new file name matches the pattern of the rest. Example: If you have file.part1.rar and file.part3.rar , the missing one must be file.part2.rar .
- Move the downloaded missing volume into the same folder as the other archive parts.
- Confirm that all parts are in a single folder before extracting.
- Right-click the first file in the series (usually part1 or the main .rar file) and select Extract Here or Extract to Folder .
- WinRAR should now detect all volumes and continue extraction normally .
2. Manually Browse & Select the Next Volume
Use this method only if the next volume already exists , but WinRAR is failing to detect it automatically. This can happen due to incorrect naming , the file being in a different location , or a temporary file access issue. Manually browsing helps WinRAR locate the correct volume and resume extraction without interruption .
- Right-click the first file in the series (usually .rar or part1.rar ) and select Extract Here or Extract to Folder .
- When WinRAR cannot find the next volume, it will show the “ Next Volume Is Required ” message.
- A small window will appear, allowing you to manually select the next volume .
- Use the file explorer window to locate the folder where the other archive parts are saved.
- Select the next part based on the naming order (example: select file.part2.rar after file.part1.rar ).
- Make sure the selected file matches the naming format of the archive (no extra characters like (1) and no mismatched numbering).
- WinRAR will resume extraction using the selected volume .
- If additional volumes are missing or stored separately, WinRAR may prompt you again. Repeat the same process until extraction completes.
3. Rename the RAR files in Order
WinRAR relies on a proper naming sequence (such as file.part1.rar , file.part2.rar , file.part3.rar ) to extract multi-volume archives. If a file is named incorrectly, contains extra characters, or is out of order, WinRAR may fail to locate the next volume and show this error. Renaming the files correctly helps WinRAR follow the sequence and extract the archive without interruptions .
Note: Renaming only changes the file name , not the file contents. The goal is to restore the correct sequence so WinRAR can detect the next volume.
- Go to the folder where all the RAR files are saved.
- Make sure all parts of the archive are present and stored in the same folder .
- Check how the parts are currently named . Common patterns include:
file.part1.rar, file.part2.rar, file.part3.rar
file.rar, file.r01, file.r02, file.r03
- Look for files that don’t match the expected numbering pattern (for example, file.part01.rar , file.part1(1).rar , or unrelated names).
- Rename each file so it follows the same order without extra characters or mismatched numbering. Example:
Incorrect: file.part1.rar, file.part3.rar, file.part2(1).rar
Correct: file.part1.rar, file.part2.rar, file.part3.rar
- Make sure the text before the number is exactly the same for all files.
- Only the last part number should change.
- Right-click the first file in the series (usually part1.rar or the main .rar file) and select Extract Here .
- WinRAR should now recognize the sequence and continue extraction normally .
If you still get the same prompt: the archive set is likely incomplete (a part was never downloaded or was removed), or one of the volumes is corrupt and must be re-downloaded from the original source.
