Since its release in 2019, WireGuard has quickly become a popular choice among users due to its secure protocols and seamless interface. Unlike many other VPN protocols that seldom offer the freedom to access sites safely without posing a threat to your privacy, WireGuard has become a lifestyle for more consumers, not just for the tech-geeks.

To find out what makes this VPN Client stand out from the crowd and how you can get started with it, read ahead!
What is WireGuard?
WireGuard is an open-source VPN protocol with state-of-the-art cryptography and algorithms for data protection. Although it was originally designed for the Linux kernel, it has come a long way and can now be downloaded on Windows, iOS, macOS, and Android.
The application uses public and private keys for peers to establish secure point-to-point connections among them. Unlike other VPN protocols, WireGuard doesn’t rely on TLS or Transport Layer Security which makes configuration of a VPN more time-consuming and error-prone.
For all these reasons, WireGuard is streamlined, simple, and easy to use, offering high performance and security to users.
Before proceeding, you must already have a WireGuard configuration file obtained from your VPN service provider. The file contains all the necessary settings to establish a VPN connection like keys, IP addresses, connection preferences, and so on.
Install WireGuard VPN Client on Windows
Installing the WireGuard VPN Client on Windows is fairly easy. The only prerequisite here is that your system runs on a compatible OS i.e. Windows 7, 8, 10, 11. Other than that, you must have administrative access to the computer.
Here’s what you must do:
- First, download the Windows client by visiting the official WireGuard website.
- Once you have downloaded the installer file, open it and follow the on-screen instructions to install the Windows client.
- Then, open WireGuard .
- Click on the Import tunnel(s) from file option.
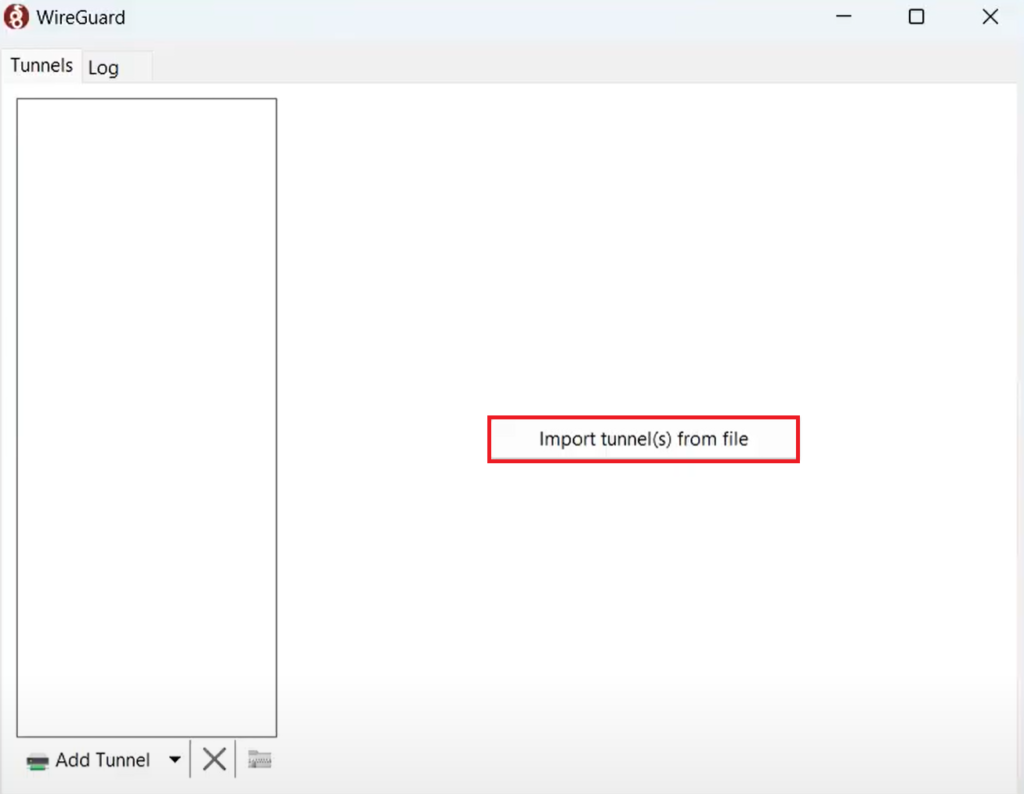
- Select your WireGuard server’s configuration file.
- After it has been imported, click on Activate .
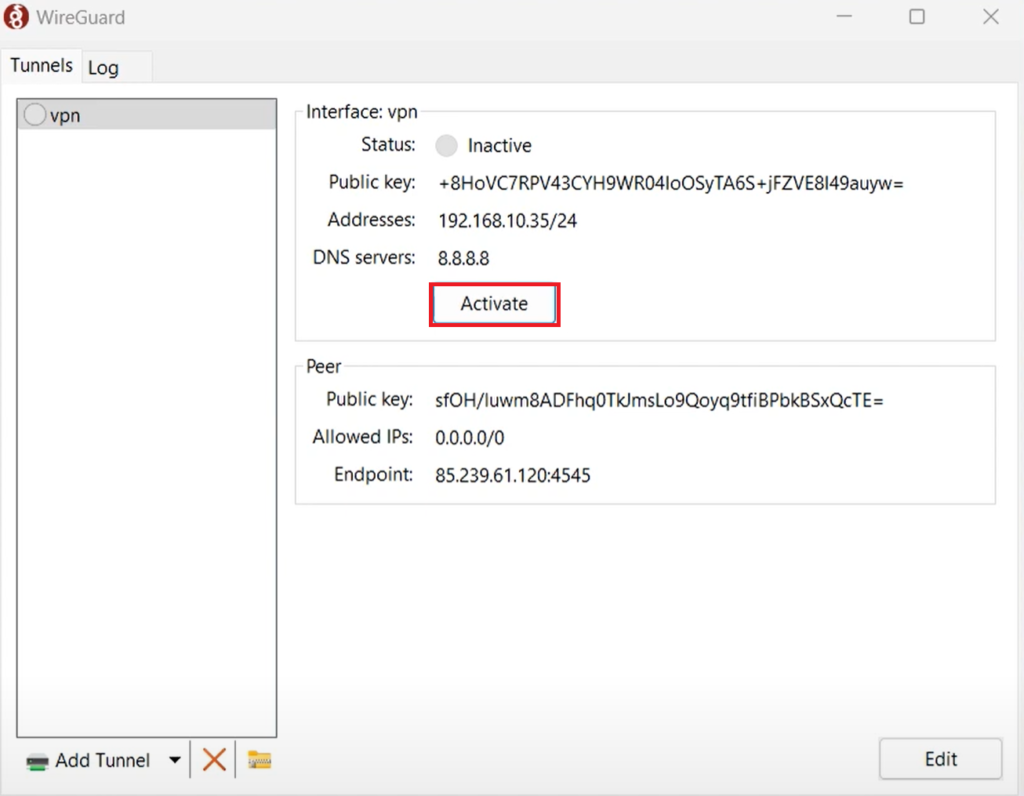
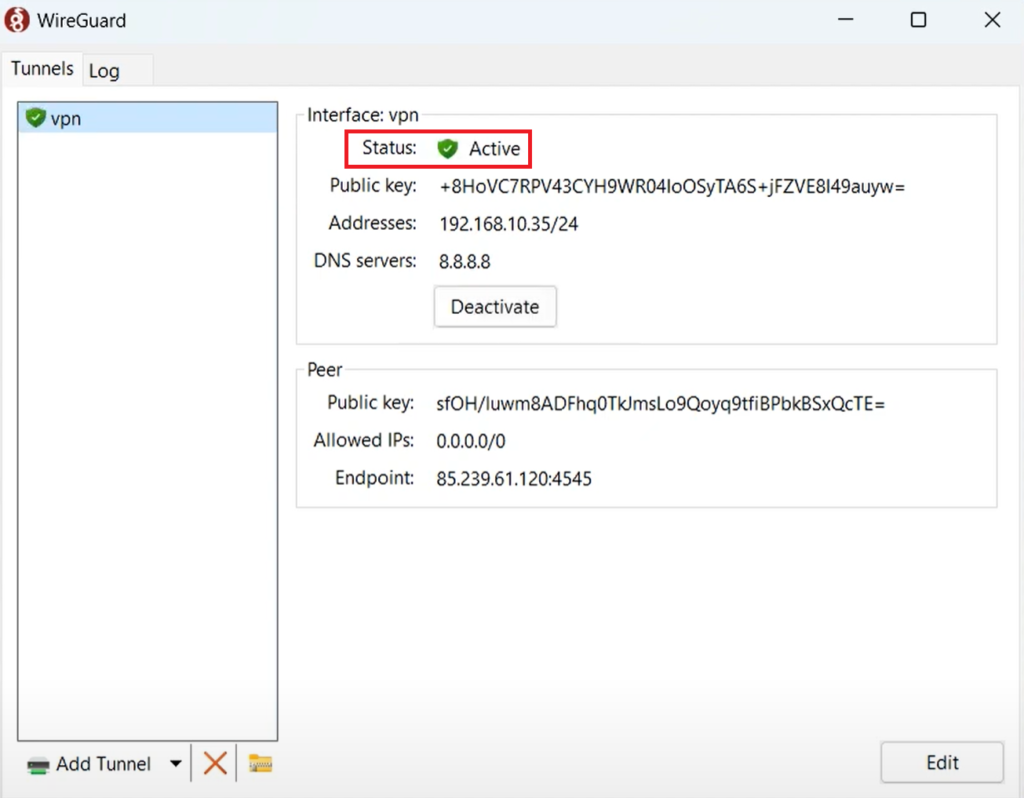
- Once the status reads Active , it means you have managed to establish a connection to the WireGuard server.
Install WireGuard VPN Client on Ubuntu Linux
Installing WireGuard VPN Client on your Linux system also requires administrative privileges. Additionally, Linux WireGuard Client exclusively demands the configuration file name to be under 15 characters. If the limit exceeds in your case, the file will not be read by the client. So, rename the file before you begin.
Here’s what you need to follow:
- Launch the terminal and run the following command to first get the Ubuntu security update:
sudo apt-get update && sudo apt-get upgrade
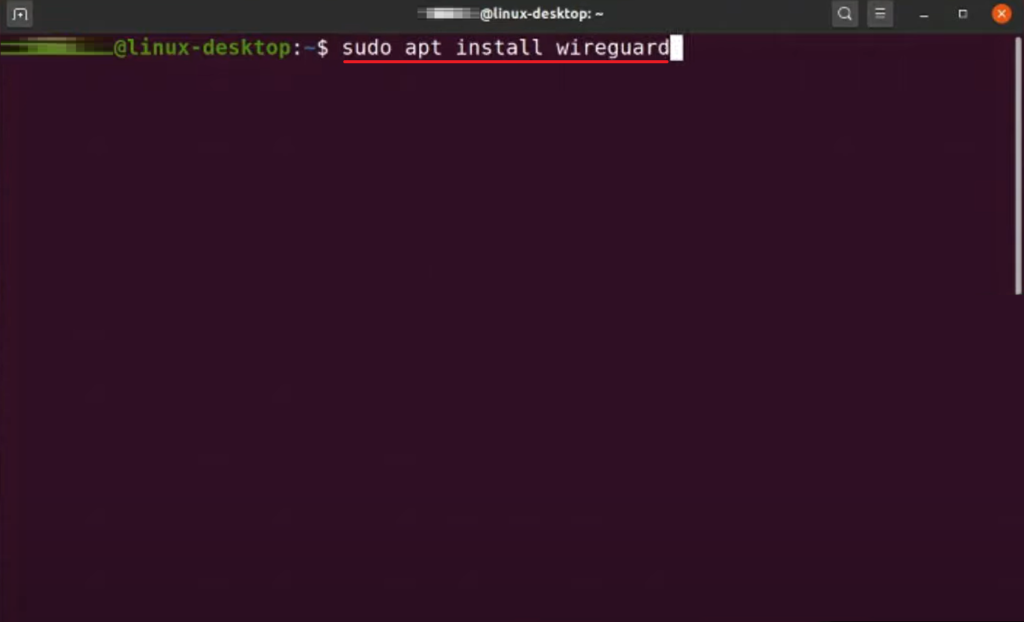
- Next, install WireGuard by executing the following command:
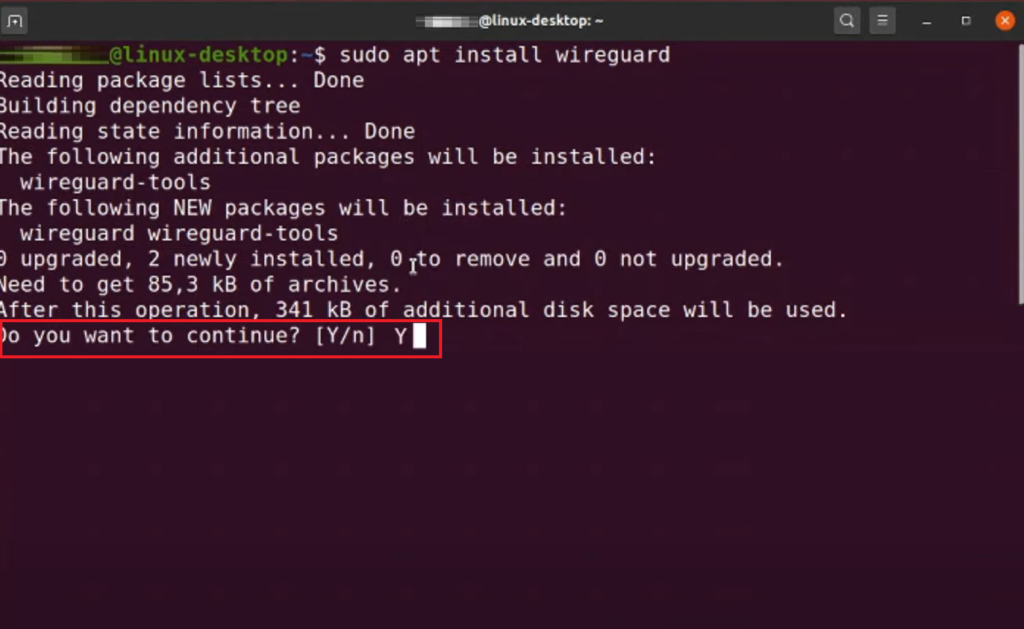
sudo apt-get install wireguard
- You will then be asked if you want to continue. Simply type Y for yes and hit the Enter key .
Install WireGuard VPN Client on macOS
Installing WireGuard on macOS can be done directly from the Apple Store. The process eliminates the need for command-line operations as it utilizes the WireGuard configuration file to set up the VPN connection.
Follow the steps below:
- Launch the Mac Apple Store and search for WireGuard .
- Download the required WireGuard client.
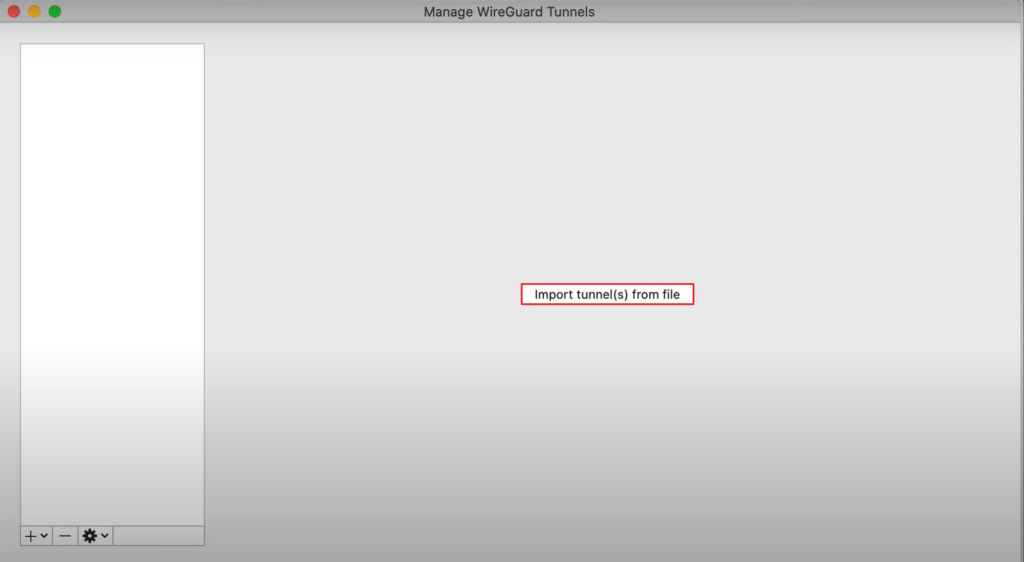
- Once installed, open Wireguard and click on the Import tunnel(s) from file button.
- Locate the configuration file and click on the Import option.
- Now, click on Activate .
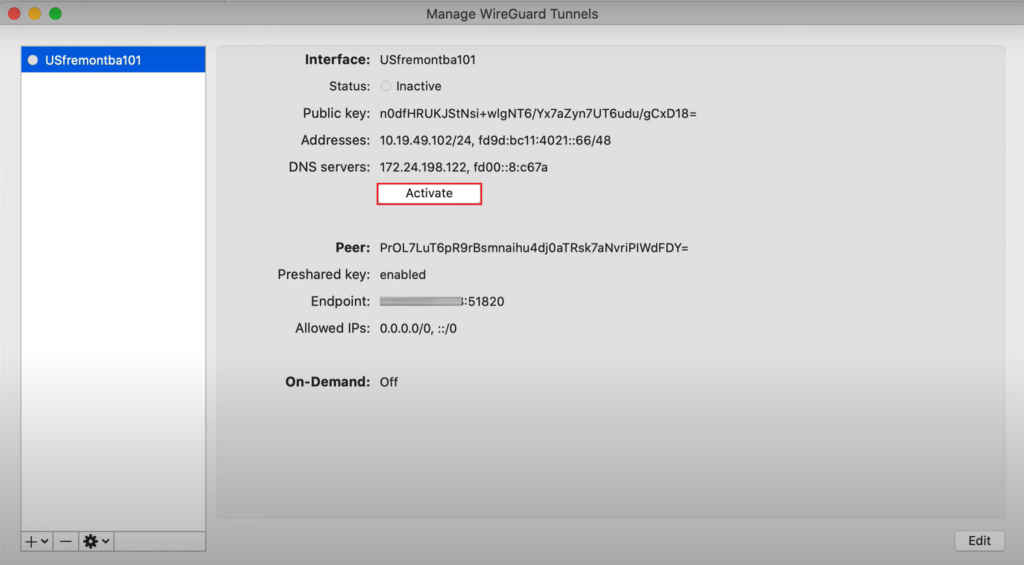
- If the status is Active and green, you have been successfully connected to the server.

Install WireGuard VPN Client on iOS
Since your phones hold almost the same private data as your computer, if not more, it’s essential to use a secure VPN connection on them as well. Fortunately, you can now install the WireGuard VPN Client on an iOS device too.
Here’s how:
- First, go to the Apple Store .
- Download WireGuard and launch it on your iPhone.
- Then, tap on Add a tunnel .
- From the options that appear, select Create from file or archive .

- Now, search for the configuration file on your device and select it.
- After it has been imported, switch on the toggle for VPN activation. To confirm its active status, you should see a VPN icon on your device’s status bar.
Install WireGuard VPN Client on Android
To secure your online activities on your Android, you need a secure VPN connection obtained via WireGuard VPN Client. To proceed, make sure you have an active Google Play Store account as you’ll need to download the WireGuard application from it.
Then, follow the steps below:
- Open the Google Play Store on your device.
- From there, download WireGuard .
- After installation, open the WireGuard client and tap on the + icon.
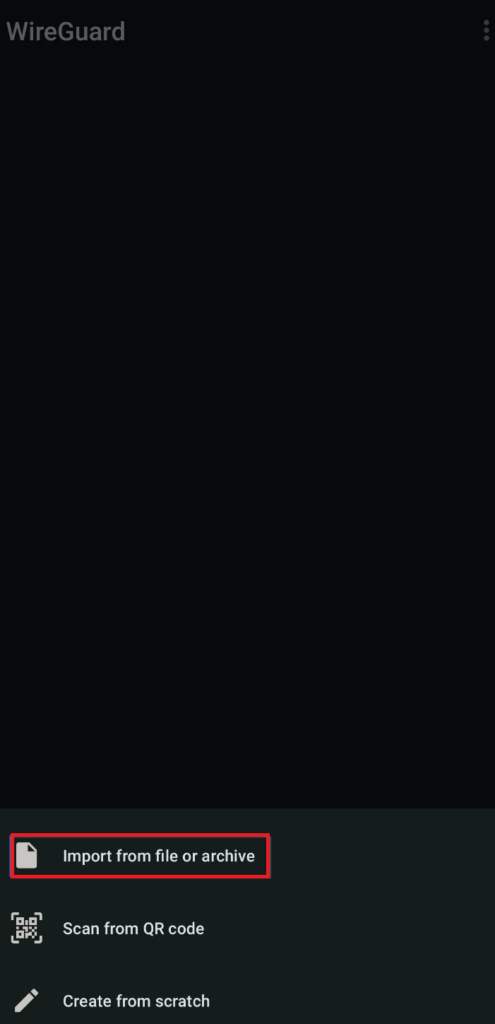
- Then, choose Import from file or archive .
- Browse for your WireGuard server’s configuration file and tap on Select .
- Now, turn on the toggle to activate the VPN. A key icon will also appear on the status bar of your device.
How to Fix “Printer is in an error state” Issue?
The error “ WinRAR Error: Next Volume Is Required ” usually appears when you’re extracting a multi-part RAR archive and WinRAR can’t find (or can’t correctly identify) the next file in the sequence . This often happens when a volume is missing , stored in a different folder , or renamed in a way that breaks the archive’s expected order .

In this guide, we’ll go over the most reliable fixes confirmed by affected users, along with what each method is doing behind the scenes so you can choose the right one for your situation.
Important: To extract multi-volume archives, you should always start extraction from the first file in the set. This is usually file.part1.rar , or (in older sets) the main .rar file that comes before .r01 , .r02 , and so on.
1. Download and Place the Missing RAR File
WinRAR needs all parts of a multi-volume archive to complete extraction. This error usually appears when one of the volumes in a set like .part2.rar , .r01 , .r02 , .001 , and similar naming formats is missing . Downloading the missing volume and placing it in the same folder as the other parts allows WinRAR to continue extracting normally .
- Look at the error message or review the list of archive parts in the folder.
- Identify which volume is missing (for example, part2.rar , .r02 , .001 , etc.).
- Go back to the website or source where you downloaded the archive.
- Locate and download the exact missing file using the same naming format as the others.
- Make sure the new file name matches the pattern of the rest. Example: If you have file.part1.rar and file.part3.rar , the missing one must be file.part2.rar .
- Move the downloaded missing volume into the same folder as the other archive parts.
- Confirm that all parts are in a single folder before extracting.
- Right-click the first file in the series (usually part1 or the main .rar file) and select Extract Here or Extract to Folder .
- WinRAR should now detect all volumes and continue extraction normally .
2. Manually Browse & Select the Next Volume
Use this method only if the next volume already exists , but WinRAR is failing to detect it automatically. This can happen due to incorrect naming , the file being in a different location , or a temporary file access issue. Manually browsing helps WinRAR locate the correct volume and resume extraction without interruption .
- Right-click the first file in the series (usually .rar or part1.rar ) and select Extract Here or Extract to Folder .
- When WinRAR cannot find the next volume, it will show the “ Next Volume Is Required ” message.
- A small window will appear, allowing you to manually select the next volume .
- Use the file explorer window to locate the folder where the other archive parts are saved.
- Select the next part based on the naming order (example: select file.part2.rar after file.part1.rar ).
- Make sure the selected file matches the naming format of the archive (no extra characters like (1) and no mismatched numbering).
- WinRAR will resume extraction using the selected volume .
- If additional volumes are missing or stored separately, WinRAR may prompt you again. Repeat the same process until extraction completes.
3. Rename the RAR files in Order
WinRAR relies on a proper naming sequence (such as file.part1.rar , file.part2.rar , file.part3.rar ) to extract multi-volume archives. If a file is named incorrectly, contains extra characters, or is out of order, WinRAR may fail to locate the next volume and show this error. Renaming the files correctly helps WinRAR follow the sequence and extract the archive without interruptions .
Note: Renaming only changes the file name , not the file contents. The goal is to restore the correct sequence so WinRAR can detect the next volume.
- Go to the folder where all the RAR files are saved.
- Make sure all parts of the archive are present and stored in the same folder .
- Check how the parts are currently named . Common patterns include:
file.part1.rar, file.part2.rar, file.part3.rar
file.rar, file.r01, file.r02, file.r03
- Look for files that don’t match the expected numbering pattern (for example, file.part01.rar , file.part1(1).rar , or unrelated names).
- Rename each file so it follows the same order without extra characters or mismatched numbering. Example:
Incorrect: file.part1.rar, file.part3.rar, file.part2(1).rar
Correct: file.part1.rar, file.part2.rar, file.part3.rar
- Make sure the text before the number is exactly the same for all files.
- Only the last part number should change.
- Right-click the first file in the series (usually part1.rar or the main .rar file) and select Extract Here .
- WinRAR should now recognize the sequence and continue extraction normally .
If you still get the same prompt: the archive set is likely incomplete (a part was never downloaded or was removed), or one of the volumes is corrupt and must be re-downloaded from the original source.
