The ‘ An error occurred during port configuration ‘ occurs when the Printer port is either in use or the Printer Driver installed is corrupt, or outdated.
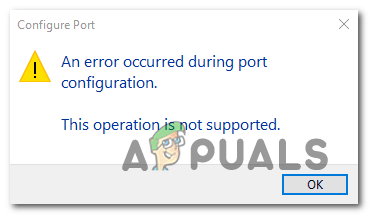
An error occurred during port configuration
What’s causing the port configuration error?
- Glitched printer menu – As it turns out, this particular issue might occur due to a common glitch that is interfering with the port configuration of wireless connected printers on Windows 10. In this case, you can resolve the issue by configuring the port via the classic Control Panel menu.
- The printer is stuck in a limbo state – Another potential scenario that will cause this issue is a printer that’s currently stuck in a limbo state (operating system isn’t aware that it’s turned on). If this scenario is applicable, you can get the issue fixed by performing a hard reset on your printer.
- 3rd party firewall interference – As it turns out, another potential scenario in which you might be prevented from accessing the Port Configuration menu is if an overprotective 3rd party firewall prevents it. In this case, you can eliminate the interference by uninstalling the firewall that’s causing the problem.
Method 1: Configuring the port via Device & Printers screen
While this is more of a workaround than an actual fix, it has helped a lot of users to avoid the ‘ An error occurred during port configuration’ altogether. But keep in mind that the steps below will only work if you encounter the error while trying to configure your printer ports.
Note: If you encounter the issue while trying to print a file, move directly to Method 2 .
As it turns out, if you circumvent the issue by trying to configure the printer ports from the classic Control Panel interface, chances are you will not encounter the same error message.
Here’s a quick guide on how to do this:
- Press Windows key + R to open up Run dialogue box. Next, inside the window, type ‘control.exe’ and press Enter to open up the classic Control Panel interface. If you’re prompted by the UAC (User Account Control) , click Yes to grant administrative privileges. Running the Control Panel
- Once you’re inside the classic Control Panel interface, use the search function in the top-right corner to search for Devices & Printers . Once the results show up, click on Device & Printers . Accessing the Devices & Printers tab
- Once you’re inside the Device & Printers menu, right-click on the printer that you’re having issues with and choose Printer Properties from the newly appeared menu. Accessing the Printer Properties screen
- Once you’re inside the Properties screen of your printer, select the Ports tab from the menu at the top. Next, select your printer from the list of ports and click on Configure Port… Accessing the Port Configuration menu via Printer Properties screen
- See if you are able to see the next menu without encountering the An error occurred during port configuration’.
If the issue is persisting, move down to the next method below.
Method 2: Doing a printer hard reset
If you’re encountering this issue while trying to use your printer driver , chances are you will be able to resolve the issue swiftly by doing a hard reset procedure on your printer.
This might not be the most focused approach, but it’s a cure-all that a lot of users have successfully used to fix port configuration issues that ended up throwing the ‘ An error occurred during port configuration ‘ error.
Here’s a quick guide on doing a hard reset on your printer:
- Turn your printer on (if it’s not already on) and wait until it enters idle mode (it completes the startup procedure).
- With the printer fully turned on, physically disconnect the power cord from the rear of the printer.
- Unplug the power cord from the wall outlet and wait at least 60 seconds. Unplugging from the socket
- After that time period has passed, plug the power cord back into the wall outlet and reconnect the power cord to the rear of your printer port.
- Turn on your printer again and wait until it enters idle mode again. Note: Wait until the printer finishes the initial warm-up period. With most manufacturers, the lights will continue flashing until this operation is complete.
- Repeat the operation that was previously causing the ‘ An error occurred during port configuration ‘ error and see if the issue is now resolved.
If the same issue is still occurring, move down to the next method below.
Method 3: Disable 3rd party firewall interference (if applicable)
According to various users that also encountered this problem, an overprotective firewall can also be responsible for the apparition of this particular error.
As it turns out, certain AV suite (particularly firewall modules) will not trust external devices so they will prevent new connections from being established. This is typically reported to occur with printers that are not fully compatible with Windows 10. Several Windows 10 users that encountered this problem have confirmed that they were able to fix the problem by uninstalling the 3rd party firewall component that is causing the problem.
If you’re currently using a 3rd party firewall and you suspect that this might be causing this problem, follow the steps on this article ( here ) to uninstall it completely and ensure that you’re not leaving behind any leftover files that will still cause this behaviour.
After you uninstall the restart your computer and repeat the action at the next computer startup to see if the issue is still occurring.
If you’re still seeing the ‘ An error occurred during port configuration ‘ error or this method wasn’t applicable to your scenario, move down to the next potential fix below.
How to Fix “Printer is in an error state” Issue?
The error “Printer not responding” usually arises the printer doesn’t respond to the requests send by your computer because of incorrect configurations, hardware faults, or some unresponsive services.
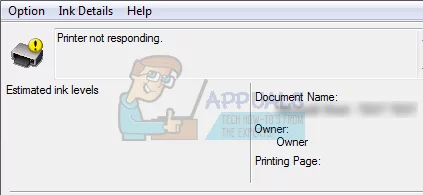
The error is a common one and occurs to users all the time. Sometimes, just restarting the printer fixes the problem while sometimes you have to completely reinstall the printer drivers. The error may have different solutions depending on the hardware configuration of each computer. We have listed down a number of different workarounds available. Start with the first one and work your way down.
Solution 1: Checking Hardware
Before we move on to troubleshooting, it is wise to perform all the hardware checks. Make sure that the printer is properly connected to your computer via a wired connection or through the wireless network. Try changing cables or resetting the wireless network to see if they make any difference
Restart your printer, router, and computer and let them power down completely. Remove the cables and keep them like this for a couple of minutes before plugging everything back in. Try printing something using another computer and see if printing is successful there. If it is, it means that there is a problem in your computer connecting to the printer. You can move on to the other solutions listed.
Solution 2: Restarting Spooler Service
The spooler service is a software program which is responsible for managing all print jobs being sent to the computer printer. The print spooler service is usually visible to users and they can also cancel a print job which is being processed. It also allows them to manage jobs which are currently on the waitlist.
We can try restarting this service and check if this solves the problem.
- Press Windows + R to launch the Run application. Type “ services. msc ” in the dialogue box and press Enter.
- Locate the service “ Print Spooler ” present in the list of services. Double-click it to open its properties. Click the “ Stop ” button present underneath system status and press “ Ok ” to save changes.

- Since we have disabled the service, we can now focus on deleting printer files. Press Windows + E to launch the quick access and click on “ This PC ” present in the left navigation pane.
- Navigate to the following path:
C:\Windows\System32\spool\PRINTERS

Permission might be needed to access the following folder. If prompted, press Continue.
- Once in the folder, delete all the files in the PRINTERS folder and close the window.
- Now navigate back to the Services tab and Start the “ Printer Spooler ” service. Also, remember to keep the startup type as “ Automatic ”.

- Restart your computer and check if the printer connects correctly.
Solution 3: Running the Printer Troubleshooter
It is worth a shot running the Printer Troubleshooter. Windows has an inbuilt collection of troubleshooters meant to troubleshoot problems in various categories. We can try running the printer troubleshooter and check if it detects any problems and fixes them.
- Press Windows + R , type “ control panel ” in the dialogue box and press Enter.
- Type “ troubleshoot ” in the search bar of the control panel at the top right side of the window.

- Select “ Troubleshooting ” heading from the list of results returned.

- Once in the troubleshooting menu, click “ View all ” present on the navigation pane at the left side of the window. Now Windows will populate all the troubleshooters available on your computer.

- Navigate through the options until you find “ Printer ”. Click it.

- Check both the options “ Run as administrator ” and “ Apply repairs automatically ”. These options will ensure that you find maximum problems and the repairs are applied fast as well.

- Follow the on-screen instructions and wait for the troubleshooting to complete.
Solution 4: Configuring to Correct Port
It is possible that your printer isn’t connected to the correct port on your computer hence it is going into an unresponsive state again and again. We can try configuring the printer ports using the control panel and see if it makes any difference. You can always revert the changes if this solution doesn’t work for you.
- Press Windows + S , type “ devices and printers ” and open the control panel application.

- Right-click on your printer and select “ Printer properties ”.

- Navigate to the ‘ ports’ Navigate through the list of all the ports available and tick the checkbox where your printer is listed . In this case, “Brother DCP-1610W series” is listed in USB001. Make sure it is checked. After making the necessary changes reboot your computer and check if the problem got solved.

Solution 5: Updating Printer Drivers
If all the above solutions don’t work, we can try updating the printer drivers. You should navigate to the manufacturer’s website and download the latest printer drivers available. Make sure to download the exact drivers meant for your printer. You can look for the model number present on the front of your printer or in its box.
Note: There are few cases where a newer driver doesn’t work. In that case, download an older version of the driver and install it using the same method described below.
- Press Windows + R to launch the Run Type “ devmgmt.msc ” in the dialogue box and hit Enter. This will launch your computer’s device manager.
- Navigate through all the hardware, open the sub-menu “Print queues”, right click on your printer hardware and select “ Update driver ”.

- Now Windows will pop a dialogue box asking you which way do you want to update your driver. Select the second option ( Browse my computer for driver software ) and proceed.
Select the driver file you downloaded using the browse button when it appears and update it accordingly.

- Restart your computer and check if the problem gets resolved.
Note: If you can’t update the drivers manually, you can also select the first option “Search automatically for updated driver software”. This option will make Windows search the web automatically and select the best driver out there.
The Printer driver is unavailable error indicates that the driver installed for your printer is incompatible, outdated, or corrupted. As a result, the computer is unable to recognize it.

When the computer cannot recognize or interact with the printer driver, you are prevented from printing. Fortunately, this common issue in the printing world is often resolvable with a few adjustments. Explore the solutions below to fix the problem.
1. Run the Printer Troubleshooter
Windows Printer troubleshooter goes through your system, identifies any issues with the printer’s connectivity or configuration, and attempts to automatically fix them. It’s an optimized solution that can resolve the issue without requiring extensive technical knowledge from the user. By simply running the troubleshooter, you set in motion a process that could bring your printer back to operational status in no time.
- Navigate to Settings > Update & Security > Troubleshoot .
- Click on Additional troubleshooters and then select Printer .
- Choose to Run the troubleshooter and follow the on-screen instructions.
2. Make Sure the Print Spooler Service Is Running
Print Spooler service is an essential background process that manages the print queue and interfaces with your printer. If it’s stopped, your print jobs won’t be processed. Making sure that the Print Spooler is active and running smoothly can restore this critical link, allowing your pending documents to reach the printer once again.
- Press Windows + R , type services.msc , and hit Enter.
- Find and right-click Print Spooler , then choose Restart . If the service is not running, select Start .
3. Verify the Correct Printer Is Set as Default
When the wrong device is set as default, documents sent for printing may go to a different printer or not print at all. By making sure the right printer is set as default, you align the print jobs with the intended device, effectively clearing a common issue that could be mistaken for a driver issue.
- Open the Control Panel and navigate to Hardware and Sound.
- Go to Devices and Printers .
- Right-click on the intended printer and select Set as default printer .
4. Download Drivers from the Manufacturer’s Website
When original equipment manufacturers (OEMs) release new drivers, they make sure the software is optimized to facilitate smooth communication between your system and the printer. By hand-picking the most recent drivers released for your exact printer model and operating system, you not only guarantee compatibility but also get potential enhancements and critical fixes that resolve known issues.
- Visit your printer manufacturer’s official website.
- Locate the Support or Downloads area.
- Use the site’s search function or navigation tools to find the appropriate drivers for your printer model and operating system.
- Download the driver that is compatible with your printer.
- Run the downloaded installer file and follow the on-screen instructions to complete the setup.
By sourcing drivers directly from the manufacturer, you reduce the likelihood of encountering compatibility issues that can occur from using incorrect drivers.
If you are unable to locate the correct drivers, you might consider using a driver updater tool for automated updates. Here are the 5 best driver updater programs for Windows .
5. Uninstall the Printer Driver
Uninstalling the printer driver removes any existing software conflicts or corruption that might be blocking communication between your printer and computer. By reinstalling, you make sure that the most compatible and up-to-date drivers are in place, which can often resolve the issue and restore your printer’s functionality.
Press Windows + R, enter control into the dialogue box, and hit Enter. Make sure the Control Panel is set to View by: Large icons , then click Devices and Printers .
Right-click on the problematic printer and choose Remove device .
Reopen the Run box with Windows + R, type devmgmt.msc, and go to Print queues . If your printer is displayed, right-click it and select Uninstall device .
Type appwiz.cpl after pressing Windows + R and hit Enter. Uninstall any software related to your printer.
Detach your printer from your computer or router, shut everything down, and unplug their power cords.
After about 10 minutes, reconnect and power up all devices. Initially, link the printer to your computer via USB to allow automatic driver installation.
In the Control Panel, right-click on the printer and select Set as default printer . Test the printer to determine if the issue has been fixed.
6. Install the Latest Drivers Manually
If reinstalling the printer does not solve the problem, you might need to update the drivers manually. For example, following a Windows update, printer functionality might be disrupted; this was notably the case with some HP printers. To prevent such issues, download the specific drivers for your hardware from the manufacturer’s site and disable Windows from updating drivers automatically.
Open Device Manager by pressing Windows + R and typing devmgmt.msc .
Navigate to Print queues , right-click on your printer, and select Update driver .
Choose Browse my computer for driver software when prompted about how to update your driver.
Select the downloaded driver file using the browse feature to update it accordingly. Note: If your printer doesn’t appear in Device Manager, run the driver installer you’ve downloaded for automatic installation.
After confirming the printer is functional, download wushowhide.diagcab from the official Microsoft website.
Run the package and click Next .
Choose Hide updates .
Select any shown printer updates and continue. This action prevents Windows Update from automatically updating your printer’s drivers unless you approve it.
7. Install Generic Printer Driver
If previous methods have failed and your printer is undetected by your computer or appears as an “Unknown device” , you might need to install a default generic printer driver manually.
These universal drivers are designed to work with a wide range of printers and provide basic printing capabilities. Although they may not enable all the advanced features of your device, they ensure that your printer is operational and can perform the basic tasks, thereby allowing you to continue printing while you seek a more permanent fix or support from the manufacturer.
Press the Windows key and hold it, then press X . Choose Device Manager .
In Device Manager , locate your printer. If you cannot find it there, check under Unknown Devices . Locating your Printer
Right-click on your printer and choose Update Driver .
Select the Browse my computer for drivers option. Installing Default Driver
Choose Let me pick from a list of available drivers…. and then select Generic Software Device .
Click Next and restart your computer. Be aware that this generic driver may not support all the functionalities of your printer, but it will enable basic operation. Installing Generic Driver
8. Contact Manufacturer Support
Manufacturer support teams have specialized knowledge and access to advanced troubleshooting techniques that might not be available to the general public. By contacting them, you might receive personalized guidance, firmware updates, or even learn about known issues with specific drivers.
In some cases, they might offer remote assistance or direct you to a service center if a hardware issue is suspected.
