The error message “Word could not create the work file. Check the temp environment variable,” occurs when a user is saving, opening, or previewing a Word document. This indicates that the temp environment variable was either added incorrectly or not present from the beginning.
The main cause of this error message is corrupted or incorrectly located temporary internet files. If this is the case, then MS Word will not be able to process them, and hence your documents will not be saved or opened.

To solve this issue, first, you can easily change the location of the temporary internet files to C:\Users(Your Username)\AppData\Local\Microsoft\Windows\INetCache. Replace (Your Username) with the one you have on your PC.
Secondly, users can repair corrupt files by running the SFC and CHKDSK scans.
This also occurs when a user installs 64-bit Office and then uninstalls it to install the 32-bit version. Therefore, it is recommended to keep 64-bit MS Office on 64-bit Windows.
That being said, there are a total of 8 fixes for this problem, and all of them guarantee the complete elimination of this error.
1. Run the SFC and CHKDSK scans.
The SFC command will conduct a thorough scan of your PC, searching for any corrupt or faulty files to repair or replace them. This process occurs automatically, so users simply need to execute the command.
Similarly, the CHKDSK (Check Disk) command will scan your SSDs and hard drives to enhance their performance. Essentially, it will repair the bad sectors on the hard disks that might be causing the “Word could not create the work file” error.
Here is how to run the SFC and CHKDSK scans :
- Type CMD in the Windows search bar.
- Select Run as Administrator below the command prompt.
- Now press Enter after typing: sfc/scannow

- Wait for the scan to complete.
- Afterward, press Enter again after typing: chkdsk C: /f

- This will scan your C drive . For other disks, just replace the ‘ C ‘ with their corresponding letter.
- Open the Word file after the scan is complete.
2. Add a new environment variable.
Environment variables are specific values that play an important role in running any program. These variables store data used by these programs and determine how a process operates on your operating system. They are also responsible for locating the storage location for temporary files.
Therefore, if there is something wrong with the environment variables, the document files will neither open nor save. In this case, you should add a new environment variable, and here is how to do that:
- Open ‘ Run ‘ by pressing the ‘ Win ‘ + ‘ R ‘ keys simultaneously.
- Click OK after typing: sysdm.cpl

- Navigate to Advanced > Environment Variables .

- Click New in the User Variables section.

- Next to the Variable name , type: %userprofile%
- Next to Variable value , type: C:\Users\”username” (Replace “username” with your username on the computer)

- Click OK to add the new environment variable .
- Restart your PC or laptop and try to open or save a Word file now.
3. Create a temporary internet files folder.
The temporary internet files folder also serves as a cache folder, where temporary work files are stored while using Microsoft Word. If the folder goes missing by any chance, it is evident that Word will not be able to save the files, resulting in the “Word could not create the work file” error.
Here’s how you can create a temporary Internet files folder:
- Run the Command Prompt as an administrator .
- Hit Enter after typing the following commands sequentially: cd /d %USERPROFILE%\AppData\Local\Microsoft\Windows\INetCache MD Content.Word

Note : In this case, the Content.Word folder was already present. However, if it had not been, this command would have created a new one.
- Restart your PC and access the Word documents now, without any problem.
4. Change the location of temporary internet files.
Setting the correct location for the temporary internet files is necessary; otherwise, Word cannot locate them and will display the work file error.
Fortunately, the steps for this method are pretty straightforward, as follows:
- Open Run with Win + R and type: inetcpl.cpl
- Click on OK to open the Internet Properties menu.
- Click on Settings under the Browsing history section in the General tab .

- Now, the Website Data Settings dialog box will open.
- Click on Move folder in the Temporary Internet Files tab.

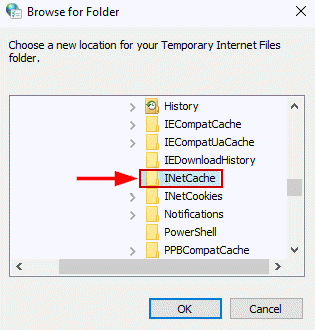
- Navigate to C:\Users\”user name”\AppData\Local\Microsoft\Windows in the Browse for folder window. Here “username” will be replaced by your username folder .

- Expand the Windows folder and click on INetCache to select this location.
- Click on OK and exit the settings.
- Restart your computer and the error will be gone now.
5. Increase the disk space for temporary Internet files.
Low disk space for temporary internet files is sometimes insufficient, causing MS Word to be unable to create the work files. To resolve this issue, users simply need to increase the disk space in the Internet Explorer settings.
Go through the following steps for this method:
- Open Run and type: inetcpl.cpl

- Click OK .
- In the General tab , select the Settings option under the Browsing history portion.
- Now increase the Disk space to 1024 MB .

- Click OK to save the changes and exit the settings.
- Now, open, save, or preview the Word documents to determine whether the error has disappeared or not.
6. Disable the preview feature for Microsoft Word.
Disabling the preview for Microsoft Word requires you to delete a specific registry subkey from the registry editor. This will fix the ‘Word could not create the work file’ issue; however, make sure to back up your registry settings in case something goes wrong. Incorrect registry settings can lead to many problems.
Anyway, here are the steps to disable the preview for MS Word:
- Open Run and hit Enter after typing: regedit

- Press Ctrl + F to open the search console .
- Click on Find Next after pasting the following subkey: HKCR\CLSID{84F66100-FF7C-4fb4-B0C0-02CD7FB668FE}

- Wait until the search is complete.
- Delete the subkey if found, and close the Registry Editor.
- Finally, restart your computer, and the Word files will open and save normally now. However, you’ll have to compromise on the preview option.
7. Change the value data of MS Word in the registry.
If the value data of AppData or Cache has been modified in the registry or entered incorrectly, the work file error will occur. Its value should be set correctly in order for Microsoft Word to function normally. For this method, we will once again utilize the Registry Editor to make the changes as follows:
- Open Run , and after typing “ regedit ,” hit OK .
- Click Yes on the next dialog box to open the Registry Editor.
- Enter the following address in the address bar: HKEY_CURRENT_USER\SOFTWARE\Microsoft\Windows\CurrentVersion\Explorer\User Shell Folders
- Now look for AppData and double-click on it.
- If its value date has been changed, then enter this: %USERPROFILE%\AppData\Roaming

- Similarly, double-click on Cache and make sure the value data is: %USERPROFILE%\AppData\Local\Microsoft\Windows\INetCache

- Click OK and exit the Registry Editor.
- Lastly, restart your PC and check whether the error has been addressed.
8. Re-register the Word files.
Executing this method will re-register the Word files and fix the issues related to them. Once the registration is done, you will be able to work with the Word documents without any issues. Secondly, this is not a time-consuming process and will only take a minute or two.
- Press Win + R to open Run .
- In the Open: box, type: winword.exe /r

- Wait for the registration to complete, and start working on Word conventionally like before.
How to Fix “Printer is in an error state” Issue?
The error “ WinRAR Error: Next Volume Is Required ” usually appears when you’re extracting a multi-part RAR archive and WinRAR can’t find (or can’t correctly identify) the next file in the sequence . This often happens when a volume is missing , stored in a different folder , or renamed in a way that breaks the archive’s expected order .

In this guide, we’ll go over the most reliable fixes confirmed by affected users, along with what each method is doing behind the scenes so you can choose the right one for your situation.
Important: To extract multi-volume archives, you should always start extraction from the first file in the set. This is usually file.part1.rar , or (in older sets) the main .rar file that comes before .r01 , .r02 , and so on.
1. Download and Place the Missing RAR File
WinRAR needs all parts of a multi-volume archive to complete extraction. This error usually appears when one of the volumes in a set like .part2.rar , .r01 , .r02 , .001 , and similar naming formats is missing . Downloading the missing volume and placing it in the same folder as the other parts allows WinRAR to continue extracting normally .
- Look at the error message or review the list of archive parts in the folder.
- Identify which volume is missing (for example, part2.rar , .r02 , .001 , etc.).
- Go back to the website or source where you downloaded the archive.
- Locate and download the exact missing file using the same naming format as the others.
- Make sure the new file name matches the pattern of the rest. Example: If you have file.part1.rar and file.part3.rar , the missing one must be file.part2.rar .
- Move the downloaded missing volume into the same folder as the other archive parts.
- Confirm that all parts are in a single folder before extracting.
- Right-click the first file in the series (usually part1 or the main .rar file) and select Extract Here or Extract to Folder .
- WinRAR should now detect all volumes and continue extraction normally .
2. Manually Browse & Select the Next Volume
Use this method only if the next volume already exists , but WinRAR is failing to detect it automatically. This can happen due to incorrect naming , the file being in a different location , or a temporary file access issue. Manually browsing helps WinRAR locate the correct volume and resume extraction without interruption .
- Right-click the first file in the series (usually .rar or part1.rar ) and select Extract Here or Extract to Folder .
- When WinRAR cannot find the next volume, it will show the “ Next Volume Is Required ” message.
- A small window will appear, allowing you to manually select the next volume .
- Use the file explorer window to locate the folder where the other archive parts are saved.
- Select the next part based on the naming order (example: select file.part2.rar after file.part1.rar ).
- Make sure the selected file matches the naming format of the archive (no extra characters like (1) and no mismatched numbering).
- WinRAR will resume extraction using the selected volume .
- If additional volumes are missing or stored separately, WinRAR may prompt you again. Repeat the same process until extraction completes.
3. Rename the RAR files in Order
WinRAR relies on a proper naming sequence (such as file.part1.rar , file.part2.rar , file.part3.rar ) to extract multi-volume archives. If a file is named incorrectly, contains extra characters, or is out of order, WinRAR may fail to locate the next volume and show this error. Renaming the files correctly helps WinRAR follow the sequence and extract the archive without interruptions .
Note: Renaming only changes the file name , not the file contents. The goal is to restore the correct sequence so WinRAR can detect the next volume.
- Go to the folder where all the RAR files are saved.
- Make sure all parts of the archive are present and stored in the same folder .
- Check how the parts are currently named . Common patterns include:
file.part1.rar, file.part2.rar, file.part3.rar
file.rar, file.r01, file.r02, file.r03
- Look for files that don’t match the expected numbering pattern (for example, file.part01.rar , file.part1(1).rar , or unrelated names).
- Rename each file so it follows the same order without extra characters or mismatched numbering. Example:
Incorrect: file.part1.rar, file.part3.rar, file.part2(1).rar
Correct: file.part1.rar, file.part2.rar, file.part3.rar
- Make sure the text before the number is exactly the same for all files.
- Only the last part number should change.
- Right-click the first file in the series (usually part1.rar or the main .rar file) and select Extract Here .
- WinRAR should now recognize the sequence and continue extraction normally .
If you still get the same prompt: the archive set is likely incomplete (a part was never downloaded or was removed), or one of the volumes is corrupt and must be re-downloaded from the original source.
