OBS Studio is a free, open-source software that is meant for professional video streaming. It has support for Windows and macOS, both. OBS Studio is very popular and preferred by end-game gamers because of its functionality to tweak videos and micromanage different modules.

OBS Display Capture not Working Fix
One feature of OBS Studio is the Display Capture. We received several reports of users where they couldn’t capture all the aspects of their screen because the module was not working properly. In this article, we will go through all the possible causes as to why these issues occur and also look at the workarounds used to fix them.
What causes OBS Display Capture, not to Work?
We across several different configurations of hardware and computers from various users. After experimenting and analyzing, we came to the conclusion that there were several different reasons as to why this issue occurs. Here are some of them listed for you.
- Specified GPU: If you have a dedicated graphics system installed, it means that you have two graphics options; dedicated and onboard graphics. OBS must be properly configured to run on your dedicated graphics.
- Version issues: OBS was seen having issues after a number of updates in Windows 10. Although the bug was fixed for several users, there were still cases where it wasn’t. Reverting to an older version fixes the issue.
- Outdated drivers: OBS and the game you are capturing, both require that your graphics are updated to the latest build. If they are problematic or outdated, you would experience issues.
- Administrator issues: Since OBS captures your entire screen along with the audio, there are instances where it comes to a halt because the required permissions were not granted. Providing elevated access usually fixes the problem.
Before we start with the solutions, make sure that you save your unsaved work from OBS since we will be resetting the application as well. Also, make sure that you are logged in as an administrator. You can also try running the OBS as an administrator before changing any settings on your computer as many people reported that it fixed the issue for them.
1. Changing the Preference of Dedicated Graphics
Usually, people who use OBS already have dedicated graphics installed on their computers because of the extensive operations required to play the games. According to our survey and the response of moderators, we came to know that OBS should be running in the dedicated graphics (not the stock Intel one) if you are using it for gaming. To sum up, if OBS is running on adapter A, and an image is being drawn on adapter B, you will get a black screen when trying to capture it.
Since in most cases, the game is being played in dedicated graphics (such as NVIDIA), it would only make sense to add OBS to NVIDIA as well. Your case might be different so change the steps accordingly.
- Right-click anywhere in your Desktop and select the NVIDIA control panel .

Changing Preference of Graphics for OBS
- Once the control panel is opened up, click on Manage 3D Settings . Now click on Program settings .
- Now, you will see a drop-down containing the list of all programs. Add OBS and select NVIDIA (Dedicated graphics) from the second drop-down.
- Save changes and exit. Restart your computer and try using Display Capture.
2. Granting Administrative Access
OBS captures the screen of your gameplay or window and transmits it to the entire world. There are several cases where your computer might not allow repeated behavior and block OBS’s activities. Hence, you should make sure that OBS is starting up as an administrator with elevated access. To do this, make sure that you are logged in as an administrator.
- Press Windows + E to launch the File Explorer. Now navigate to the directory where OBS Studio is installed on your computer. The default install location is inside Local Disk C’s Program Files.
- Once you are in the installation directory, right-click on the application’s executable and select Properties .
- Once in Properties, click on the Compatibility tab and check the option which says Run this program as an administrator .
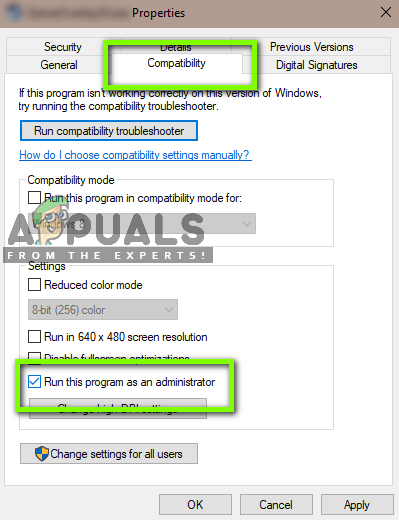
Running OBS as Administrator
- Press Apply to save changes and exit. Now try running OBS again and check if the issue is resolved.
Note: If this doesn’t work, you can always try running the application in compatibility mode for Windows 8 or 8.1 (depends on your case).
3. Using Compatibility Mode in OBS
OBS comes with a compatibility mode which is a workaround to issues like these. Here, it is not recommended that you use compatibility mode using the game capture. Instead, in Display capture, you can enable the compatibility mode to ensure that a capture goes through.

Running OBS in Compatibility mode
Hence, whenever you capture, make sure that you check the option of Compatibility mode . The drawback of enabling this mode is that when this is enabled, everything goes through your RAM to your GPU which means a great performance loss. In normal cases, everything stays within your GPU memory which is very fast.
Note: Make sure that you use the compatibility mode as the last resort when nothing else is working.
4. Reinstalling OBS Studio
Since OBS is open-source and free to use, there are instances when the application does not appear to be stable and has various bugs induced in it. Furthermore, it was also seen that specific versions of OBS Studio had issues within them which cause bizarre issues like Display Capture not working as expected.
In this solution, we will uninstall the current copy of OBS Studio and after restarting, install the latest version. All user data will be deleted so make sure that you have saved all your work.
- Press Windows + R, type “ appwiz.cpl ” in the dialogue box, and press Enter.
- Once in the application manager, search the entries for OBS Studio. Right-click on the application and select Uninstall .
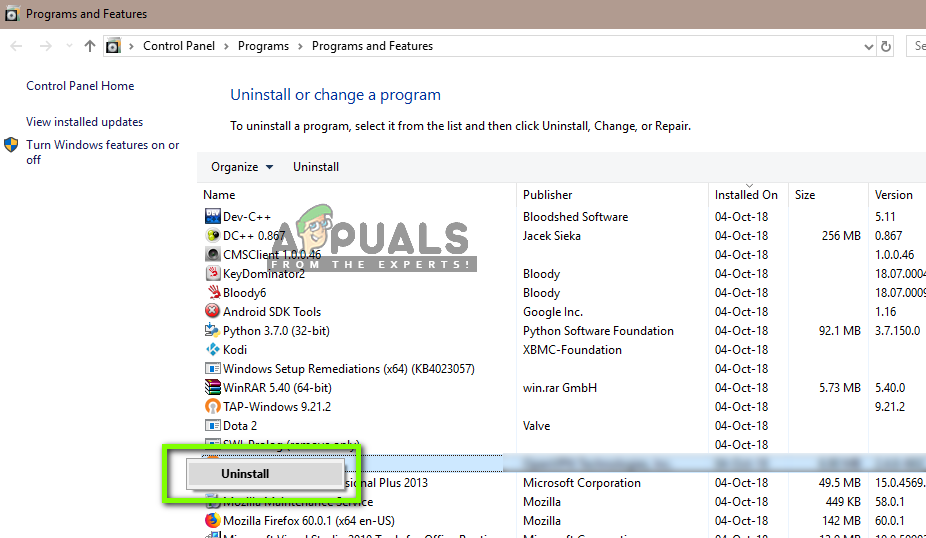
Uninstalling OBS
- Now navigate to the OBS Official Download website and after selecting the correct operating system, download the executable to an accessible location.

Downloading OBS again
- Now, right-click on the installer and select Run as administrator . After the installation is complete, restart your computer and try using Display capture again. Check if the issue is resolved. Note: Make sure that the user account that you are using is an administrator before proceeding with this method.
5. Updating Graphics Drivers
Graphics drivers are the main modules that enable the communication between your Graphics hardware and the operating system (applications or games etc.). If the graphics drivers themselves are not working properly, you will experience issues with almost all graphics demanding applications. In this solution, we will uninstall your existing graphics drivers and install newer ones later on.
- Download and install DDU (Display driver uninstaller) from its official website.
- After installing Display Driver Uninstaller (DDU) , launch your computer in safe mode .
- After launching the DDU, select the first option “ Clean and restart ”. This will uninstall the current drivers completely from your computer.
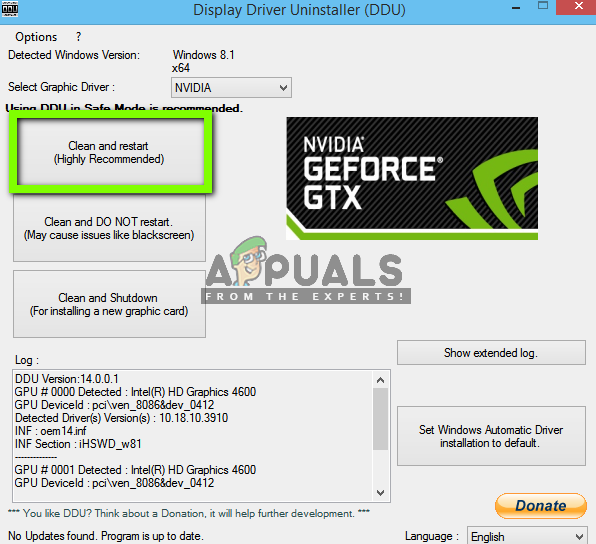
Clean and Restart – DDU
- Now after the uninstallation, boot your computer normally without safe mode. Press Windows + R, type “ devmgmt. msc ” in the dialogue box and press Enter. Right-click on any empty space and select “ Search for hardware changes ”. The default drivers will be installed. Try launching the Display Capture and check if this solves the problem. Note: You might have to perform solution 1 again after this step.
- In the majority of the cases, the default drivers will not work for you so you can either install the latest drivers through Windows update or navigate to your manufacturer’s website and download the latest ones.

Updating Drivers Manually
- After you have installed the drivers, restart your computer and check if the problem is solved.
Keep in mind that if you are using a laptop you will have to install the custom modified drivers that are provided by your manufacturer on the product page. Otherwise the GPU your laptop is using won’t be able to utilize the dedicated GPU properly.
How to Fix “Printer is in an error state” Issue?
The error “ WinRAR Error: Next Volume Is Required ” usually appears when you’re extracting a multi-part RAR archive and WinRAR can’t find (or can’t correctly identify) the next file in the sequence . This often happens when a volume is missing , stored in a different folder , or renamed in a way that breaks the archive’s expected order .

In this guide, we’ll go over the most reliable fixes confirmed by affected users, along with what each method is doing behind the scenes so you can choose the right one for your situation.
Important: To extract multi-volume archives, you should always start extraction from the first file in the set. This is usually file.part1.rar , or (in older sets) the main .rar file that comes before .r01 , .r02 , and so on.
1. Download and Place the Missing RAR File
WinRAR needs all parts of a multi-volume archive to complete extraction. This error usually appears when one of the volumes in a set like .part2.rar , .r01 , .r02 , .001 , and similar naming formats is missing . Downloading the missing volume and placing it in the same folder as the other parts allows WinRAR to continue extracting normally .
- Look at the error message or review the list of archive parts in the folder.
- Identify which volume is missing (for example, part2.rar , .r02 , .001 , etc.).
- Go back to the website or source where you downloaded the archive.
- Locate and download the exact missing file using the same naming format as the others.
- Make sure the new file name matches the pattern of the rest. Example: If you have file.part1.rar and file.part3.rar , the missing one must be file.part2.rar .
- Move the downloaded missing volume into the same folder as the other archive parts.
- Confirm that all parts are in a single folder before extracting.
- Right-click the first file in the series (usually part1 or the main .rar file) and select Extract Here or Extract to Folder .
- WinRAR should now detect all volumes and continue extraction normally .
2. Manually Browse & Select the Next Volume
Use this method only if the next volume already exists , but WinRAR is failing to detect it automatically. This can happen due to incorrect naming , the file being in a different location , or a temporary file access issue. Manually browsing helps WinRAR locate the correct volume and resume extraction without interruption .
- Right-click the first file in the series (usually .rar or part1.rar ) and select Extract Here or Extract to Folder .
- When WinRAR cannot find the next volume, it will show the “ Next Volume Is Required ” message.
- A small window will appear, allowing you to manually select the next volume .
- Use the file explorer window to locate the folder where the other archive parts are saved.
- Select the next part based on the naming order (example: select file.part2.rar after file.part1.rar ).
- Make sure the selected file matches the naming format of the archive (no extra characters like (1) and no mismatched numbering).
- WinRAR will resume extraction using the selected volume .
- If additional volumes are missing or stored separately, WinRAR may prompt you again. Repeat the same process until extraction completes.
3. Rename the RAR files in Order
WinRAR relies on a proper naming sequence (such as file.part1.rar , file.part2.rar , file.part3.rar ) to extract multi-volume archives. If a file is named incorrectly, contains extra characters, or is out of order, WinRAR may fail to locate the next volume and show this error. Renaming the files correctly helps WinRAR follow the sequence and extract the archive without interruptions .
Note: Renaming only changes the file name , not the file contents. The goal is to restore the correct sequence so WinRAR can detect the next volume.
- Go to the folder where all the RAR files are saved.
- Make sure all parts of the archive are present and stored in the same folder .
- Check how the parts are currently named . Common patterns include:
file.part1.rar, file.part2.rar, file.part3.rar
file.rar, file.r01, file.r02, file.r03
- Look for files that don’t match the expected numbering pattern (for example, file.part01.rar , file.part1(1).rar , or unrelated names).
- Rename each file so it follows the same order without extra characters or mismatched numbering. Example:
Incorrect: file.part1.rar, file.part3.rar, file.part2(1).rar
Correct: file.part1.rar, file.part2.rar, file.part3.rar
- Make sure the text before the number is exactly the same for all files.
- Only the last part number should change.
- Right-click the first file in the series (usually part1.rar or the main .rar file) and select Extract Here .
- WinRAR should now recognize the sequence and continue extraction normally .
If you still get the same prompt: the archive set is likely incomplete (a part was never downloaded or was removed), or one of the volumes is corrupt and must be re-downloaded from the original source.
