Microsoft included additional security features to Microsoft Excel for Windows in 2022 to safeguard users from harmful Excel macros. Microsoft had to take action to protect customers after a sharp rise in hacker attempts to use macros.
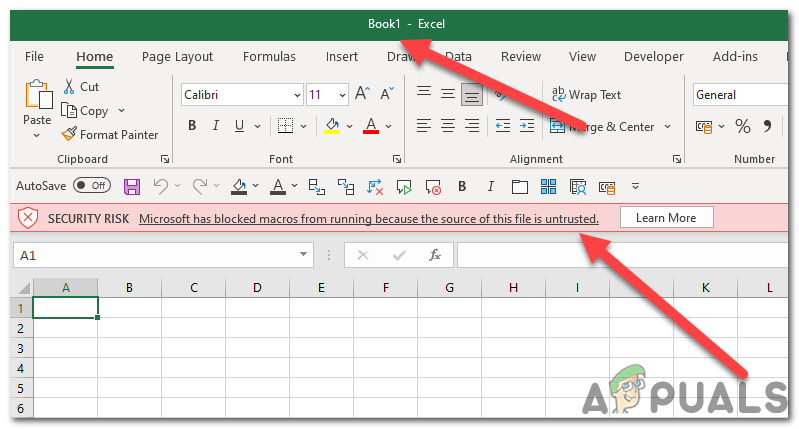
Microsoft has blocked macros from running because the source is untrusted error
This modification by Microsoft prevented macros from operating on files downloaded from the internet. However, since macros are an excellent way to automate Excel and make working on an Excel sheet simpler, the inability to use actual macros may cause some users’ work to become more laborious and decrease their productivity.
What are VBA Macros:
VBA macros are segments of user-written code that function inside MS Office programs . In certain circumstances, they transform MS Excel from a flat spreadsheet into a completely functional GUI application interface by helping to enable custom automation within the files. Bringing the power of VBA to customized client projects makes up a large portion of the work that various business development departments conduct. facilitating the quick development of automation and apps within the exact MS Office products that our clients are already utilizing .
It can be exceedingly challenging to distinguish between valid and malicious VBA code. As a result, all Excel users were affected by the security that Microsoft implemented. The identical warning notice is shown to files containing absolutely safe macros as well, so there is no need to worry. This article provides instructions for a quick remedy to help you fix the “ Microsoft has blocked macros from running because the source of this file is untrusted” error.
1. Unblock the File from File’s Properties
When you download the file from internet or you import that excel file from another computer, Windows will block it and limit it’s functionality to work properly. This is a security feature but it prevents users from taking full access of the file and use it in applications. If the file is blocked you won’t be able to use macros on that specific excel file. Follow these steps to unblock the file on your Window computer:
- Close the Workbook .
- Right-click on the Workbook file, and click ‘ Properties ‘ button. Right-click on the Workbook fil
- Make sure the Unblock box in Security is checked under the General tab , then click Apply and OK. Unblock box in Security is checked under the General tab
- Now open the Workbook again.
- Now try running the macros again and check if you are facing the same error again. running macros
2. Add Trusted Locations.
Microsoft Excel allows you to add trusted locations in it’s directory so that you don’t have to unblock the files again and again. You can simply download the files into the locations you are adding in trusted section which will automatically be recognized by Excel as safe files and it will unblock them automatically.
- Press the ‘ File ‘ button on menu bar. Press the ‘File’ button on menu bar
- Now press the ‘ Options ‘ button. press the ‘Options’ button
- Navigate to Trust Center > Trust Center Settings > Trusted Locations
- Inside Trusted Locations , click ‘Add new location ‘. Inside Trusted Locations, click ‘Add new location’
- Press Browse . Press Browse
- Choose any folder you want to designate as a trusted location . When opening an excel file from the selected folder, you won’t see the error message again if you download or import the files in the trusted location .
- Make sure the option “ Sub-folders of this location are also trusted ” is checked so that you can still run macros anytime you create a subfolder inside of that folder. the option “Sub-folders of this location are also trusted” is checked
- Re-open the file after moving it to the selected folder . This should now allow you to run macros on any excel file that is present in the Trusted folder .
3. Uninstall and Reinstall Microsoft Excel.
If the earlier fixes require a newer version of this program or the program’s files integrity was compromised, reinstalling Microsoft Excel can repair your issue. With this patch, you can be sure that your copy of Microsoft Excel is the most recent.
To uninstall Microsoft Excel , you will need to follow these steps:
- Press the Windows key + R on your keyboard to open the Run dialog. open the Run dialog
- Type “appwiz.cpl” and press Enter to open the Programs and Features window. Type “appwiz.cpl”
- Scroll through the list of installed programs and locate Microsoft Excel.
- Click on Microsoft Excel and then click the “Uninstall” button. Click on Microsoft Excel and then click the “Uninstall” button
- Follow the prompts to uninstall Microsoft Excel.
To reinstall Microsoft Excel , you will need to follow these steps:
- Go to the Microsoft website and sign in to your account.
- Click on the “Office” tab and then click on the “Install” button. The prompts to install Microsoft Excel on your computer will vary depending on your specific operating system and version of Microsoft Excel. However, the general process should be similar to the following :
- After clicking on the “ Install ” button on the Microsoft website , you will be prompted to select the version of Office you want to install. Select whichever one you prefer and then click “ Install “. click on “Install”
- You may be prompted to choose between installing the 32-bit or 64-bit version of Office. If you are not sure which version to choose, you can select the default option, which is usually the 32-bit version. versions of Microsoft office
- You may be asked to accept the Microsoft Office License Agreement . Read the agreement and then click “ Accept ” if you agree to the terms. click “Accept”
- You will be prompted to choose where you want to install Office. You can accept the default location or choose a different location.
- The installation process will begin and you may see a progress bar or other indicators showing the progress. The installation process
- Once the installation is complete, you will be prompted to open an Office application, such as Excel, to finish the activation process.
- If the marcos still do not function, repeat the above fixes on this newer installation and maybe this will resolve your issue with the macros error.
Hopefully, these fixes have taken care of your problem with the macros not running error.
How to Fix “Printer is in an error state” Issue?
The error “ WinRAR Error: Next Volume Is Required ” usually appears when you’re extracting a multi-part RAR archive and WinRAR can’t find (or can’t correctly identify) the next file in the sequence . This often happens when a volume is missing , stored in a different folder , or renamed in a way that breaks the archive’s expected order .

In this guide, we’ll go over the most reliable fixes confirmed by affected users, along with what each method is doing behind the scenes so you can choose the right one for your situation.
Important: To extract multi-volume archives, you should always start extraction from the first file in the set. This is usually file.part1.rar , or (in older sets) the main .rar file that comes before .r01 , .r02 , and so on.
1. Download and Place the Missing RAR File
WinRAR needs all parts of a multi-volume archive to complete extraction. This error usually appears when one of the volumes in a set like .part2.rar , .r01 , .r02 , .001 , and similar naming formats is missing . Downloading the missing volume and placing it in the same folder as the other parts allows WinRAR to continue extracting normally .
- Look at the error message or review the list of archive parts in the folder.
- Identify which volume is missing (for example, part2.rar , .r02 , .001 , etc.).
- Go back to the website or source where you downloaded the archive.
- Locate and download the exact missing file using the same naming format as the others.
- Make sure the new file name matches the pattern of the rest. Example: If you have file.part1.rar and file.part3.rar , the missing one must be file.part2.rar .
- Move the downloaded missing volume into the same folder as the other archive parts.
- Confirm that all parts are in a single folder before extracting.
- Right-click the first file in the series (usually part1 or the main .rar file) and select Extract Here or Extract to Folder .
- WinRAR should now detect all volumes and continue extraction normally .
2. Manually Browse & Select the Next Volume
Use this method only if the next volume already exists , but WinRAR is failing to detect it automatically. This can happen due to incorrect naming , the file being in a different location , or a temporary file access issue. Manually browsing helps WinRAR locate the correct volume and resume extraction without interruption .
- Right-click the first file in the series (usually .rar or part1.rar ) and select Extract Here or Extract to Folder .
- When WinRAR cannot find the next volume, it will show the “ Next Volume Is Required ” message.
- A small window will appear, allowing you to manually select the next volume .
- Use the file explorer window to locate the folder where the other archive parts are saved.
- Select the next part based on the naming order (example: select file.part2.rar after file.part1.rar ).
- Make sure the selected file matches the naming format of the archive (no extra characters like (1) and no mismatched numbering).
- WinRAR will resume extraction using the selected volume .
- If additional volumes are missing or stored separately, WinRAR may prompt you again. Repeat the same process until extraction completes.
3. Rename the RAR files in Order
WinRAR relies on a proper naming sequence (such as file.part1.rar , file.part2.rar , file.part3.rar ) to extract multi-volume archives. If a file is named incorrectly, contains extra characters, or is out of order, WinRAR may fail to locate the next volume and show this error. Renaming the files correctly helps WinRAR follow the sequence and extract the archive without interruptions .
Note: Renaming only changes the file name , not the file contents. The goal is to restore the correct sequence so WinRAR can detect the next volume.
- Go to the folder where all the RAR files are saved.
- Make sure all parts of the archive are present and stored in the same folder .
- Check how the parts are currently named . Common patterns include:
file.part1.rar, file.part2.rar, file.part3.rar
file.rar, file.r01, file.r02, file.r03
- Look for files that don’t match the expected numbering pattern (for example, file.part01.rar , file.part1(1).rar , or unrelated names).
- Rename each file so it follows the same order without extra characters or mismatched numbering. Example:
Incorrect: file.part1.rar, file.part3.rar, file.part2(1).rar
Correct: file.part1.rar, file.part2.rar, file.part3.rar
- Make sure the text before the number is exactly the same for all files.
- Only the last part number should change.
- Right-click the first file in the series (usually part1.rar or the main .rar file) and select Extract Here .
- WinRAR should now recognize the sequence and continue extraction normally .
If you still get the same prompt: the archive set is likely incomplete (a part was never downloaded or was removed), or one of the volumes is corrupt and must be re-downloaded from the original source.
