When you connect a Kindle to a PC with a USB, it might charge but not show up for file access. This means the computer doesn’t see it as storage. This often happens with a USB cable that only charges. Other causes could be missing drivers, damaged Kindle storage, or USB port problems.

In this article, we will discuss different ways to solve this error.
1. Check USB Cable
Before doing anything else, make sure you’re using a USB cable that can transfer data. Many cables only charge the device, which means your PC won’t recognize the Kindle as storage. Using a data-capable cable can fix the problem and give you access to the Kindle’s files.
2. Tweak Your Kindle Connection
Adjusting your Kindle’s connection settings can help your PC recognize it as storage. Try restarting the Kindle, changing the connection mode, or checking device settings to refresh the connection and fix detection problems. These steps reset communication between your Kindle and PC.
- Connect your Kindle to a USB port on your computer. Turn it off completely, then back on to check if it’s detected. To restart, hold the power button for about 40 seconds and release when restarting begins.
- Connect your Kindle to your PC, open the device, swipe down to access the menu, and select “Connect as camera.” This has worked for some users.
- Use Calibre to connect your Kindle. Turn off both devices, disconnect cables, restart the PC, open Calibre, connect the Kindle, and turn it on to check the connection.
- Ensure PIN authentication is off or enter your PIN when connecting the Kindle.
- Try enabling Android Debug Bridge (ADB) on your Kindle. Toggle it on or off under Settings > Device > Turn ADB on/off to see which works.
- Try connecting your Kindle using a USB hub .
- Update the Kindle application on your device to the latest version for better connectivity.
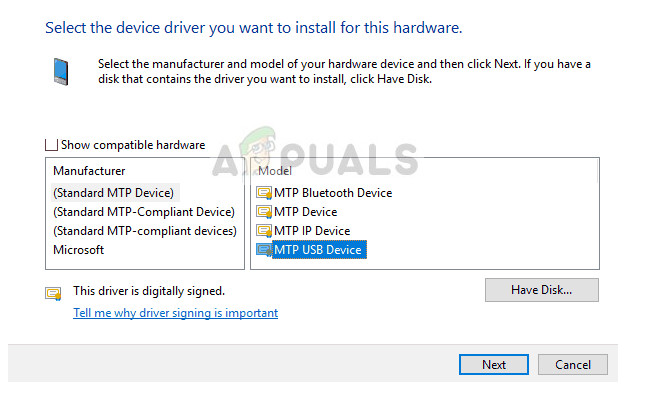
3. Install Kindle as an MTP Device
Setting up your Kindle as an MTP (Media Transfer Protocol) device helps your computer see it as media storage, allowing file access. This ensures the Kindle is correctly recognized on the PC, solving detection issues, especially if the default USB mode doesn’t support file transfers.
- Press Windows + R, type “ devmgmt.msc ,” and press Enter.
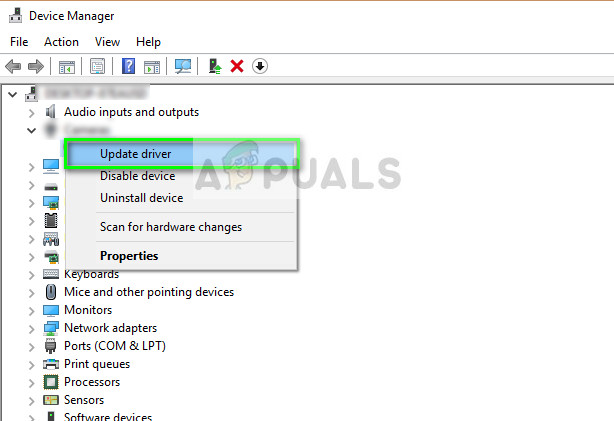
- In Device Manager, expand “ Portable device .” Look for Kindle with a yellow exclamation mark, right-click, and select Update driver .
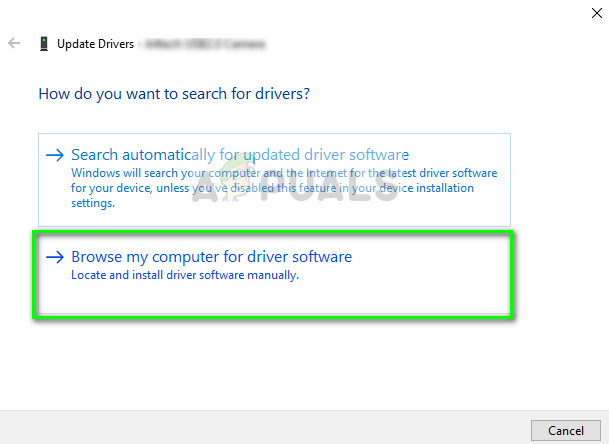
- Select “ Browse my computer for driver software .”
- Select “ Let me pick from a list of available drivers for my computer .”
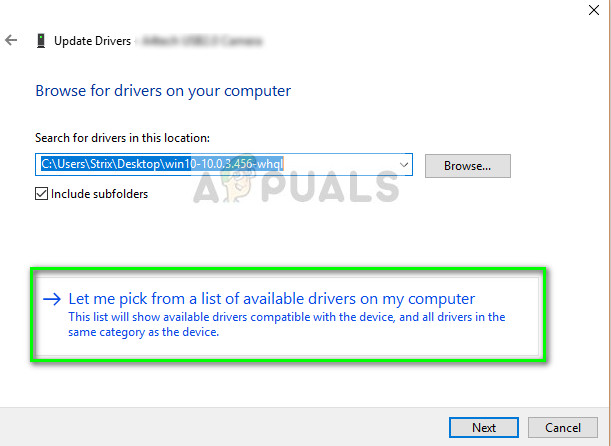
- Choose Portable Devices and find the MTP driver. You might uncheck “Only show compatible drivers” for more options. Restart your computer after applying the changes to see if the issue is resolved.
If your computer still doesn’t detect Kindle, try connecting the tablet to another computer and see if the connection is successful. Additionally, you can transfer files using Wi-Fi if the connection doesn’t establish.
4. Disable USB Selective Suspend
Sometimes, your PC’s power-saving features can disrupt device connections. USB Selective Suspend, for example, can switch off USB ports to save energy, stopping your Kindle from appearing. Turning off this setting keeps the USB port on, allowing a steady connection and letting you transfer files from your Kindle.
- Press Windows + R , type “ control panel ,” and press Enter.
- Select “ Hardware and Sound .”
- Click on “ Power Options .” Choose your current plan and click “ Change plan settings .”

- Click “ Change advanced power settings .”
- Expand USB settings and “ USB selective suspend settings .” Choose Disabled for both options. Save changes and exit.
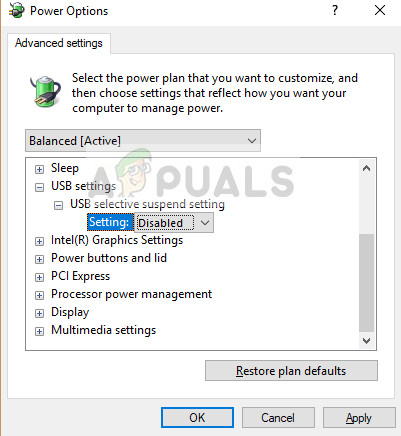
- Power cycle both devices to see if the problem is solved.
5. Reinstall Driver and Application
Refreshing your PC’s connection to the Kindle can fix detection problems. Reinstalling the driver and Kindle app ensures your computer has the latest files to recognize the device. This removes any glitches or outdated settings that might block the connection, restoring proper communication between the Kindle and PC.
- Press “Windows” + “R” and type “appwiz.cpl” . Type “appwiz.cpl” into the Run dialog and press Enter
- Press Enter to open the app management window. Find the “Kindle” software.
- Right-click and select “Uninstall” . Uninstalling Kindle Applications
- Follow prompts to remove it. Repeat for other Kindle-related software.
- Clear installation directories if anything is left.
- Uninstall the Kindle device driver.
- Press “Windows” + “R” and type “devmgmt.msc” to open Device Manager. Run dialog: devmgmt.msc
- Find and right-click on the Kindle Device Driver. Select “Uninstall Device.” Clicking on the “Uninstall Device” option
- Go to this page and download Kindle software for PC.
- Reinstall the Kindle driver and set up ADB.
- Check if the issue is fixed.
6. Reinstall USB Controller Drivers
Corrupted drivers can stop your Kindle from connecting to your PC as a storage device. Reinstalling USB controller drivers removes faulty or outdated settings, resetting the USB ports, and allowing a stable connection with your Kindle.
- Press “Windows” + “R” to open Run.
- Type “devmgmt.msc” and press “Enter” to open Device Manager. Running Device Manager
- Expand the USB Controllers list.
- Right-click on each USB controller driver, and select “Uninstall Device.” Clicking on the “Uninstall Device” option
- Follow the prompts to remove drivers.
- Restart the computer; drivers will reinstall automatically.
- Check if the Kindle is now recognized.
7. Assign Drive Letter
Sometimes, Windows doesn’t give a drive letter to connected devices, so they don’t show in file explorer. Manually assigning a drive letter helps Windows recognize the Kindle as storage, allowing file transfers. This can fix detection issues by ensuring the device is properly identified by the system.
- Press “Windows” + “R” to open Run.
- Type “diskmgmt.msc” and press “Enter” to open Disk Management. Opening disk management
- Right-click on the Kindle device and select “Change Drive Letter and Paths.” Selecting the Change Drive Letter and Paths option
- Click “Add” and assign a letter.
- Save changes and exit.
- Check File Explorer for Kindle access.
How to Fix “Printer is in an error state” Issue?
The error “ WinRAR Error: Next Volume Is Required ” usually appears when you’re extracting a multi-part RAR archive and WinRAR can’t find (or can’t correctly identify) the next file in the sequence . This often happens when a volume is missing , stored in a different folder , or renamed in a way that breaks the archive’s expected order .

In this guide, we’ll go over the most reliable fixes confirmed by affected users, along with what each method is doing behind the scenes so you can choose the right one for your situation.
Important: To extract multi-volume archives, you should always start extraction from the first file in the set. This is usually file.part1.rar , or (in older sets) the main .rar file that comes before .r01 , .r02 , and so on.
1. Download and Place the Missing RAR File
WinRAR needs all parts of a multi-volume archive to complete extraction. This error usually appears when one of the volumes in a set like .part2.rar , .r01 , .r02 , .001 , and similar naming formats is missing . Downloading the missing volume and placing it in the same folder as the other parts allows WinRAR to continue extracting normally .
- Look at the error message or review the list of archive parts in the folder.
- Identify which volume is missing (for example, part2.rar , .r02 , .001 , etc.).
- Go back to the website or source where you downloaded the archive.
- Locate and download the exact missing file using the same naming format as the others.
- Make sure the new file name matches the pattern of the rest. Example: If you have file.part1.rar and file.part3.rar , the missing one must be file.part2.rar .
- Move the downloaded missing volume into the same folder as the other archive parts.
- Confirm that all parts are in a single folder before extracting.
- Right-click the first file in the series (usually part1 or the main .rar file) and select Extract Here or Extract to Folder .
- WinRAR should now detect all volumes and continue extraction normally .
2. Manually Browse & Select the Next Volume
Use this method only if the next volume already exists , but WinRAR is failing to detect it automatically. This can happen due to incorrect naming , the file being in a different location , or a temporary file access issue. Manually browsing helps WinRAR locate the correct volume and resume extraction without interruption .
- Right-click the first file in the series (usually .rar or part1.rar ) and select Extract Here or Extract to Folder .
- When WinRAR cannot find the next volume, it will show the “ Next Volume Is Required ” message.
- A small window will appear, allowing you to manually select the next volume .
- Use the file explorer window to locate the folder where the other archive parts are saved.
- Select the next part based on the naming order (example: select file.part2.rar after file.part1.rar ).
- Make sure the selected file matches the naming format of the archive (no extra characters like (1) and no mismatched numbering).
- WinRAR will resume extraction using the selected volume .
- If additional volumes are missing or stored separately, WinRAR may prompt you again. Repeat the same process until extraction completes.
3. Rename the RAR files in Order
WinRAR relies on a proper naming sequence (such as file.part1.rar , file.part2.rar , file.part3.rar ) to extract multi-volume archives. If a file is named incorrectly, contains extra characters, or is out of order, WinRAR may fail to locate the next volume and show this error. Renaming the files correctly helps WinRAR follow the sequence and extract the archive without interruptions .
Note: Renaming only changes the file name , not the file contents. The goal is to restore the correct sequence so WinRAR can detect the next volume.
- Go to the folder where all the RAR files are saved.
- Make sure all parts of the archive are present and stored in the same folder .
- Check how the parts are currently named . Common patterns include:
file.part1.rar, file.part2.rar, file.part3.rar
file.rar, file.r01, file.r02, file.r03
- Look for files that don’t match the expected numbering pattern (for example, file.part01.rar , file.part1(1).rar , or unrelated names).
- Rename each file so it follows the same order without extra characters or mismatched numbering. Example:
Incorrect: file.part1.rar, file.part3.rar, file.part2(1).rar
Correct: file.part1.rar, file.part2.rar, file.part3.rar
- Make sure the text before the number is exactly the same for all files.
- Only the last part number should change.
- Right-click the first file in the series (usually part1.rar or the main .rar file) and select Extract Here .
- WinRAR should now recognize the sequence and continue extraction normally .
If you still get the same prompt: the archive set is likely incomplete (a part was never downloaded or was removed), or one of the volumes is corrupt and must be re-downloaded from the original source.
