How can one tell if their computer can run a Hosted Network? First things first, what is a Hosted Network? A virtual network, also known as a hosted wireless network or a virtual access point, is a wireless network that your PC can set up for other wireless devices to access and connect to. The wireless Hosted Network is a new WLAN feature supported on Windows 7, 8, 8.1, 10 and on Windows Server 2008 R2 with the Wireless LAN Service installed. This feature is implements the following:
- The virtualization of a physical wireless adapter into more than one virtual wireless adapter sometimes referred to as Virtual Wi-Fi.
- A software-based wireless access point (AP) sometimes referred to as a SoftAP that uses a designated virtual wireless adapter.
The two are enable and disabled at the same time. It is not possible to have only one enabled at a time. The virtual network feature lets you set up a wireless hotspot from which other computers can connect to your computer and even to the internet through your computer.
So how do you tell if your computer has a hosted wireless network and how do you activate it? This guide will give you a procedure to this and tell you how to fix an inactive virtual network.
How can I tell if my Wi-Fi card support virtual network?
The hosted network is a recent feature in windows. It came into existence with the release of windows 7. It is therefore supported in the following Microsoft operating systems:
- The following operating systems can run wireless hosted networks and SoftAP: Windows 7, Windows Server 2008 R2, Windows 8, Windows 8.1, Windows 10.
- The following operating systems cannot run wireless hosted networks and SoftAP: Windows 7 Starter Edition, Windows Vista, Windows XP, or any older version of Windows.
Therefore if your computer was built for a Windows 7, 8, 8.1 or 10, then your computer’s Wi-Fi card is capable of a hosted wireless network. Check the back of your computer, or on the side of your laptop for a windows sticker. If it has a sticker of the mentioned operating system then it supports a hosted network.
If your computer was originally running on Windows Vista, Windows XP or any earlier versions, then it is probably not compatible with a virtual wireless network. The Wi-Fi hardware of the previous operating systems might not support a hosted network. If you also built your computer from scratch, there might be a possibility that it is not compatible with the Wi-Fi hotspot feature.
To find out if your computer supports a virtual network, follow these instructions:
- Press Windows + R to open Run
- Type CMD in the run textbox and hit enter to open command prompt
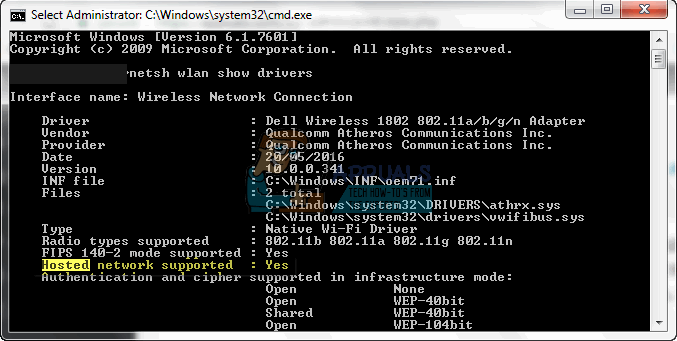
- Type “ netsh wlan show drivers ” in the Command prompt window and press the Enter key.
- Scroll up until you see a line that says “Hosted Network Support”.
- If the setting says Yes , your computer’s hardware supports the creation of wireless hosted networks, if it says No , then it doesn’t.
However, if the Hosted Network Support says No it is not always the case that it does not support a wireless hosted network. If your Wi-Fi card device is not working properly, then it won’t be available for analysis therefore the support report will always say No. This could be because of a faulty device or bad drivers. Here is how you can remedy this situation especially if your computer was able to set up a hotspot network previous.
Method 1: Update your Wi-Fi card drivers
If you upgraded to another OS e.g. from Windows 7 to Windows 10, then the previous drivers might not be compatible with the new OS, rendering your Wi-Fi card inoperable. Here is how to update your drivers and set up a wireless hosted network.
Step 1: Troubleshoot your hardware
This step will install your Wi-Fi card if it isn’t already installed. Make sure you are connected to the internet via the Ethernet cable.
- Press the Windows logo key + R to open the Run dialog box.
- Type control in the Run dialog box, then press Enter .
- In the Search box in Control Panel , type troubleshooter , and then click Troubleshooting .
- Under the Hardware and Sound item , click Configure a device. If you are prompted to enter an administrator password or provide confirmation, type the password or provide confirmation.
- Press Next and let the troubleshooter scan for problems. Fix all emerging problems.
Step 2: Update your Wi-Fi card drivers
Step 1 will install your missing driver. If you already had half functional/bad drivers, you will need to update to the latest compatible drivers. You will need to connect to the internet via the Ethernet for this step.
- Press the Windows logo key + R to open the Run dialog box.
- Type devmgmt.msc in the Run dialog box, then press Enter. If you are prompted for an administrator password or for a confirmation, type the password, or click Allow
- In Device Manager, expand Network Adapters devices
- Right click on your Wireless/Wi-Fi device and select ‘ Update Driver Software’
- Choose ‘ Scan Automatically for Updated driver software’ and let the scan find and update your drivers
- Restart your computer
Step 3: Set up a hosted network on your computer via command prompt
You must be an administrator to do this.
- Press Windows + R to open Run
- Type CMD in the run textbox and hit enter to open command prompt
- Type “ netsh wlan set hostednetwork mode=allow ssid= YourWiFiName key= YourWiFiPassword ” in the Command prompt window and press the Enter key; where YourWiFiName and YourWiFiPassword are your virtual network name and password respectively.
- Type netsh wlan start hostednetwork to start your wireless hosted network
This will start a wireless hosted network with your name of choice and password of choice.
- To stop the hosted network via command prompt, type: netsh wlan stop hostednetwork
- To show the hosted networks on your PC via command prompt, type: netsh wlan show hostednetwork
If your network does not create in step 3 then probably, your computer does not supported a virtual network, especially if you can connect to other Wi-Fi hotspots from your computer.
Also checkout hosted network couldn’t be started if you get this error when starting up the adapter via command prompt.
