Programmers using the IDE Android Studio experience the error message “ Gradle Project Sync Failed ” when they are compiling their code or running it on their Android device (either real or emulated). Gradle Sync is a Gradle task who’s main function is to check all the dependencies in your build.gradle files which are associated with your Android studio project and then download that specified version (if not downloaded already).

Gradle Project Sync Failed
There are many variations in which this error message might occur. You might be facing something as simple as an internet connection to complex issues where your gradle compilation isn’t working. In this article, we will go through all the causes as to why this issue occurs and then move on to the solutions.
What causes the error message “Gradle Project Sync Failed” in Android Studio?
Like mentioned before, there are several reasons as to why your Gradle project might fail to compile or sync. Here are some of the causes (each one of them might not be applicable to you):
- Bad internet connection: Since Gradle downloads all the missing versions which are required to run your project, it might fail if you don’t have a valid internet connection.
- Issues in Gradle compiler: There might be cases where your Gradle compiler is not working properly. Here we can manually try to load Gradle and see if this does the trick for you.
- Bad cache in Android Studio: Android Studio makes use of cache in your computer in order to work properly. In some cases, it might get corrupt and cause issues in several modules (including Gradle).
- Missing files: There might also be missing files which are required to run Gradle. Installing them solves the issue instantly.
- Proxy servers: Even though proxy servers are becoming increasingly popular, we saw some cases where Gradle wasn’t syncing on them properly. Disabling the proxy server resolves the issue.
Before we start with the solutions, make sure that you have a backup of your current project. Save the file and make a copy elsewhere as well just in case. Also, make sure that you are logged in as an administrator on your computer.
Solution 1: Checking Internet Connection
Gradle requires that you have a working internet connection on your computer. As its main job is to download all the required versions from the internet which are missing on your computer, it is mandatory to have a proper internet connection. You also check the connection by trying to connect other devices to the same network. Once you are absolutely sure that this isn’t the problem, you can move to other solutions.
Solution 2: Disabling Proxy Server
Proxy servers are getting common day by day where they are used in organizations and other institutes to boost the current bandwidth and provide better internet access to all the users. However, proxy servers have their limitations. One of them include issues where syncing modules don’t work as required. This includes Gradle as well. Here is the method to make sure that you are not using a proxy server.
- Press Windows + R, type “ inetcpl. cpl ” in the dialogue box and press Enter.
- Now Internet Properties will be opened. Click on the tab Connections and then LAN settings .
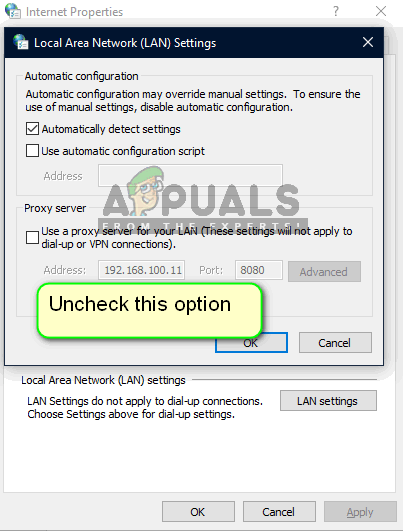
Disabling Proxy Server
- Now if you are using a proxy server, the field will be checked with the details inside. Uncheck any proxy servers if enabled. Now restart the Android Studio and check if the issue is resolved.
Solution 3: Installing Missing Components
Before we indulge in more technical methods, you should check if you have some modules missing which are necessary for syncing Gradle. Gradle isn’t standalone itself and it requires other services as well to perform properly.
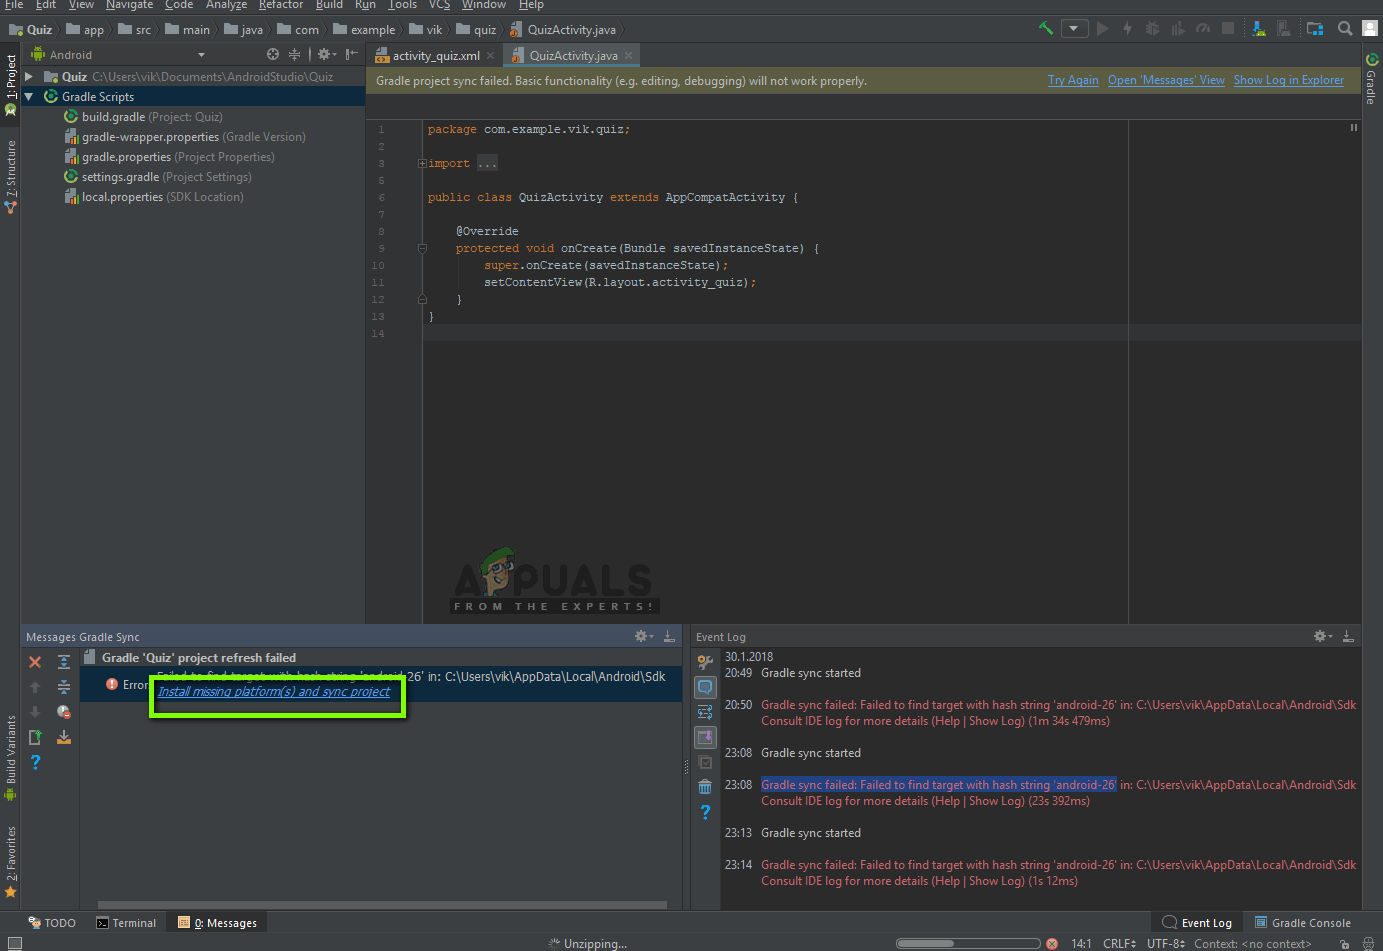
Install missing platform(s) and sync project – Android Studio
Now whenever you try to sync Gradle and the error message appears, check if there is any hyperlink underneath the issue with the heading Install missing platform(s) and sync project . After clicking the link, Android Studio will start the download process and install everything which is missing. Try syncing your project now and see if this solves the issue.
Solution 4: Utilizing Local Gradle Distribution
Whenever you build your project and Gradle gets activated, it connects to an online distribution which is latest and downloads all the required modules or versions from there. We came across several cases where the online distribution was not working as expected and failed the Gradle sync. Another workaround to this issue is to download the Gradle distribution manually and make use of that. Follow the steps below:
- Download the latest version of Gradle from the official Gradle Release Website .
- After downloading, extract all the files to an accessible folder.
- Now launch Android Studio and go to File > Settings > Build, Execution, Deployment > Gradle .
- Now select the option of Local Gradle Distribution . Also, when in the Gradle home, point to the path where you just extracted the files.
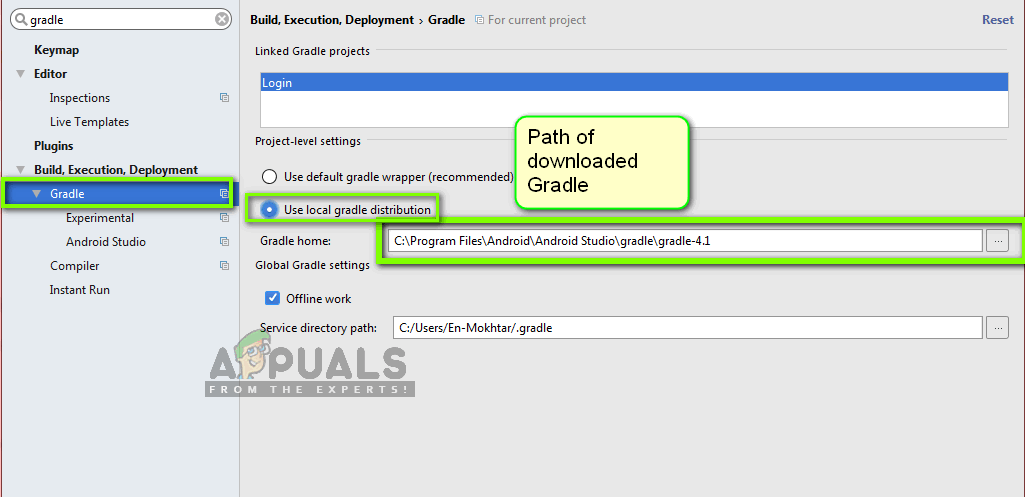
Using Local Gradle Distribution – Android Studio
Note: If you are using offline work in the Global Gradle Settings, uncheck that option.
- Now try building your project and check if Gradle syncs properly. You would have to repeat these steps every time you create a new project.
Solution 5: Enabling GPU Debugger
The GPU Debugger enables you to debug and analyze OpenGL ES applications. It has several functionalities where it lets you inspect the GPU state and also understand what caused a rendering outcome. In some Gradle build instances, there is some bug in the system where this is not enabled. In this solution, we will force the modules to refresh and install this component.
- Click on Tools and then select Android > SDK Manager .
- Now click on the tab of SDK Tools and then uncheck the option of Android SDK Build-Tools . After waiting for around 5 seconds, enable the option again.
- Now, wait a little while until the list is refreshed and items are populated.
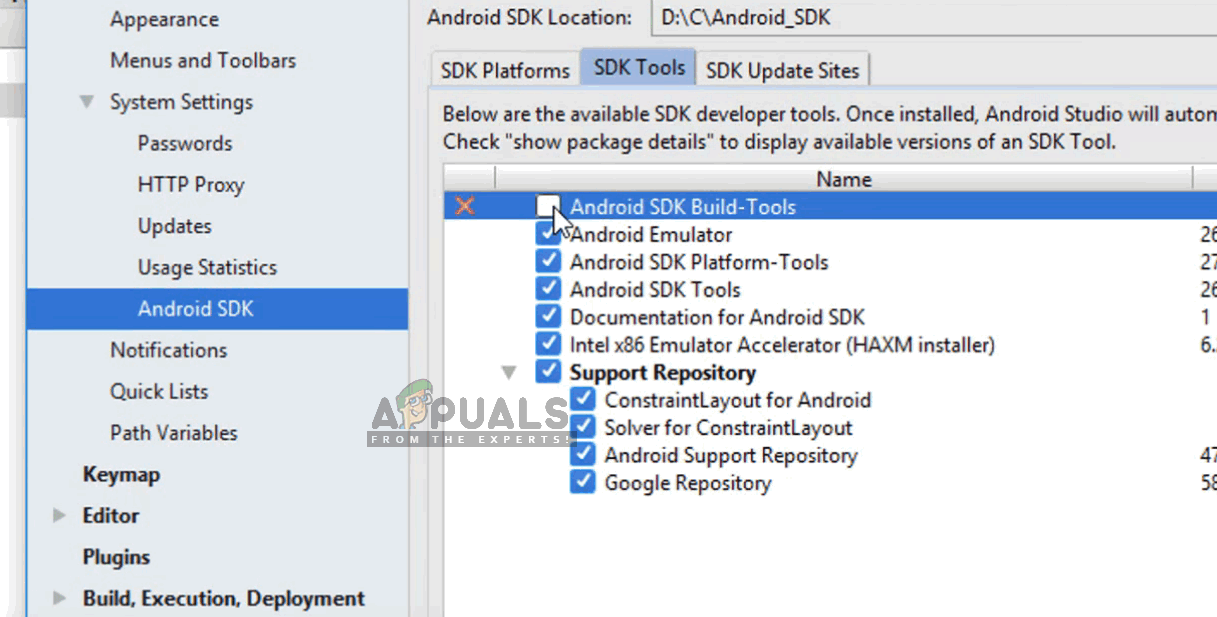
Android SDK Build Tools
- Once new items are populated, look at the list and check the option of GPU Debugging Tools . Press OK when you are done.
Now, these tools will be downloaded into your Android Studio application and you will be able to sync the Gradle properly without any issues.
Solution 6: Refreshing the Cache
Every application including Microsoft Windows has cache’s everywhere to help the application in running smoothly without any issues. They serve as temporary storage where the application stores preferences or temporary data to pick up later on. We determined that this cache, if corrupt, will halt the gradle build process. In this solution, we will refresh the entire cache and after deleting the existing Gradle files, restart Android Studio and see if this fixes the issue.
- Navigate to File and click Invalidate cache/Restart . Invalidate cache/Restart
- Now after the process is done, shut Android Studio down completely.
- Navigate to the .gradle folder in your Android Studio installation directory. Now you can either cut/paste it to some other location or simply rename it. Now when Android studio tries to access the Gradle files, it will see that there are none present and it will attempt at downloading the entire thing again.
- Restart your Android Studio and try Gradle sync again. Now check if the issue is resolved.
How to Fix “Printer is in an error state” Issue?
The error “ WinRAR Error: Next Volume Is Required ” usually appears when you’re extracting a multi-part RAR archive and WinRAR can’t find (or can’t correctly identify) the next file in the sequence . This often happens when a volume is missing , stored in a different folder , or renamed in a way that breaks the archive’s expected order .

In this guide, we’ll go over the most reliable fixes confirmed by affected users, along with what each method is doing behind the scenes so you can choose the right one for your situation.
Important: To extract multi-volume archives, you should always start extraction from the first file in the set. This is usually file.part1.rar , or (in older sets) the main .rar file that comes before .r01 , .r02 , and so on.
1. Download and Place the Missing RAR File
WinRAR needs all parts of a multi-volume archive to complete extraction. This error usually appears when one of the volumes in a set like .part2.rar , .r01 , .r02 , .001 , and similar naming formats is missing . Downloading the missing volume and placing it in the same folder as the other parts allows WinRAR to continue extracting normally .
- Look at the error message or review the list of archive parts in the folder.
- Identify which volume is missing (for example, part2.rar , .r02 , .001 , etc.).
- Go back to the website or source where you downloaded the archive.
- Locate and download the exact missing file using the same naming format as the others.
- Make sure the new file name matches the pattern of the rest. Example: If you have file.part1.rar and file.part3.rar , the missing one must be file.part2.rar .
- Move the downloaded missing volume into the same folder as the other archive parts.
- Confirm that all parts are in a single folder before extracting.
- Right-click the first file in the series (usually part1 or the main .rar file) and select Extract Here or Extract to Folder .
- WinRAR should now detect all volumes and continue extraction normally .
2. Manually Browse & Select the Next Volume
Use this method only if the next volume already exists , but WinRAR is failing to detect it automatically. This can happen due to incorrect naming , the file being in a different location , or a temporary file access issue. Manually browsing helps WinRAR locate the correct volume and resume extraction without interruption .
- Right-click the first file in the series (usually .rar or part1.rar ) and select Extract Here or Extract to Folder .
- When WinRAR cannot find the next volume, it will show the “ Next Volume Is Required ” message.
- A small window will appear, allowing you to manually select the next volume .
- Use the file explorer window to locate the folder where the other archive parts are saved.
- Select the next part based on the naming order (example: select file.part2.rar after file.part1.rar ).
- Make sure the selected file matches the naming format of the archive (no extra characters like (1) and no mismatched numbering).
- WinRAR will resume extraction using the selected volume .
- If additional volumes are missing or stored separately, WinRAR may prompt you again. Repeat the same process until extraction completes.
3. Rename the RAR files in Order
WinRAR relies on a proper naming sequence (such as file.part1.rar , file.part2.rar , file.part3.rar ) to extract multi-volume archives. If a file is named incorrectly, contains extra characters, or is out of order, WinRAR may fail to locate the next volume and show this error. Renaming the files correctly helps WinRAR follow the sequence and extract the archive without interruptions .
Note: Renaming only changes the file name , not the file contents. The goal is to restore the correct sequence so WinRAR can detect the next volume.
- Go to the folder where all the RAR files are saved.
- Make sure all parts of the archive are present and stored in the same folder .
- Check how the parts are currently named . Common patterns include:
file.part1.rar, file.part2.rar, file.part3.rar
file.rar, file.r01, file.r02, file.r03
- Look for files that don’t match the expected numbering pattern (for example, file.part01.rar , file.part1(1).rar , or unrelated names).
- Rename each file so it follows the same order without extra characters or mismatched numbering. Example:
Incorrect: file.part1.rar, file.part3.rar, file.part2(1).rar
Correct: file.part1.rar, file.part2.rar, file.part3.rar
- Make sure the text before the number is exactly the same for all files.
- Only the last part number should change.
- Right-click the first file in the series (usually part1.rar or the main .rar file) and select Extract Here .
- WinRAR should now recognize the sequence and continue extraction normally .
If you still get the same prompt: the archive set is likely incomplete (a part was never downloaded or was removed), or one of the volumes is corrupt and must be re-downloaded from the original source.
