Adobe Photoshop is a graphics editor which is developed by Adobe Systems for Windows and Mac OS. It is probably the leading software in a graphics editor and is used by millions of professionals around the world. It has tons of features with frequent updates rolling out as well.
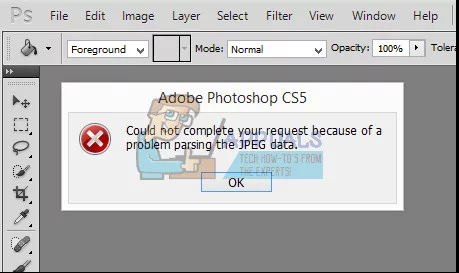
There was a specific case experienced by the users where users were unable to import pictures from their desktop. The error message stated, “Could not complete your request because of a problem parsing the JPEG data”. As you all know, photoshop parses all the images you import to enable several functionalities and make some features possible. This error is usually associated with the problem in the extension of the picture. There are no direct settings that you can change to solve the issue. Instead, we will make use of third-party applications and try to refresh the file.
Note: This error is not limited to only JPEG files. It may also occur in PNG or GIF files. The workarounds listed below will work for almost all the file formats.
Solution 1: Using Paint Application
The simplest workaround for this bug is to open the picture in ‘Paint’ and then save the picture in the correct JPEG format. When you perform this operation, paint automatically corrects any misconfigurations and saves the file as a fresh copy. Then you can import the picture using Photoshop and continue with your work.
- Press Windows + S, type “ paint ” in the dialogue box and open the application.
- Click on the ‘ File ’ tab present at the top-left side of the screen and select “ Open ”.

- Navigate to the directory where the file is saved and open the file.

- Once the file is opened, click File > Save as > JPEG picture . Now you will be asked the location where you want to save. Select an appropriate directory and save the file.

- Now open Photoshop again and try importing the new picture we just created.
Solution 2: Opening in Picture Viewer
Another workaround that seemed to work for users was opening the picture in the default picture viewer, rotating the image, and then closing it without making any changes. Now when the picture was opened in Photoshop, it was imported successfully. The reason for this behavior is unknown but as long as it works, why go into the details.
- Open the picture in the default picture viewing application for Windows. This might be the older picture viewer or the new Photos application in Windows 10.
- After opening the image, click on the rotate icon to rotate the image.

- Keep rotating the image until you bring it back to its default configuration. Now close the application and open Photoshop. Try importing the file and see if this works.
Solution 3: Taking a screenshot
If both the above methods don’t work, you can take a screenshot, crop out the un-needed area and save the final picture. This might induce some losses in your original picture as a screenshot is only a snap of what’s displaying on your screen whereas an original and complete picture has all of the pixels. However, if the above methods are not working for you, you can use this workaround to temporarily avoid the error.
- Open the image you are trying to view in a default photo viewing application.
- Now take a screenshot of your Windows. You can check out our extensive guide on how to take screenshots on Windows 10, 8, and 7 .
- You should save the screenshot in the correct file format and then try importing it in Photoshop.
Solution 4: Changing File Handling
As JPEG files are opened in Camera Raw which is part of Photoshop. It’s possible that incorrect settings of your Camera Raw’s JPEG Handler aren’t letting you open the JPEG Formated files. In that case, you will have to change the file handling preferences so that Photoshop won’t apply the settings you specified for them. Follow the steps below:-
- Open Photoshop then head over to preferences or you can press (CTRL + K) keys together.
- Now head over to the “File Handling” Section.
- Click “Camera Raw Preferences” , now head over to the “File Handling” tab within Camera Raw Preferences.
- Change both JPEG and TIFF handling to “Open all support JPED and TIFF Files”.
- Restart your Photoshop and check to see if the issue still persists.
Solution 5: Opening in Flash Editing Software (for GIFs)
In the above examples, we were dealing with static pictures. However, if you have an animated GIF file that is refusing to be opened by Photoshop, you need to open the picture in Flash Editing Software and then save it in the correct format again.
There are several instances where all image files are BMP except for one or two GIFs. In this case, you need to go to the publish settings in Flash and republish the whole thing as a GIF file in order for Photoshop to correctly recognize it.
There are numerous Flash Editing Software out there. You can use anyone who has a feature to republish the whole file after making any changes. Good luck!
Tip: The methods will more or less be the same for Mac OS. You only have to use the default applications available on Mac to perform all the listed workarounds
How to Fix “Printer is in an error state” Issue?
The error “ WinRAR Error: Next Volume Is Required ” usually appears when you’re extracting a multi-part RAR archive and WinRAR can’t find (or can’t correctly identify) the next file in the sequence . This often happens when a volume is missing , stored in a different folder , or renamed in a way that breaks the archive’s expected order .

In this guide, we’ll go over the most reliable fixes confirmed by affected users, along with what each method is doing behind the scenes so you can choose the right one for your situation.
Important: To extract multi-volume archives, you should always start extraction from the first file in the set. This is usually file.part1.rar , or (in older sets) the main .rar file that comes before .r01 , .r02 , and so on.
1. Download and Place the Missing RAR File
WinRAR needs all parts of a multi-volume archive to complete extraction. This error usually appears when one of the volumes in a set like .part2.rar , .r01 , .r02 , .001 , and similar naming formats is missing . Downloading the missing volume and placing it in the same folder as the other parts allows WinRAR to continue extracting normally .
- Look at the error message or review the list of archive parts in the folder.
- Identify which volume is missing (for example, part2.rar , .r02 , .001 , etc.).
- Go back to the website or source where you downloaded the archive.
- Locate and download the exact missing file using the same naming format as the others.
- Make sure the new file name matches the pattern of the rest. Example: If you have file.part1.rar and file.part3.rar , the missing one must be file.part2.rar .
- Move the downloaded missing volume into the same folder as the other archive parts.
- Confirm that all parts are in a single folder before extracting.
- Right-click the first file in the series (usually part1 or the main .rar file) and select Extract Here or Extract to Folder .
- WinRAR should now detect all volumes and continue extraction normally .
2. Manually Browse & Select the Next Volume
Use this method only if the next volume already exists , but WinRAR is failing to detect it automatically. This can happen due to incorrect naming , the file being in a different location , or a temporary file access issue. Manually browsing helps WinRAR locate the correct volume and resume extraction without interruption .
- Right-click the first file in the series (usually .rar or part1.rar ) and select Extract Here or Extract to Folder .
- When WinRAR cannot find the next volume, it will show the “ Next Volume Is Required ” message.
- A small window will appear, allowing you to manually select the next volume .
- Use the file explorer window to locate the folder where the other archive parts are saved.
- Select the next part based on the naming order (example: select file.part2.rar after file.part1.rar ).
- Make sure the selected file matches the naming format of the archive (no extra characters like (1) and no mismatched numbering).
- WinRAR will resume extraction using the selected volume .
- If additional volumes are missing or stored separately, WinRAR may prompt you again. Repeat the same process until extraction completes.
3. Rename the RAR files in Order
WinRAR relies on a proper naming sequence (such as file.part1.rar , file.part2.rar , file.part3.rar ) to extract multi-volume archives. If a file is named incorrectly, contains extra characters, or is out of order, WinRAR may fail to locate the next volume and show this error. Renaming the files correctly helps WinRAR follow the sequence and extract the archive without interruptions .
Note: Renaming only changes the file name , not the file contents. The goal is to restore the correct sequence so WinRAR can detect the next volume.
- Go to the folder where all the RAR files are saved.
- Make sure all parts of the archive are present and stored in the same folder .
- Check how the parts are currently named . Common patterns include:
file.part1.rar, file.part2.rar, file.part3.rar
file.rar, file.r01, file.r02, file.r03
- Look for files that don’t match the expected numbering pattern (for example, file.part01.rar , file.part1(1).rar , or unrelated names).
- Rename each file so it follows the same order without extra characters or mismatched numbering. Example:
Incorrect: file.part1.rar, file.part3.rar, file.part2(1).rar
Correct: file.part1.rar, file.part2.rar, file.part3.rar
- Make sure the text before the number is exactly the same for all files.
- Only the last part number should change.
- Right-click the first file in the series (usually part1.rar or the main .rar file) and select Extract Here .
- WinRAR should now recognize the sequence and continue extraction normally .
If you still get the same prompt: the archive set is likely incomplete (a part was never downloaded or was removed), or one of the volumes is corrupt and must be re-downloaded from the original source.
