Adobe Creative Cloud is a set of applications and services from Adobe Systems which give users access to various software that is mostly used for graphics designing, video editing, photography, etc. When you use the Cloud, you are probably subscribing to either monthly or annual subscription of these products.
Cannot Uninstall Adobe Creative Cloud
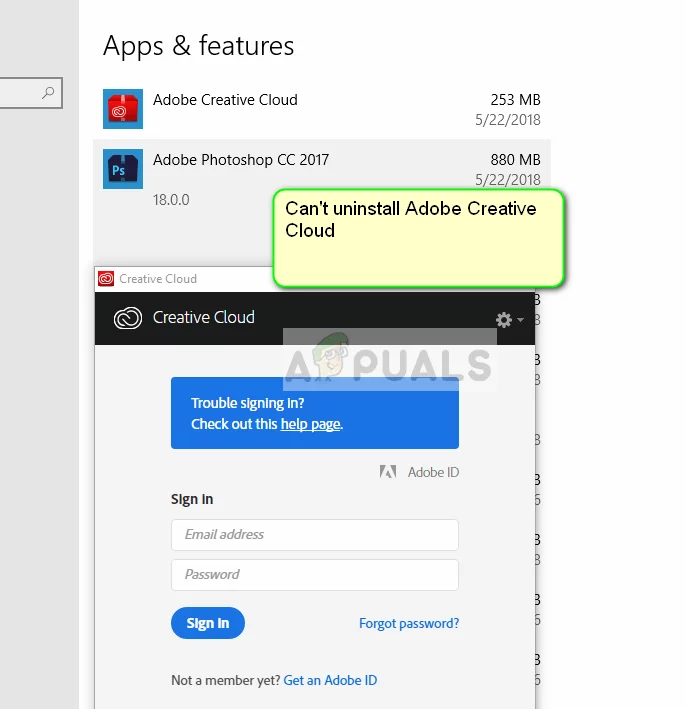
Despite Adobe making Creative Cloud the core of all its products, there is an issue in Windows where users are unable to uninstall the Creative Cloud on their computers. This is a known issue that received a lot of backlash from the community.
What Causes Adobe Creative Cloud Not to Uninstall?
The answer is simple; the bad design of the application. Whenever you try to uninstall Creative Cloud, either you are asked to enter your Email address or log into the service properly. To do that, you will need your credentials at hand after which the uninstallation process will begin.
Adobe engineers designed the application in such a way that it required you to be signed in or have an internet connection. Even though this may be frustrating if you don’t have either of the two, there are still some ways through which you can easily uninstall Creative Cloud.
Running Adobe CC Cleaner Tool
Luckily Adobe has released a Cleaner software that will automatically detect all the modules of Creative Cloud installed on your computer and will remove them instantly.
Make sure that you are logged in as an administrator on your computer.
- Navigate to the Official Adobe CC Cleaner Tool website .
- Now select the correct version of the operating system. In this case, Windows. Selecting Windows – Adobe CC Cleaner
- After you have selected the OS, follow the steps. Press Windows + R, type “appwiz.cpl” in the dialogue box and press Enter. Locate Adobe CC and after right-clicking, select Uninstall . If you cannot uninstall using this, don’t worry and continue with the solution. Now move to the 6 th step and download the executable to an accessible location. Downloading Adobe CC Cleaner
- After the download is complete, right-click on the application and select Run as administrator .
- After a while, a command prompt will come forward with a list of options. Select the option according to your situation and press Enter. Selecting Uninstall Options – CC Cleaner
- Now the cleaner will proceed with the uninstallation and remove the program/s from your computer. Restart your computer and check if the applications are indeed removed from your system.
Note: You can try uninstalling the application using Revo Installer. You can also Uninstall Programs On Windows 10 That Won’t Uninstall .
How to Fix “Printer is in an error state” Issue?
The error “ WinRAR Error: Next Volume Is Required ” usually appears when you’re extracting a multi-part RAR archive and WinRAR can’t find (or can’t correctly identify) the next file in the sequence . This often happens when a volume is missing , stored in a different folder , or renamed in a way that breaks the archive’s expected order .

In this guide, we’ll go over the most reliable fixes confirmed by affected users, along with what each method is doing behind the scenes so you can choose the right one for your situation.
Important: To extract multi-volume archives, you should always start extraction from the first file in the set. This is usually file.part1.rar , or (in older sets) the main .rar file that comes before .r01 , .r02 , and so on.
1. Download and Place the Missing RAR File
WinRAR needs all parts of a multi-volume archive to complete extraction. This error usually appears when one of the volumes in a set like .part2.rar , .r01 , .r02 , .001 , and similar naming formats is missing . Downloading the missing volume and placing it in the same folder as the other parts allows WinRAR to continue extracting normally .
- Look at the error message or review the list of archive parts in the folder.
- Identify which volume is missing (for example, part2.rar , .r02 , .001 , etc.).
- Go back to the website or source where you downloaded the archive.
- Locate and download the exact missing file using the same naming format as the others.
- Make sure the new file name matches the pattern of the rest. Example: If you have file.part1.rar and file.part3.rar , the missing one must be file.part2.rar .
- Move the downloaded missing volume into the same folder as the other archive parts.
- Confirm that all parts are in a single folder before extracting.
- Right-click the first file in the series (usually part1 or the main .rar file) and select Extract Here or Extract to Folder .
- WinRAR should now detect all volumes and continue extraction normally .
2. Manually Browse & Select the Next Volume
Use this method only if the next volume already exists , but WinRAR is failing to detect it automatically. This can happen due to incorrect naming , the file being in a different location , or a temporary file access issue. Manually browsing helps WinRAR locate the correct volume and resume extraction without interruption .
- Right-click the first file in the series (usually .rar or part1.rar ) and select Extract Here or Extract to Folder .
- When WinRAR cannot find the next volume, it will show the “ Next Volume Is Required ” message.
- A small window will appear, allowing you to manually select the next volume .
- Use the file explorer window to locate the folder where the other archive parts are saved.
- Select the next part based on the naming order (example: select file.part2.rar after file.part1.rar ).
- Make sure the selected file matches the naming format of the archive (no extra characters like (1) and no mismatched numbering).
- WinRAR will resume extraction using the selected volume .
- If additional volumes are missing or stored separately, WinRAR may prompt you again. Repeat the same process until extraction completes.
3. Rename the RAR files in Order
WinRAR relies on a proper naming sequence (such as file.part1.rar , file.part2.rar , file.part3.rar ) to extract multi-volume archives. If a file is named incorrectly, contains extra characters, or is out of order, WinRAR may fail to locate the next volume and show this error. Renaming the files correctly helps WinRAR follow the sequence and extract the archive without interruptions .
Note: Renaming only changes the file name , not the file contents. The goal is to restore the correct sequence so WinRAR can detect the next volume.
- Go to the folder where all the RAR files are saved.
- Make sure all parts of the archive are present and stored in the same folder .
- Check how the parts are currently named . Common patterns include:
file.part1.rar, file.part2.rar, file.part3.rar
file.rar, file.r01, file.r02, file.r03
- Look for files that don’t match the expected numbering pattern (for example, file.part01.rar , file.part1(1).rar , or unrelated names).
- Rename each file so it follows the same order without extra characters or mismatched numbering. Example:
Incorrect: file.part1.rar, file.part3.rar, file.part2(1).rar
Correct: file.part1.rar, file.part2.rar, file.part3.rar
- Make sure the text before the number is exactly the same for all files.
- Only the last part number should change.
- Right-click the first file in the series (usually part1.rar or the main .rar file) and select Extract Here .
- WinRAR should now recognize the sequence and continue extraction normally .
If you still get the same prompt: the archive set is likely incomplete (a part was never downloaded or was removed), or one of the volumes is corrupt and must be re-downloaded from the original source.
