The ‘ Cannot Open File for Writing ‘ error occurs when Windows users attempt to install or update VLC media player. In most cases, the issue occurs on machines that already have or have had VLC Media Player installed at some point.
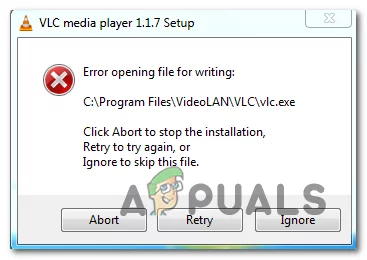
VLC Media Player Error “Cannot open file for writing”
Most commonly, the ‘ Cannot Open File for Writing ‘ error is caused by multiple instances of VLC or other applications using LibVLC. To fix this, you can use Task Manager to close any conflicting VLC instance while the installation or updating sequence is taking place. However, some browsers also have the potential to interfere with the legacy way of updating the VLC Media Player application.
And under certain circumstances, some type of system file corruption can be the determining factor why your VLC Media Player installation is no longer able to update.
Method 1: Closing all VLC Instances
As it turns out, the most common cause that will cause the ‘ Cannot Open File for Writing ‘ error is a situation where multiple VLC instances (or any other applications that are also using LibCLC) are actively running on your machine.
If this scenario is applicable, you can fix the issue swiftly by opening Task Manager and terminating all running instances of applications using LibVLC. Several affected users have confirmed that the issue was resolved as soon as every running instance was closed.
Note: If you don’t want to use Task Manager , you can simply restart your computer and repeat the action that’s currently causing the issue as soon as the next startup is complete.
Here’s a quick guide on closing all VLC instances that might end up causing the ‘ Cannot Open File for Writing ‘ error:
- Close the setup screen where you encounter the error.
- Press Ctrl + Shift + Esc to open up Task Manager. Once you’re inside, select the Processes tab from the menu at the top, then scroll down through the list of processes and right-click on the process associated with VLC media player.
- Once you see the context menu, click on End Task . Ending all associated instances with VLC media player Note: If you confirm that no additional instances of VLC Media Player are running, look specifically for other applications that are using LibVLC.
- Once every relevant instance is closed, repeat the action that was previously causing the ‘ Cannot Open File for Writing ‘ error and see if the problem is now resolved.
In case this scenario wasn’t applicable or it didn’t resolve the issue, move down to the next potential fix below.
Method 2: Close all browser instances
One unlikely cause that might contribute to the apparition of the ‘ Cannot Open File for Writing ‘ error is an installation interference caused by your default browser.
As several affected users have reported, VLC’s ability to update itself can be also interrupted by an open instance of Chrome, Firefox or Brave browser.
If this scenario is applicable, you should be able to fix the issue by using Task Manager to close any active browser instance that might be causing the issue.
Here’s a quick guide on how to close any browser instance in order to resolve the ‘ Cannot Open File for Writing ‘ error:
- Close the setup that is causing the ‘ Cannot Open File for Writing ‘ error.
- Open up a Task Manager instance by pressing Ctrl + Shift + Esc. Once you’re inside Task Manager, choose the Processes tab from the ribbon menu at the top.
- Inside the Processes tab, scroll down through the list of active processes, right-click on your active browser instances and choose End Task from the newly appeared context menu. Ending the Browser tasks using Task Manager
- Once every browser process is closed, repeat the VLC update or VLC installation and see if the problem is now fixed.
In case you’re still encountering the same ‘ Cannot Open File for Writing ‘ error, move down to the next method below.
Method 3: Running SFC and DISM scans
As it turns out, the issue can also occur due to some kind of System File Corruption that ends up affecting your operating system’s ability to install new software. If this scenario is applicable, you should be able to fix the issue by running a couple of native utilities (DISM and SFC) that were designed to find, fix or replace corrupted instances.
Although the two utilities have similar functionality, they do things differently. For example, DISM (Deployment Image Servicing and Management) relies heavily on a subcomponent of WU to replace corrupted data with healthy equivalents.
On the other hand, SFC (System File Checker) is an entirely local tool that uses locally cached data to fetch healthy files when corrupted instances are found.
Since both utilities have their own strong suits, we recommend that you run both in quick succession in order to maximize your chance of resolving the ‘ Cannot Open File for Writing ‘ error:
- Press Windows key + R to open up a Run dialog box. Next, type ‘cmd’ inside the text box, then press Ctrl + Shift + Enter to open up an Elevated Command Prompt . If you get prompted by the User Account Control (UAC), click Yes to grant admin access. Running Command Prompt
- Once you manage to get inside the elevated CMD prompt, type the following command and hit Enter to initiate an SFC scan : sfc / scannow Note: It’s very important that you don’t interrupt this process once you get this started. Doing this might create bad sectors that might facilitate the apparition of similar issues in the future.
- After the scan is complete, restart your computer once again and wait for the next startup to complete.
- Once your computer boots back up, follow step 1 once again to open up another elevated CMD prompt. When you return to the elevated CMD window, type the following command below to initiate a DISM scan: dism /online /cleanup-image /restorehealth Note: To complete this scan without issues, you will need to ensure that your Internet connection is stable. This is important because DISM uses WU to download healthy copies for broken systems that need to be replaced. If you get a DISM error when you try to launch the utility, here’s how to fix it .
- As soon as the operation is complete, reboot your computer once again and see if the issue is resolved at the next startup.
How to Fix “Printer is in an error state” Issue?
The error “ WinRAR Error: Next Volume Is Required ” usually appears when you’re extracting a multi-part RAR archive and WinRAR can’t find (or can’t correctly identify) the next file in the sequence . This often happens when a volume is missing , stored in a different folder , or renamed in a way that breaks the archive’s expected order .

In this guide, we’ll go over the most reliable fixes confirmed by affected users, along with what each method is doing behind the scenes so you can choose the right one for your situation.
Important: To extract multi-volume archives, you should always start extraction from the first file in the set. This is usually file.part1.rar , or (in older sets) the main .rar file that comes before .r01 , .r02 , and so on.
1. Download and Place the Missing RAR File
WinRAR needs all parts of a multi-volume archive to complete extraction. This error usually appears when one of the volumes in a set like .part2.rar , .r01 , .r02 , .001 , and similar naming formats is missing . Downloading the missing volume and placing it in the same folder as the other parts allows WinRAR to continue extracting normally .
- Look at the error message or review the list of archive parts in the folder.
- Identify which volume is missing (for example, part2.rar , .r02 , .001 , etc.).
- Go back to the website or source where you downloaded the archive.
- Locate and download the exact missing file using the same naming format as the others.
- Make sure the new file name matches the pattern of the rest. Example: If you have file.part1.rar and file.part3.rar , the missing one must be file.part2.rar .
- Move the downloaded missing volume into the same folder as the other archive parts.
- Confirm that all parts are in a single folder before extracting.
- Right-click the first file in the series (usually part1 or the main .rar file) and select Extract Here or Extract to Folder .
- WinRAR should now detect all volumes and continue extraction normally .
2. Manually Browse & Select the Next Volume
Use this method only if the next volume already exists , but WinRAR is failing to detect it automatically. This can happen due to incorrect naming , the file being in a different location , or a temporary file access issue. Manually browsing helps WinRAR locate the correct volume and resume extraction without interruption .
- Right-click the first file in the series (usually .rar or part1.rar ) and select Extract Here or Extract to Folder .
- When WinRAR cannot find the next volume, it will show the “ Next Volume Is Required ” message.
- A small window will appear, allowing you to manually select the next volume .
- Use the file explorer window to locate the folder where the other archive parts are saved.
- Select the next part based on the naming order (example: select file.part2.rar after file.part1.rar ).
- Make sure the selected file matches the naming format of the archive (no extra characters like (1) and no mismatched numbering).
- WinRAR will resume extraction using the selected volume .
- If additional volumes are missing or stored separately, WinRAR may prompt you again. Repeat the same process until extraction completes.
3. Rename the RAR files in Order
WinRAR relies on a proper naming sequence (such as file.part1.rar , file.part2.rar , file.part3.rar ) to extract multi-volume archives. If a file is named incorrectly, contains extra characters, or is out of order, WinRAR may fail to locate the next volume and show this error. Renaming the files correctly helps WinRAR follow the sequence and extract the archive without interruptions .
Note: Renaming only changes the file name , not the file contents. The goal is to restore the correct sequence so WinRAR can detect the next volume.
- Go to the folder where all the RAR files are saved.
- Make sure all parts of the archive are present and stored in the same folder .
- Check how the parts are currently named . Common patterns include:
file.part1.rar, file.part2.rar, file.part3.rar
file.rar, file.r01, file.r02, file.r03
- Look for files that don’t match the expected numbering pattern (for example, file.part01.rar , file.part1(1).rar , or unrelated names).
- Rename each file so it follows the same order without extra characters or mismatched numbering. Example:
Incorrect: file.part1.rar, file.part3.rar, file.part2(1).rar
Correct: file.part1.rar, file.part2.rar, file.part3.rar
- Make sure the text before the number is exactly the same for all files.
- Only the last part number should change.
- Right-click the first file in the series (usually part1.rar or the main .rar file) and select Extract Here .
- WinRAR should now recognize the sequence and continue extraction normally .
If you still get the same prompt: the archive set is likely incomplete (a part was never downloaded or was removed), or one of the volumes is corrupt and must be re-downloaded from the original source.
