OST stands for Offline Storage Table . It is a database file utilized by Microsoft Outlook, created when a user opens Outlook for the first time and connects to an email server. Outlook maintains a synchronized copy of server data within this OST file, allowing users to access emails even in the absence of a network connection. Modifications made while offline get synchronized once the connection is re-established.

The advantage of an OST file lies in its ability to store a locally-synced version of server data, enabling email accessibility without network connectivity. Users can edit these items offline, and the changes will synchronize with the server once connected.
When establishing a mailbox, if Cached Exchange Mode is disabled, no OST file will be formed, and the server will handle data download as needed.
Contents of an OST File
An OST file contains:
- Emails, notes, tasks, journals, documents, and more.
- Calendar entries, including meetings and appointments.
- Stored Outlook items in their designated folders, complete with properties and values.
- User preferences, such as view settings, email signatures, and message rules.
Features of an OST File
Key characteristics of an OST file include:
- Enabling offline work, with local saving of changes that sync upon reconnection.
- Support for BitLocker encryption in Outlook 2007 and later versions.
- Capability to convert OST to PST for backup or archival purposes.
- Individual OST files for each Outlook profile, permitting multiple OSTs on a single system.
- Option to access additional mailboxes via Exchange account connections.
Account Types for OST File
OST files are specific to Exchange accounts, IMAP, or MAPI accounts, and accounts from Office 365/Outlook 365 and Outlook.com.
Types of Outlook Files for Different Account Types
Outlook uses PST (Personal Storage Table) files for POP accounts, distinct from OST files. Both OST and PST utilize a Personal Folder File (PFF) format. Additionally, Outlook employs an Outlook Group Storage file (NST or GST), used for group communications and similar to OST files in function.
Difference Between OST and PST
OST and PST differ in several aspects:
- Data in PST is stored and removed from the server locally, while OST remains synchronized across devices.
- Offline work is not possible with PST files.
- OST files are exclusive to Microsoft services like Outlook or Exchange, while PST files are more versatile.
- PST files are transportable and can be used on different systems. Contrastingly, OST files are non-portable.
- Automatic synchronization over a network is absent in PST files.
- Both file types utilize Scanpst.exe for file repair.
OST Supported Outlook Versions
Outlook has supported PST files since Outlook 97. OST files have been integral for offline use alongside Microsoft Exchange and have been default since the introduction of Cached Exchange Mode in Outlook 2003.
Reasons to Locate an OST File
There may be occasions necessitating direct OST file access:
- Issues with Outlook starting up.
- Errors indicating OST inaccessibility or unrecognized data formats.
- Conversion of OST to PST, valuable for recovering data from deleted/disabled server profiles or when export and backup to PST are unfeasible.
- Relocation of oversized OST files to storage with greater capacity.
Location of OST File
The OST file location varies depending on Outlook version. Here are methods for finding it:
1. Through Outlook
Outlook provides a feature to find the OST file location:
Open Directly
- Open Outlook, right-click on the email account, and select Open File Location ; this opens the File Explorer to the OST file’s location. Directly Open the OST File in Outlook
Use the Outlook Account Settings
For Outlook 2013, 2016, 2019, or 2021:
- Navigate to Info > Account Settings > Account Settings . Open Outlook Account Settings
- Under the Data Files tab, choose the desired file, then click Open File Location to bring up the File Explorer with the OST file location. Open the Location of the OST File in the Outlook Account Settings
2. Check the Default Location
If Outlook is inaccessible, resort to checking the OST file’s default site, which varies by Outlook and OS version. Refer to the image provided to locate the default file path.
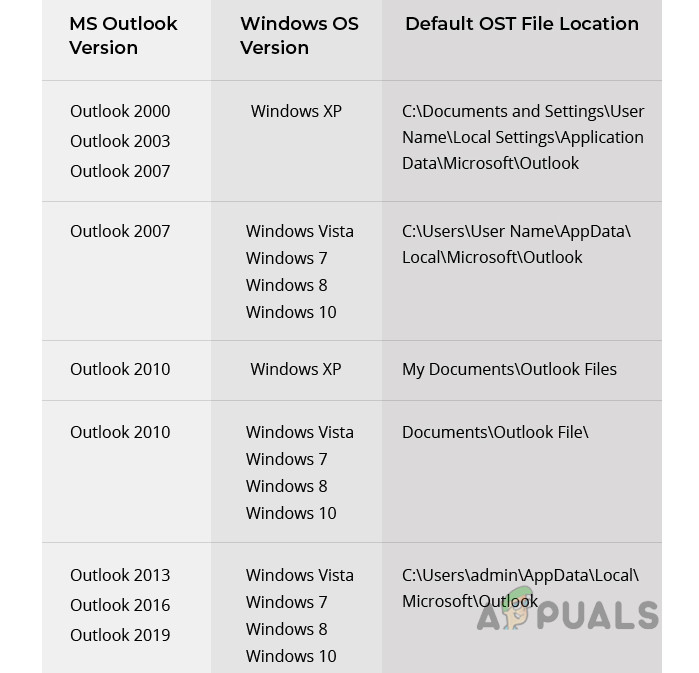
Default Location of OST Files in Different Outlook Versions
3. Use the Mail in the Control Panel
If Outlook remains inoperative:
- Open the Control Panel and select Mail . Open Mail in the Windows Control Panel
- Click Data Files , followed by Open File Location to reveal the OST directory via File Explorer. Open the OST File Location Through the Control Panel’s Mail
Reduce the Size of the OST Files
Large OST files (over 50GB) may require size reduction due to synchronization issues:
- Limit cache duration between 3 to 6 months to prevent excessive file growth. Change the Cached Mode of the OST File to 3 Months
- Close Outlook and relocate to the OST file’s directory.
- Optionally Rename the OST file adding a .old extension or move it as a backup, also consider converting to PST.
- Delete the file, ensuring a backup exists (deleting OST differs from deleting PST which also removes data), then reopen Outlook.
- If issues persist, remove Shared Mailboxes or Folders to troubleshoot size problems. Disable Shared Folders in the OST File Settings
- If necessary, eliminate the email profile, remove OST, and reintroduce Outlook.
- Add the email account but restrict Shared Mailboxes and cache settings as done previously.
Further file size limits can be established via the registry edit, per Microsoft’s guidance , or by utilizing Symbolic Links .
Open and Convert the OST File
At times, opening or converting an orphaned OST file may be required. Directly opening or importing is not feasible, so consider these steps or third-party tools:
1. Convert OST to PST
When able to access the OST file in Outlook:
- Open Outlook, move to Open & Export > Export to a File . Open Import Export in the Open & Export Tab of Outlook
- Choose Outlook Data File (.pst) and proceed to next steps. Export the OST File to a PST File
- Select the location for the PST file and finalize the process.
2. Open the OST File without Outlook
If the OST cannot be opened with Outlook, try third-party utilities, but please exercise caution and use at your own risk:
- Explorer Tool
- Viewer Tool
- OST Conversion Applications
OST Viewer Tool
For instance, the OST Viewer Tool can open the OST file.
- Download and install the OST Viewer Tool , or opt for the online version .
- Select the problematic OST file with the app. Use the Viewer Tool to Open the OST File
- Choose the relevant conversion mode or opt for restoration in case of corruption.
- Once loaded, proceed with conversion or extraction as needed.
How to Fix “Printer is in an error state” Issue?
The error “ WinRAR Error: Next Volume Is Required ” usually appears when you’re extracting a multi-part RAR archive and WinRAR can’t find (or can’t correctly identify) the next file in the sequence . This often happens when a volume is missing , stored in a different folder , or renamed in a way that breaks the archive’s expected order .

In this guide, we’ll go over the most reliable fixes confirmed by affected users, along with what each method is doing behind the scenes so you can choose the right one for your situation.
Important: To extract multi-volume archives, you should always start extraction from the first file in the set. This is usually file.part1.rar , or (in older sets) the main .rar file that comes before .r01 , .r02 , and so on.
1. Download and Place the Missing RAR File
WinRAR needs all parts of a multi-volume archive to complete extraction. This error usually appears when one of the volumes in a set like .part2.rar , .r01 , .r02 , .001 , and similar naming formats is missing . Downloading the missing volume and placing it in the same folder as the other parts allows WinRAR to continue extracting normally .
- Look at the error message or review the list of archive parts in the folder.
- Identify which volume is missing (for example, part2.rar , .r02 , .001 , etc.).
- Go back to the website or source where you downloaded the archive.
- Locate and download the exact missing file using the same naming format as the others.
- Make sure the new file name matches the pattern of the rest. Example: If you have file.part1.rar and file.part3.rar , the missing one must be file.part2.rar .
- Move the downloaded missing volume into the same folder as the other archive parts.
- Confirm that all parts are in a single folder before extracting.
- Right-click the first file in the series (usually part1 or the main .rar file) and select Extract Here or Extract to Folder .
- WinRAR should now detect all volumes and continue extraction normally .
2. Manually Browse & Select the Next Volume
Use this method only if the next volume already exists , but WinRAR is failing to detect it automatically. This can happen due to incorrect naming , the file being in a different location , or a temporary file access issue. Manually browsing helps WinRAR locate the correct volume and resume extraction without interruption .
- Right-click the first file in the series (usually .rar or part1.rar ) and select Extract Here or Extract to Folder .
- When WinRAR cannot find the next volume, it will show the “ Next Volume Is Required ” message.
- A small window will appear, allowing you to manually select the next volume .
- Use the file explorer window to locate the folder where the other archive parts are saved.
- Select the next part based on the naming order (example: select file.part2.rar after file.part1.rar ).
- Make sure the selected file matches the naming format of the archive (no extra characters like (1) and no mismatched numbering).
- WinRAR will resume extraction using the selected volume .
- If additional volumes are missing or stored separately, WinRAR may prompt you again. Repeat the same process until extraction completes.
3. Rename the RAR files in Order
WinRAR relies on a proper naming sequence (such as file.part1.rar , file.part2.rar , file.part3.rar ) to extract multi-volume archives. If a file is named incorrectly, contains extra characters, or is out of order, WinRAR may fail to locate the next volume and show this error. Renaming the files correctly helps WinRAR follow the sequence and extract the archive without interruptions .
Note: Renaming only changes the file name , not the file contents. The goal is to restore the correct sequence so WinRAR can detect the next volume.
- Go to the folder where all the RAR files are saved.
- Make sure all parts of the archive are present and stored in the same folder .
- Check how the parts are currently named . Common patterns include:
file.part1.rar, file.part2.rar, file.part3.rar
file.rar, file.r01, file.r02, file.r03
- Look for files that don’t match the expected numbering pattern (for example, file.part01.rar , file.part1(1).rar , or unrelated names).
- Rename each file so it follows the same order without extra characters or mismatched numbering. Example:
Incorrect: file.part1.rar, file.part3.rar, file.part2(1).rar
Correct: file.part1.rar, file.part2.rar, file.part3.rar
- Make sure the text before the number is exactly the same for all files.
- Only the last part number should change.
- Right-click the first file in the series (usually part1.rar or the main .rar file) and select Extract Here .
- WinRAR should now recognize the sequence and continue extraction normally .
If you still get the same prompt: the archive set is likely incomplete (a part was never downloaded or was removed), or one of the volumes is corrupt and must be re-downloaded from the original source.
