- Removing formulas in Excel enhances data security, simplifies sharing, and ensures data integrity.
- To remove formuals, duplicate the worksheet, select all cells, and paste values to replace formulas with calculated results.
- While removing formulas can enhance data security and prevent unintended changes, it’s essential to ensure that the data integrity is maintained and that critical calculations are not compromised during the process.
Saving Excel workbooks without formulas is vital for data security and confidentiality. Removing formulas keeps sensitive calculations hidden, ensuring only calculated values are visible. This practice enhances data protection and streamlines sharing, safeguarding the integrity of your information while retaining its analytical value.
In this guide, we explore the steps to save Excel workbooks without formulas and highlight their significance in data management. Let’s delve into the process and understand its benefits.

Excel worksheet
- Can You Save Excel Workbook Without Formulas? ↪ Uses of Saving Excel Workbook Without Formulas
- How to Remove Formulas from Excel Workbook Step 1: Open Original Workbook Step 2: Select Worksheet Step 3: Move or Copy Step 4: Choose Destination Workbook & Save Step 5: Select All Cells Step 6: Paste Values Step 7: Save Workbook
- Google Sheets vs. Excel at Saving Workbook Without Formulas
- Final Words
Can You Save Excel Workbook Without Formulas?
Yes, you can save an Excel workbook without formulas by copying the worksheets containing formulas to a new workbook and pasting only the values calculated by the formulas.
↪ Uses of Saving Excel Workbook Without Formulas
- Enhanced Security : Protect sensitive formulas and prevent accidental modification.
- Simplified Sharing : Share data without revealing underlying formulas or calculations.
- Data Integrity : Ensure that data remains intact without the risk of unintended formula changes.
How to Remove Formulas from Excel Workbook
Here’s how you can remove formulas from an Excel workbook:
Step 1: Open Original Workbook
Open your original Excel workbook containing sensitive formulas.

Open the worksheet with formulas
Step 2: Select Worksheet
Navigate to the tab of the worksheet that contains sensitive formulas.

Navigate to the tab with formulas
Step 3: Move or Copy
Right-click on the worksheet’s tab and select “ Move or Copy ” from the popup menu.
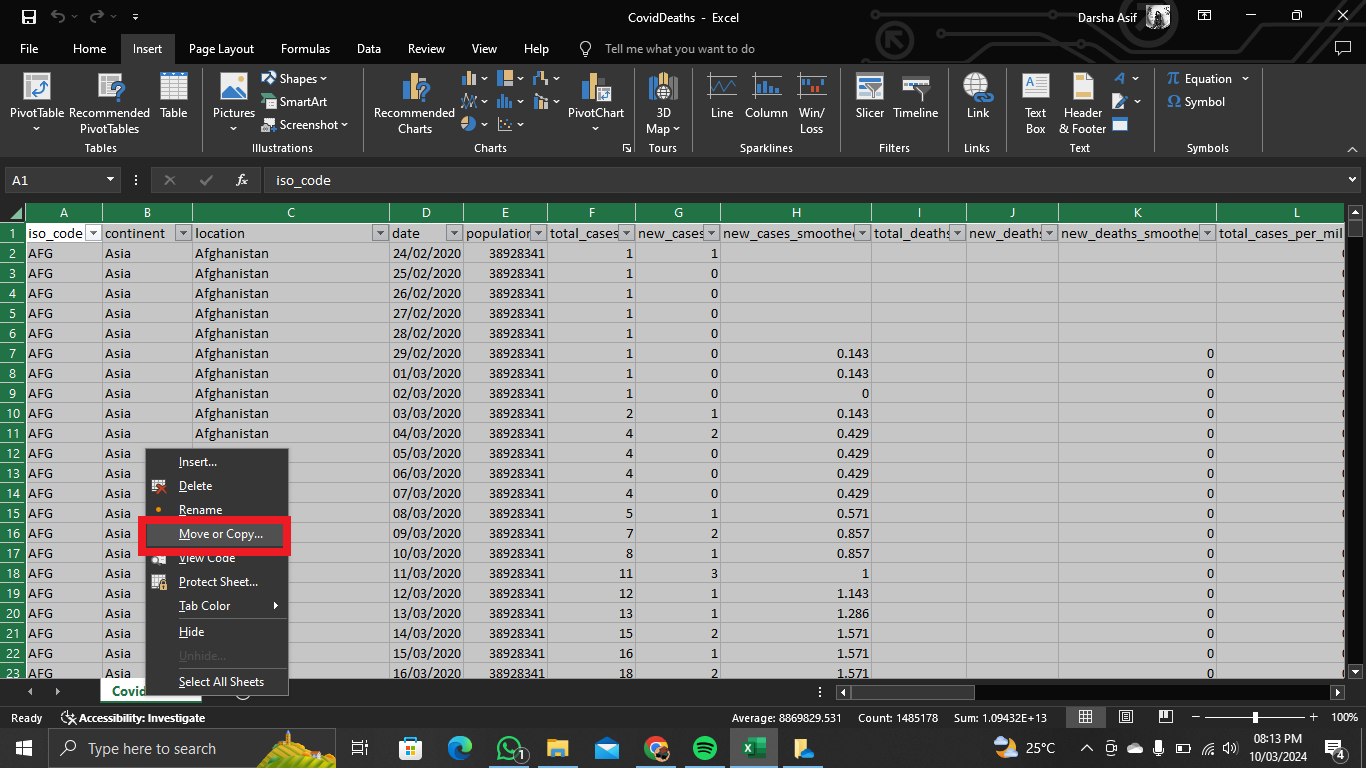
Select Move or Copy
Step 4: Choose Destination Workbook & Save
Select “ (new book) ” from the “ To book ” drop-down list. Ensure the “ Create a copy ” check box is selected and click “ OK .”

Select new book and check the box for Create a copy
A new Excel workbook is created with the copied worksheet pasted into it. Save this new workbook with a different name to preserve the original workbook.
Step 5: Select All Cells
Select all the cells on the copied worksheet by pressing Ctrl+A or clicking the square in the upper-left corner of the cells.

Select all cells
Step 6: Paste Values
Now, click the “ Values ” button in the “ Paste Values ” section of the drop-down menu. The worksheet now contains only the results from the formulas in the original worksheet, not the formulas themselves.
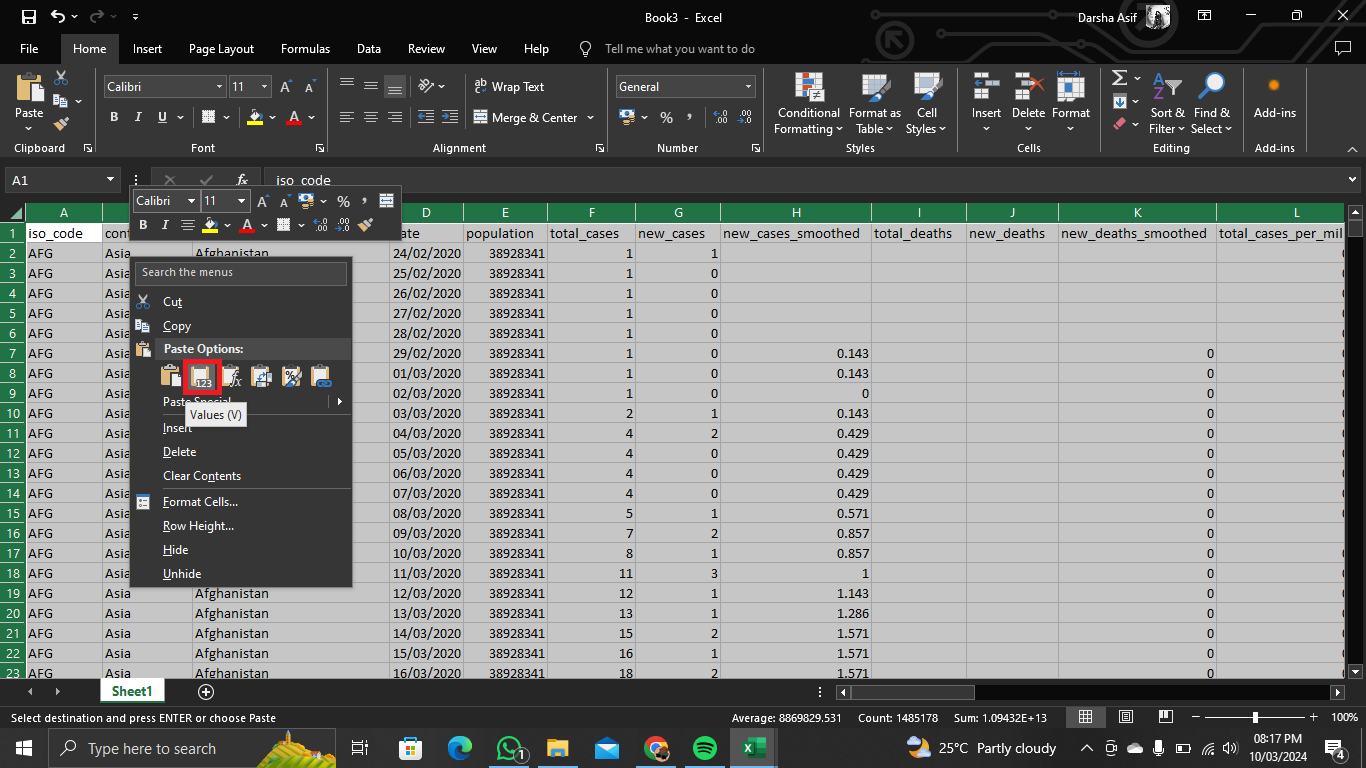
Select Paste Values
Follow the same procedure for each worksheet in the original workbook from which you want to remove the formulas.
Step 7: Save Workbook
Press Ctrl + S ( Windows ) or Command + S ( Mac ) to save the workbook. Enter a file name and select “ Save ” to confirm the action. Make sure the workbook is saved in “ .xlsx ” format to maintain compatibility for recipients who need to view or edit the sheet in Excel.

Save the workbook
Google Sheets vs. Excel at Saving Workbook Without Formulas
Google Sheets and Excel allow users to manipulate data by removing formulas and pasting values, providing flexibility and control over spreadsheet calculations and outputs. Both platforms offer similar functionality for removing formulas and pasting values.
In Google Sheets , the process involves duplicating the sheet, selecting the entire duplicated sheet, and then pasting special to paste values. This method is straightforward and intuitive within the Google Sheets environment.
In Excel , the process is quite similar. Users duplicate the worksheet, select all cells, and then paste special to paste values. While the steps differ slightly due to interface variations, the overall concept remains consistent between the two platforms. The decision between the two platforms ultimately depends on user preference, familiarity, and specific collaboration and data analysis requirements.
Final Words
In summary, the guide has outlined how to remove formulas and paste values in Excel, helping users manage data securely and efficiently. By mastering these steps, you can ensure your spreadsheet data remains accurate and accessible while simplifying collaboration. With these insights, you can confidently manage spreadsheets, improving productivity and task effectiveness.
Yes, you can undo the removal of formulas by using the “Undo” feature immediately after pasting values. Simply press Ctrl + Z (Windows) or Command + Z (Mac) to undo the action.
Yes, you can manually re-enter formulas after pasting values. However, this process may be time-consuming, especially for large datasets.
No, removing formulas only affects the calculation logic within the spreadsheet. The original data remains intact.
Yes, you can selectively remove formulas by manually copying and pasting values for specific ranges of cells rather than the entire worksheet.
How to Fix “Printer is in an error state” Issue?
The error “ WinRAR Error: Next Volume Is Required ” usually appears when you’re extracting a multi-part RAR archive and WinRAR can’t find (or can’t correctly identify) the next file in the sequence . This often happens when a volume is missing , stored in a different folder , or renamed in a way that breaks the archive’s expected order .

In this guide, we’ll go over the most reliable fixes confirmed by affected users, along with what each method is doing behind the scenes so you can choose the right one for your situation.
Important: To extract multi-volume archives, you should always start extraction from the first file in the set. This is usually file.part1.rar , or (in older sets) the main .rar file that comes before .r01 , .r02 , and so on.
1. Download and Place the Missing RAR File
WinRAR needs all parts of a multi-volume archive to complete extraction. This error usually appears when one of the volumes in a set like .part2.rar , .r01 , .r02 , .001 , and similar naming formats is missing . Downloading the missing volume and placing it in the same folder as the other parts allows WinRAR to continue extracting normally .
- Look at the error message or review the list of archive parts in the folder.
- Identify which volume is missing (for example, part2.rar , .r02 , .001 , etc.).
- Go back to the website or source where you downloaded the archive.
- Locate and download the exact missing file using the same naming format as the others.
- Make sure the new file name matches the pattern of the rest. Example: If you have file.part1.rar and file.part3.rar , the missing one must be file.part2.rar .
- Move the downloaded missing volume into the same folder as the other archive parts.
- Confirm that all parts are in a single folder before extracting.
- Right-click the first file in the series (usually part1 or the main .rar file) and select Extract Here or Extract to Folder .
- WinRAR should now detect all volumes and continue extraction normally .
2. Manually Browse & Select the Next Volume
Use this method only if the next volume already exists , but WinRAR is failing to detect it automatically. This can happen due to incorrect naming , the file being in a different location , or a temporary file access issue. Manually browsing helps WinRAR locate the correct volume and resume extraction without interruption .
- Right-click the first file in the series (usually .rar or part1.rar ) and select Extract Here or Extract to Folder .
- When WinRAR cannot find the next volume, it will show the “ Next Volume Is Required ” message.
- A small window will appear, allowing you to manually select the next volume .
- Use the file explorer window to locate the folder where the other archive parts are saved.
- Select the next part based on the naming order (example: select file.part2.rar after file.part1.rar ).
- Make sure the selected file matches the naming format of the archive (no extra characters like (1) and no mismatched numbering).
- WinRAR will resume extraction using the selected volume .
- If additional volumes are missing or stored separately, WinRAR may prompt you again. Repeat the same process until extraction completes.
3. Rename the RAR files in Order
WinRAR relies on a proper naming sequence (such as file.part1.rar , file.part2.rar , file.part3.rar ) to extract multi-volume archives. If a file is named incorrectly, contains extra characters, or is out of order, WinRAR may fail to locate the next volume and show this error. Renaming the files correctly helps WinRAR follow the sequence and extract the archive without interruptions .
Note: Renaming only changes the file name , not the file contents. The goal is to restore the correct sequence so WinRAR can detect the next volume.
- Go to the folder where all the RAR files are saved.
- Make sure all parts of the archive are present and stored in the same folder .
- Check how the parts are currently named . Common patterns include:
file.part1.rar, file.part2.rar, file.part3.rar
file.rar, file.r01, file.r02, file.r03
- Look for files that don’t match the expected numbering pattern (for example, file.part01.rar , file.part1(1).rar , or unrelated names).
- Rename each file so it follows the same order without extra characters or mismatched numbering. Example:
Incorrect: file.part1.rar, file.part3.rar, file.part2(1).rar
Correct: file.part1.rar, file.part2.rar, file.part3.rar
- Make sure the text before the number is exactly the same for all files.
- Only the last part number should change.
- Right-click the first file in the series (usually part1.rar or the main .rar file) and select Extract Here .
- WinRAR should now recognize the sequence and continue extraction normally .
If you still get the same prompt: the archive set is likely incomplete (a part was never downloaded or was removed), or one of the volumes is corrupt and must be re-downloaded from the original source.
