Gone are the days in which people had a very limited number of choices for decorating their environment. Even if they do manage to find a good variety somewhere, they still did not have the liberty to make modifications to it to fit their own taste. However, now we live in a world of customization where we can easily turn everything into whatever we like without any worries. If we talk about furniture, then we know very well that good furniture is a must for beautifying any infrastructure. Very few people these days accept the readymade furniture as it is. Most of us are habitual of getting it ready on an order with a slight touch of customization at the very least so that it can fulfill our requirements.
More like this: Best Computers For Graphics Design
Now you must be thinking that it sounds very vague if we explain our requirements to someone verbally because they might not interpret it right whatever we are actually trying to convey so there must be some kind of a diagram or a picture with the help of which we can illustrate our requirements clearly. However, not every one of us is a great artist therefore, there should be some tool which can design your requirements for you to be conveyed to someone else. But now, you do not need to worry about this anymore because we are here for you with a list of 5 Best Furniture Design Software . Let us see what these products have in store for us.
1. SketchUp
SketchUp is a very powerful 2D and 3D design software which is extensively used for the purpose of furniture designing. This tool provides support for the Windows and Mac operating systems. This software has a very intuitive and friendly user interface which is liked by both the naive users as well as by the professionals. You can easily create the 3D models of your furniture as well as of your buildings and landscapes with the help of this software. After creating your 2D or 3D designs, you can enhance them to the fullest by making use of the features such as Lightening Effects , Textures , and Animations .
The Walkthrough feature of SketchUp enables you to recheck your created 3D design in order to look for any shortcomings. There is a huge SketchUp 3D Library that can be used to import templates for your furniture design. It has a fully customizable interface. The Share 3D Models feature of this software lets you share your designs as walkthrough animations, scenes or printouts with rest of the SketchUp users. You can even Print your 3D designs with the help of a 3D printer . Moreover, this tool is flexible enough to Import designs as a template from other design software as well as you can Export your SketchUp projects to be used with other design software.
SketchUp
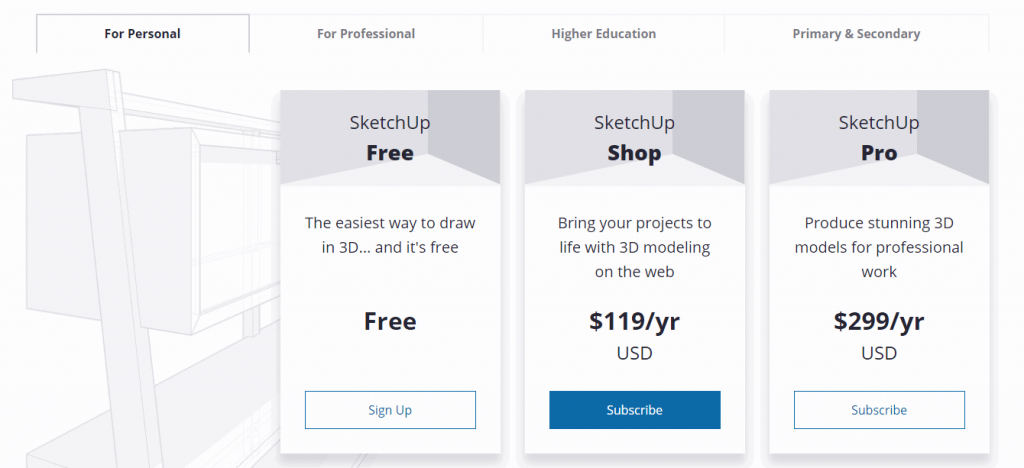
As far as the pricing of this software is concerned, then SketchUp offers us the following four plans:
- SketchUp for Personal- There are a total of three different categories under this plan i.e. Free , Shop , and Pro . The Free version is free of cost, the Shop version costs $119 per year whereas the Pro version is worth $299 per year.
- SketchUp for Professional- There are three distinct categories under this plan i.e. Shop , Pro , and Studio . The price of the Shop version is $119 per year, the Pro version costs $299 per year whereas the Studio version is worth $1199 per year.
- Higher Education- This plan has a total of two different categories. One is for the Students whereas the other one is for the Teachers . SketchUp charges $55 per year for the Students category whereas the Teachers category is further subdivided into three different versions. One of them is free of cost, the second one costs $80 per year whereas the last one is worth $120 per year.
- Primary and Secondary- This plan is divided into two categories i.e. SketchUp for School and SketchUp Pro . The SketchUp for School category is available online for free with a G Suite account whereas the SketchUp Pro category has its desktop versions available for Windows and Mac for free with a State Grant .
SketchUp Pricing
2. CAD Pro Furniture Design Software

CAD Pro Furniture Design Software is a software designed for the Windows operating system that is not limited to only furniture designing but is indeed great at it. With the help of this software, you can conveniently design your cabinets, drawers, doors, cupboards, chairs, tables and much much more. The Sketch Tracing feature of this software is there to help you when you have created a handmade sketch of your furniture on a piece of paper but now you want to add details to it which is difficult for you to do manually. So all you have to do is to scan that sketch and import it to CAD Pro and you will be able to make modifications to it as a CAD Pro project.
CAD Pro Furniture Design Software
This tool not only enables you to create great furniture designs but is also capable of communicating them to others in a very efficient manner. It allows you to Record your designs and to add Voice Instructions to them in order to make them more clear. You can also add Pop-up Text Messages and Photos to your design as the supporting details. There are also loads of free Symbols and Cliparts available in CAD Pro that you can incorporate in your designs. Moreover, you can also create your own symbols or cliparts and then add them to the CAD Pro Library for using later on.
After creating your furniture design, CAD Pro allows you to share your designs with your friends, family, and colleagues with the help of its Send as Mail feature. You can also Save your CAD Pro furniture designs as a PDF for Printing at any time. As far as the pricing of this software is concerned, then it has a very simple yet reasonable pricing strategy. There is only a single version of this software available i.e. CAD Pro Platinum and its price is $99.95 which is a one time cost.

CAD Pro Furniture Design Software Pricing
3. SketchList 3D

SketchList 3D is a very useful software solely dedicated to furniture design. It supports the Windows and Mac operating systems. This specialized furniture design software contains all the tools that are required by professional woodworkers. The Drag and Snap Objects feature of this software allows you to ensure a perfect fit for the very first time whenever you are designing your furniture. You can Dynamically Resize the objects within SketchList 3D in order to modify them as per your requirements.
The Insert Photo Realistic Backgrounds feature is there for you to upload the actual pictures of your room or house to this software in order to provide a realistic environment for designing your flawless furniture. You can make use of the Alignment Tools of SketchList 3D in order to align your furniture such as drawers, tables, cupboards, etc. perfectly with the walls or other furniture present in your room. This software also provides you with an unlimited number of colors and grains in order to make your designs look even more natural. Moreover, you can also define your own Custom Colors to fit your needs.
SketchList 3D
If you have ever run into the problem of creating symmetric designs, then you do not need to worry about this thing anymore. SketchList 3D has a very powerful Cloning and Mirroring feature with the help of which you only need to create one side of your design and the software itself will take care of the symmetry of the other half. This software also gives you the liberty of Drilling Holes and Cutting Shapes in order to give you all the more original and ingenious furniture designing experience.
SketchList 3D offers us a free trial version whereas the details of the paid versions are listed below:
- SketchList 3D Pro- The actual price of this version is $799.99 which is currently discounted to $750 .
- SketchList 3D Hobby- The actual cost of this version is $200 which is presently discounted to $149.99 .
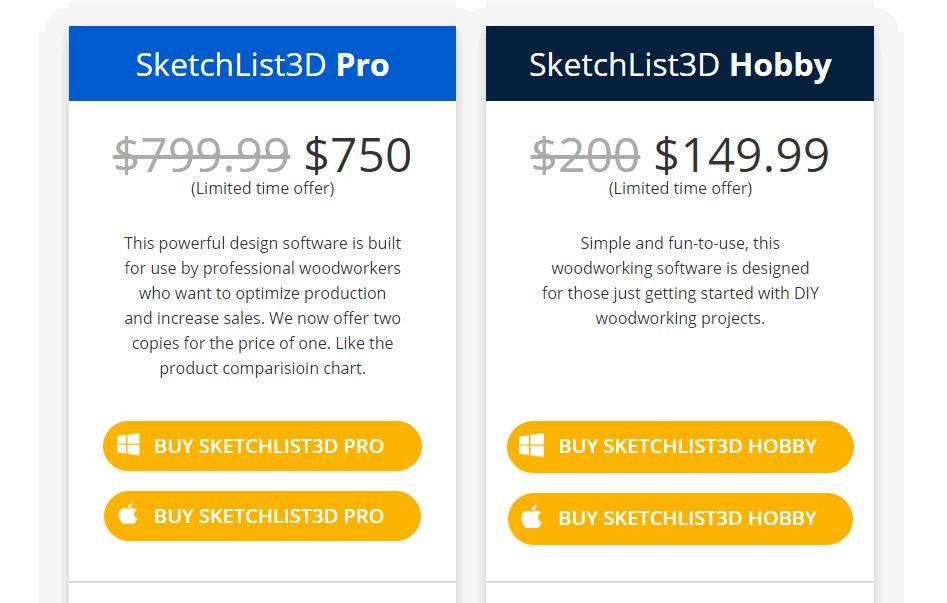
SketchList 3D Pricing
4. SolidWorks
SolidWorks is a very famous computer-aided design (CAD) software created for the Windows operating system. This software is perfect for all kinds of 3D modeling and designing but it specializes in furniture designing. You can create any type of furniture with the help of this software whether it is made up of wood, steel, plastic or anything else. With the Materials , Textures and 3D Elements features of SolidWorks, you can easily add details to your created furniture.
SolidWorks
After designing your furniture, you can also add Doors and Windows to your work environment in order to check your furniture in a Realistic Setting and see if any further changes are required. This software also provides you with the flexibility to work with other Third Party Software along with it so that you can use tools from them as well as per your requirements. SolidWorks offers us a free trial version however, it does not disclose the pricing of its paid versions. For knowing that, you will need to contact the SolidWorks Developers Team .
5. Woodwork for Inventor

Woodwork for Inventor is yet another furniture design software created by AutoDesk for the Windows operating system. This software has a wide range of features for fulfilling all of your furniture designing needs. The Dressup Skeleton Body feature of this software does not let your furniture stay bare rather you can easily dress it up with boards. You can enhance the look of these boards with the help of the Trimming feature of this software. Woodwork for Inventor tool is efficient enough to get Automatic Measurements and Size Calculations of your furniture.
The Material Assignment feature of this software offers an extensive variety of different materials such as wood, steel, plastic, etc. to be used for your furniture. Also, you can even use these materials in various different forms like boards, rods, edge bands, etc. You can accurately align various components of your furniture with the help of the Arrange Furniture Hardware feature of Woodwork for Inventor. It also enables you to perfectly assemble all your furniture parts with the help of the little elements such as the screws, nuts, and bolts, etc.
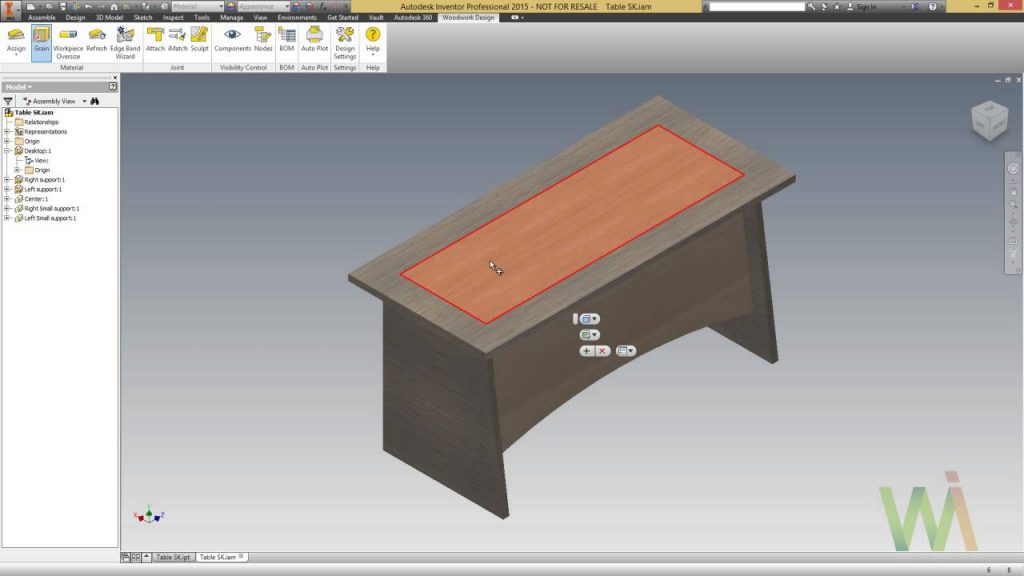
Woodwork for Inventor
This software is efficient enough to create the connections for your hinges and other joints with the help of its Automatic Generation of Mortises and Tenons feature. This software also lets you design Multi-Body Skeleton Designs by making use of its iBox Components . You can even add different Textures and multiple Paint Coatings to your furniture in order to make them look more finished. You can also Generate a Drawing Bundle with the help of this software which is nothing but the details of your designs summarized in the form of a proper report.
The Bill of Materials Generator feature of Woodwork for Inventor is there for you to generate a detailed list of all the components used in your design, product structure, purchased components, cutting list, a general list of parts, etc. This bill is generated in the form of an Excel File . It is especially useful for you if you are a professional furniture designer and you convey each and every detail of your product manufacturing to your client in order to provide him with the maximum level of trust and satisfaction. Moreover, this auto-generated bill is so efficient that it automatically updates itself as you make changes to your furniture design.

Woodwork for Inventor
At times, you want to design something that resembles somewhat to your previous projects and therefore you do not want to start building it from scratch. Well, Woodwork for Inventor resolves this problem for you with its Use of Prototype and Assembly Copying feature. This feature enables you to use the sketch of any of your older projects as a prototype or a template and then you can build your new design on top of it very conveniently. Last but not least, this software offers a free trial version whereas you will need to contact its Developer Team in order to know the pricing of its three paid licenses i.e. Home , Educational and Commercial .
How to Fix “Printer is in an error state” Issue?
Embarking on the journey of 3D printing is both exciting and, at times, a bit daunting. Thankfully, this innovative technology has become considerably accessible, allowing users to convert digital designs into real-world objects. For 2024, a wide selection of 3D printers is designed specifically for beginners.

This guide offers genuine recommendations whether you are an educator, an entrepreneur working on prototypes, or a hobbyist pushing creative boundaries, to help establish a solid base for your 3D printing endeavors. But before we dive into these top picks, let’s explore what makes a 3D printer truly outstanding. Here’s a breakdown of the key considerations based on specific needs and applications.
Print Quality: Focus on obtaining high-quality prints first and foremost. Opt for a printer that generates detailed, clean, and precise prints, as these are crucial for any printing project. Elements such as resolution, measured in microns, play a role; a lower micron count results in a higher resolution. Furthermore, the layer height is pivotal, with thinner layers yielding finer details. While faster speeds can reduce print time, they might affect print quality, hence balancing speed and quality is key.
Build Volume: The build volume dictates the maximum size of objects you can print. Choose a printer with a build volume that aligns with your intended print sizes.
Reliability and Durability: A dependable 3D printer should consistently produce quality prints and remain durable over time. Prioritize printers with robust construction and reliable components.
Ease of Use: For beginners and those desiring easy printing, prioritize features that enhance usability. Look for elements like a user-friendly interface, perhaps via touchscreens or intuitive software. Automatic bed leveling diminishes the necessity for manual calibration, streamlining the process. Additionally, filament sensors are handy for notifying users about low filament levels or if issues arise during printing.
Material Compatibility: Projects may require diverse materials. Top 3D printers support multiple filaments like PLA, ABS, PETG, and specialized filaments such as flexible or composite variants.
Connectivity: Depending on your setup, connection options for your printer may include USB , SD card, Wi-Fi , or Ethernet. Some models even offer remote monitoring and control via apps.
Software: The software included with the printer, or compatible options, should smoothly translate designs into printable files. Look for slicer software balancing user-friendliness with advanced features.
Safety Features: Safety is paramount, particularly in educational settings or around children. Consider printers with enclosed areas for temperature regulation and burn prevention. Furthermore, HEPA filters reduce potentially harmful particle emissions, enhancing operational safety.
Support and Community: Having a strong user community and excellent customer support is invaluable, especially for troubleshooting and learning how to use your printer.
Price: Lastly, consider the cost. The best printer for you balances these factors with your budget.
Here, we have intricately curated a list of the best 3D printers for beginners. So, let’s get started.
1. Creality Ender 3 V2 Neo
Best Value
Pros
- Auto-Leveling
- Improved Extruder System
- Removable Build Plate
- Print Resume Feature
Cons
- No Touchscreen
- Print Speed Limitations
- No Double Z-Axis
- Bare-Bones Appearance
No products found.
No products found.
The Creality Ender 3 V2 Neo combines accessibility with precision, designed to make 3D printing approachable without sacrificing quality. This model exemplifies Creality ‘s dedication to innovation, incorporating a CR Touch auto-leveling system for perfect layering. The printer features a PC steel printing platform, delivering strong adhesion and a smooth foundation for creations.
Its all-metal Bowden extruder ensures durability and stable performance, suitable for both beginners and experienced users. This upgraded version of the well-known Ender 3 V2 model is crafted with user-friendliness and print quality in focus. It comes 95% pre-installed, facilitating an easy setup.

Creality Ender 3 V2 Neo
The addition of the CR Touch auto-leveling kit significantly improves leveling accuracy, while the PC steel platform and all-metal Bowden extruder support its dependability and longevity.
↪Pros
- Auto-Leveling: The CR Touch auto-leveling feature performs excellently, simplifying the process for beginners by negating manual leveling challenges.
- Improved Extruder System: Enhanced with metal construction, the extruder system boosts the printer’s performance and durability.
- Removable Build Plate: The removable build plate eases print removal, preventing damage caused by overly adhered prints.
- Print Resume Feature: The print resume feature saves progress during power outages, allowing for a smooth continuation once power is restored.
↪Cons
- No Touchscreen: Despite its improvements, the Ender 3 V2 Neo lacks a touchscreen interface, which could enhance user experience.
- Print Speed Limitations: Higher speeds (around 120mm/s) may result in reduced print quality, indicating an optimization for moderate speeds.
- No Double Z-Axis: Missing a double Z-axis, the printer might not offer the maximum stability and precision that some users seek.
- Bare-Bones Appearance: Some might find the Ender 3 V2 Neo’s design quite basic, lacking the aesthetic appeal found in other models.
This printer is part of Creality’s initiative to make 3D printing more accessible and user-friendly while incorporating features catering to advanced users. It strikes a balance between usability and performance, making it a suitable choice for many 3D printing enthusiasts.
2. Original Prusa i3 MK3S+
Best Overall
Pros
- High-Quality Prints
- User-Friendly Software
- Good Support Resources
- Included PLA Spool
Cons
Build Volume
No Built-In 3D Scanner
Dated Interface
Price
The Original Prusa i3 MK3S+ symbolizes continuous innovation, reflecting years of meticulous enhancement to provide superior print quality and reliability in 3D printing. A key feature is the SuperPINDA probe, which ensures meticulous first-layer calibration, paving the way for flawless prints. Its advanced extruder is engineered to handle filament smoothly and adapt seamlessly to various types, ensuring hassle-free printing.
More than a tool, this printer opens a world of precision and limitless possibilities, built upon Prusa’s lasting dedication to quality. As an evolution from the MK3S , the MK3S+ introduces enhancements while preserving the reputable Prusa i3 series’ legacy.
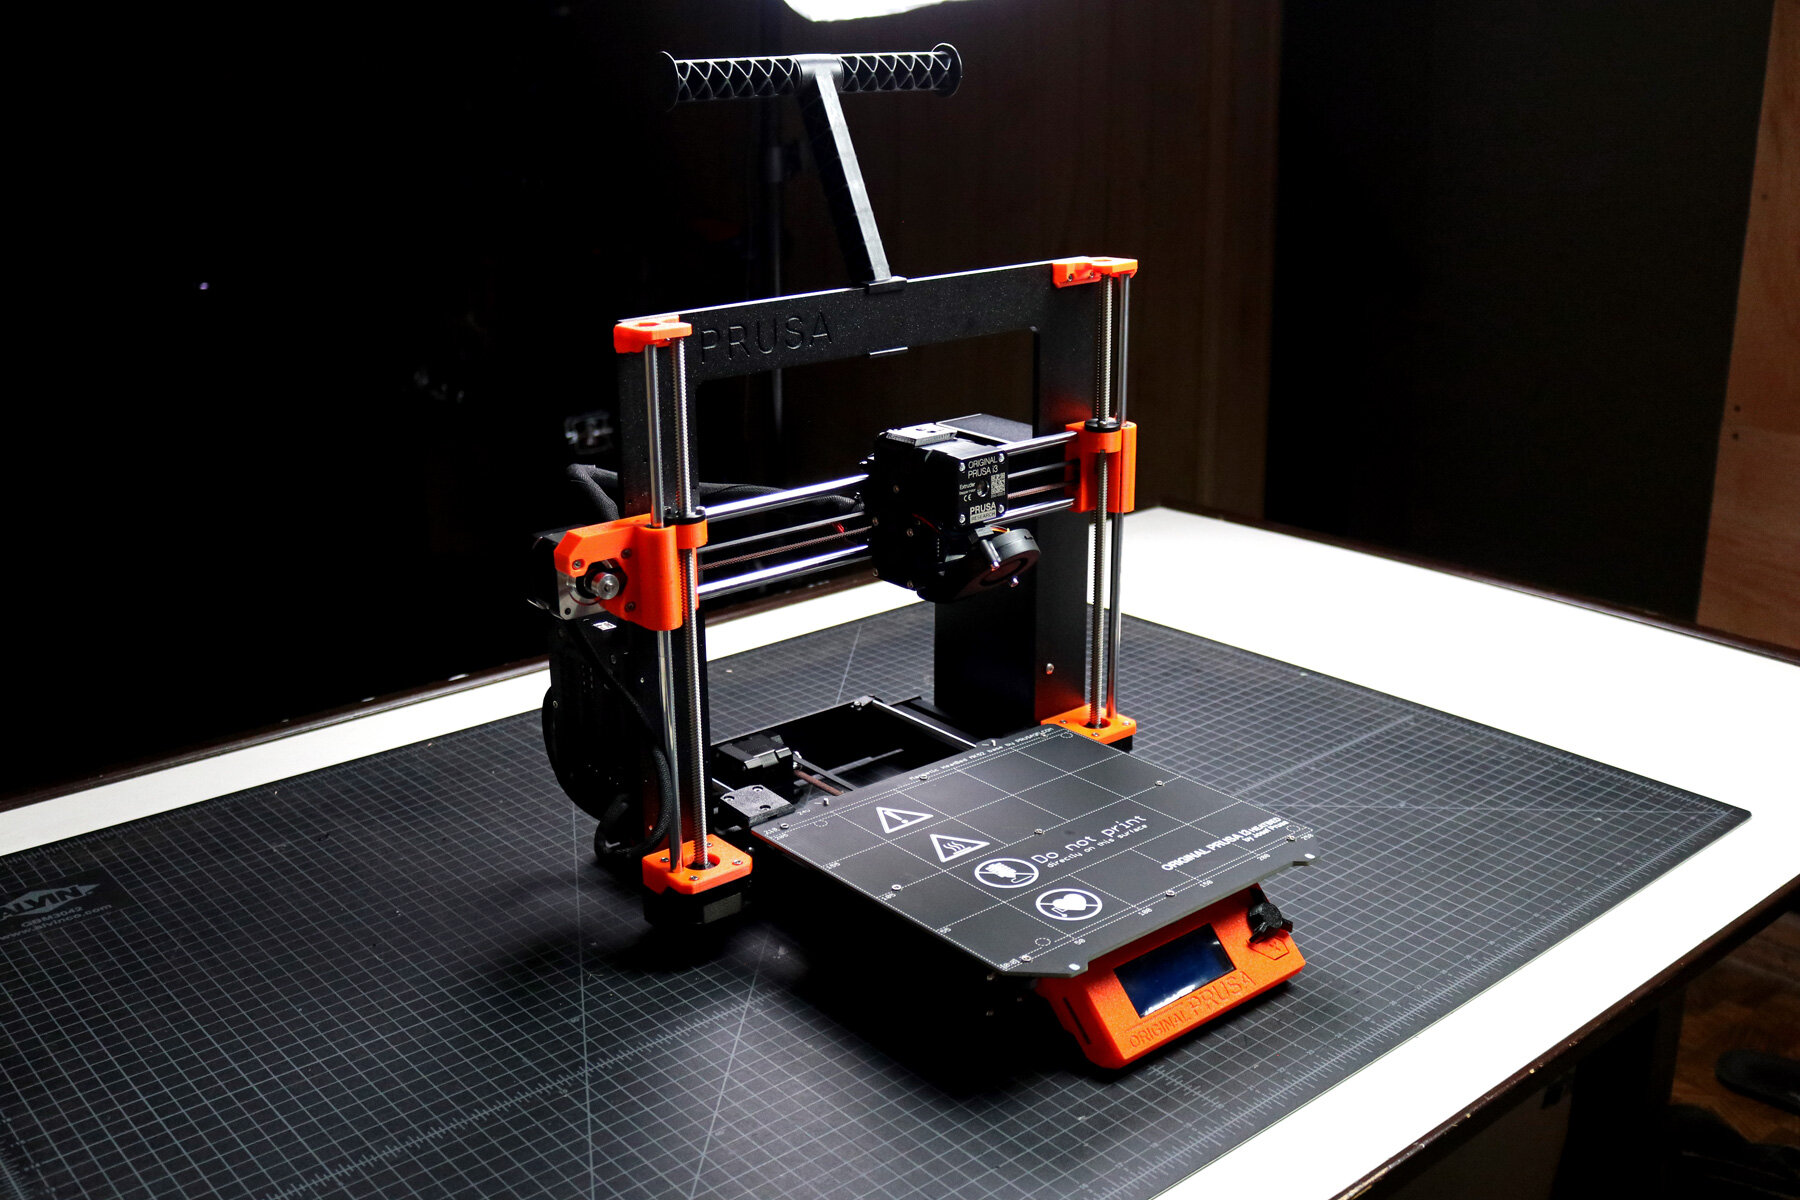
Original Prusa i3 MK3S+
Additionally, the integrated filament sensor detects any filament type or color, enhancing its functionality. Retaining its direct drive system, the MK3S+ remains notably advantageous for printing flexible materials, lending versatility to a broad spectrum of printing requirements.
↪Pros
- High-Quality Prints: The MK3S+ consistently delivers high-quality prints without errors, demonstrating its dependability.
- User-Friendly Software: The printer is accompanied by easy-to-use yet powerful software that supports multiple filament types.
- Good Support Resources: Prusa offers a professionally printed user guide and excellent support materials for the MK3S+.
- Included PLA Spool: A 1-kilogram PLA spool is included with the MK3S+, a beneficial bonus for beginners.
↪Cons
- Build Volume: The build volume might be slightly small for the price, which could limit larger projects.
- No Built-In 3D Scanner: The MK3S+ lacks a built-in 3D scanner, unlike some other models.
- Dated Interface: The LCD screen and interface are somewhat outdated compared to more current 3D printers.
- Price: Although the MK3S+ is a robust printer, some users may feel it doesn’t justify the cost considering market alternatives.
The Original Prusa i3 MK3S+ remains popular in the 3D printing community for its consistent performance and Prusa’s commitment to open-source development. It strikes a balance between ease of use and advanced capabilities for both enthusiasts and professionals.
3. Bambu Lab P1P
Best Speed
Pros
- Blazing Speed
- Simple Auto Bed Leveling
- DIY Custom Side Panels
- Optional Multicolor Capabilities
Cons
Appearance
Noise Level
Proprietary Parts
Filament Wastage
The Bambu Lab P1P excels in speed, characterized by a robust CoreXY framework engineered for rapid printing results. Ready for action from the start, this printer features a direct drive extruder and an all-metal hot end, accommodating various filament types.
Its automatic bed leveling sensor ensures a perfect first layer is effortlessly achieved, enabling prints that are both swift and visually appealing. Bambu Lab’s creation emphasizes not just speed but also reliability and versatility. The P1P offers a spacious build volume of 256 x 256 x 256 mm , coupled with impressive speeds reaching 500 mm/s and an acceleration of 20,000 mm/s .
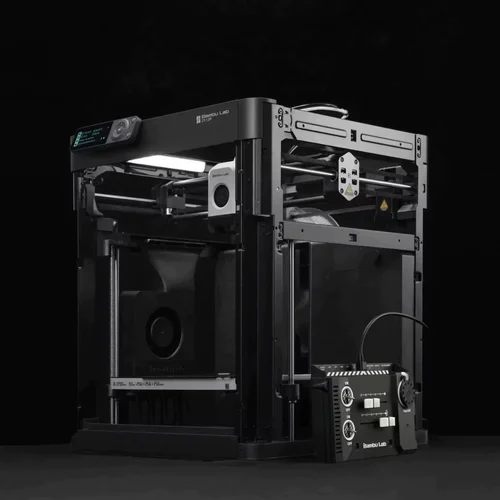
Its direct drive extruder and high-temperature hot end facilitate printing with various filaments, including PLA, PETG , and TPU .
Additionally, the P1P is designed with future enhancements in mind, being compatible with Bambu Lab’s Automatic Material System (AMS) for multicolor printing, and can be further customized with printable mod plates, adding layers of flexibility to meet changing needs.
↪Pros
- Blazing Speed: A key highlight is the P1P’s speed, which facilitates rapid printing without compromising quality.
- Simple Auto Bed Leveling: The auto bed leveling streamlines the printing process, particularly advantageous for beginners.
- DIY Custom Side Panels: Customizable side panels add a degree of personalization.
- Optional Multicolor Capabilities: Utilizing the AMS unit, the P1P supports multicolor prints, enhancing creative opportunities.
↪Cons
- Appearance: The P1P’s “naked” design may not appeal to everyone as it lacks side panels.
- Noise Level: The printer can be loud in operation, which may be a concern for certain settings.
- Proprietary Parts: Using proprietary parts can increase maintenance and upgrade costs.
- Filament Wastage: The AMS unit can lead to filament wastage, affecting cost-efficiency.
The Bambu Lab P1P is appealing to those seeking speed, reliability, and customization with the flexibility to adapt to various needs.
4. Anycubic Kobra Max
Best for Large Prints
Pros
- Enormous Build Size
- Accurate Auto Bed Leveling
- Convenient Build Plate
- Comprehensive Kit
Cons
Large Footprint
Bed Slinger Design
No Larger Nozzle Included
Slow Printing
The Anycubic Kobra Max is a powerhouse in 3D printing, offering an impressive build volume that allows creators to manifest large-scale concepts. With its responsive touchscreen and remarkable printing speed, the Kobra Max distinguishes itself in FDM printing.
Its robust frame and automatic bed leveling offer stability and precision, making it a preferred choice for tackling substantial projects. Designed for hobbyists, enthusiasts, and professionals, the Anycubic Kobra Max boasts a large build volume of 400 x 400 x 450 mm , perfect for ambitious prints. The 4.3-inch LCD touchscreen simplifies navigation and operation.
Anycubic Kobra Max
With a maximum printing speed of 180mm/s , faster than many rivals, it ensures swift progress without sacrificing quality, supported by its solid aluminum frame for continuous stability and precision.
↪Pros
- Enormous Build Size: Ideal for large prints like props and costumes, accomplishing projects in a single run.
- Accurate Auto Bed Leveling: The auto leveling yields precise results, simplifying usage.
- Convenient Build Plate: The coated glass bed facilitates easy print releases as they cool.
- Comprehensive Kit: It comes with essential tools and a PLA sample to start off immediately.
↪Cons
- Large Footprint: The significant size requires ample space to operate effectively.
- Bed Slinger Design: The design might be a drawback for some users.
- No Larger Nozzle Included: Lacking a larger nozzle, which can expedite larger prints.
- Slow Printing: Despite a high maximum speed, actual printing can be slow.
The Anycubic Kobra Max offers a budget-friendly solution for those requiring significant build volume, prized for automatic bed leveling and touchscreen interface. However, consider the large size and slower operation pace.
5. Toybox 3D Printer
Best for Newbies/Children
Pros
- Ease of Use
- Creative Freedom
- Kid-Friendly Design
- Educational Value
Cons
Small Build Area
Internet Dependency
Unheated Bed
Proprietary Filament
The Toybox 3D Printer introduces a delightful touch of innovation, sparking creativity for both kids and adults. Its compact, intuitive design reshapes play by allowing users to easily design and print toys. With a simple, user-friendly interface, the Toybox invites everyone into the realm of 3D printing, serving as an ideal gateway for young enthusiasts.
Featuring a modest build volume of 7 x 8 x 9 cm , perfect for small hands and big imaginations, the Toybox operates at a pace of 60 mm/s with a resolution of 200 microns , ensuring precise toy reproduction. The 4mm Smooth-Flow Extruder Head and Easy-Peel bed simplify the printing experience, eliminating complexities.
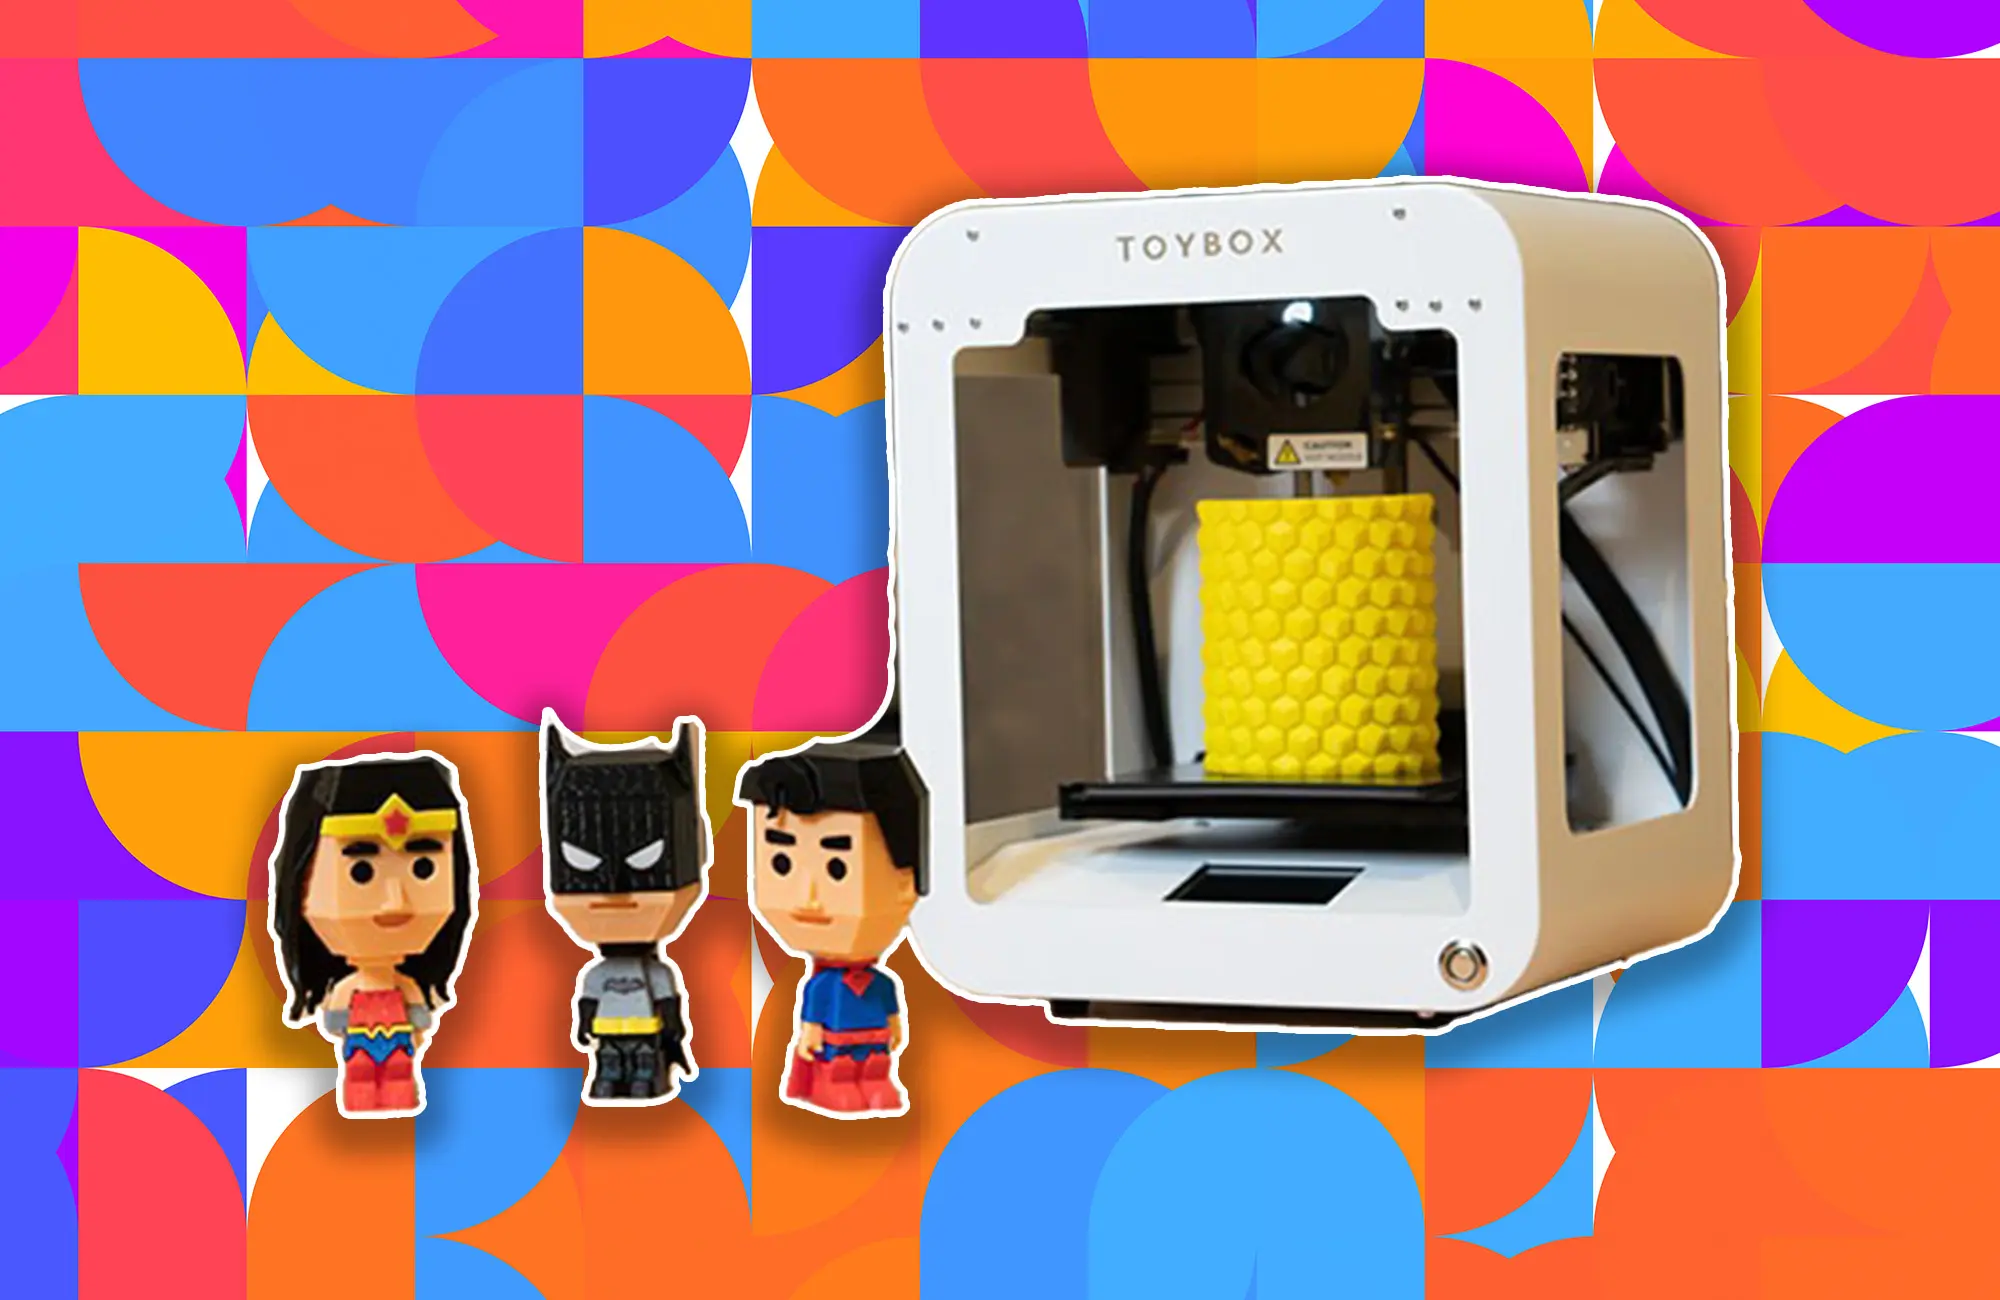
Toybox 3D Printer
Compatible with STL, OBJ , and gCode formats, and offering easy connectivity via 2.4GHz Wi-Fi , sending designs from your smartphone or tablet is seamless. The Toybox puts the magic of creation at your fingertips.
↪Pros
- Ease of Use: Known for reliable, misprint-free performance and one-touch operation, ideal for kids and beginners.
- Creative Freedom: Access to more than 2,000 printable toys and crafting your own designs expands imaginative possibilities.
- Kid-Friendly Design: The robust all-metal frame features rounded edges, safe and easy enough for children to operate with minimal supervision.
- Educational Value: Introduces children to 3D printing and design basics, fostering creativity and problem-solving skills.
↪Cons
- Small Build Area: The build area may limit the size of toys that can be printed.
- Internet Dependency: Requires an internet connection to access its design library, which could be a constraint.
- Unheated Bed: An unheated bed may affect print adhesion compared to other printers.
- Proprietary Filament: Limited to its brand of filament, which may restrict material variety and increase long-term costs.
The Toybox 3D Printer is a doorway into 3D printing, offering a joyful and educational experience that encourages creative thinking and idea realization.
Look for printers with an easy setup, intuitive controls, good customer support, and a robust online community.
Entry-level 3D printers can range from $200 to $500, depending on features and quality.
You can print a wide variety of objects, but always check the printer’s material compatibility and build volume limits.
Yes, if you follow the manufacturer’s safety guidelines, such as proper ventilation and not touching hot surfaces.
Regular maintenance includes cleaning the build plate, lubricating moving parts, and updating firmware.
Check for common issues like bed leveling, filament quality, and slicer settings. Online communities can also offer support.
The error “ WinRAR Error: Next Volume Is Required ” usually appears when you’re extracting a multi-part RAR archive and WinRAR can’t find (or can’t correctly identify) the next file in the sequence . This often happens when a volume is missing , stored in a different folder , or renamed in a way that breaks the archive’s expected order .

In this guide, we’ll go over the most reliable fixes confirmed by affected users, along with what each method is doing behind the scenes so you can choose the right one for your situation.
Important: To extract multi-volume archives, you should always start extraction from the first file in the set. This is usually file.part1.rar , or (in older sets) the main .rar file that comes before .r01 , .r02 , and so on.
1. Download and Place the Missing RAR File
WinRAR needs all parts of a multi-volume archive to complete extraction. This error usually appears when one of the volumes in a set like .part2.rar , .r01 , .r02 , .001 , and similar naming formats is missing . Downloading the missing volume and placing it in the same folder as the other parts allows WinRAR to continue extracting normally .
- Look at the error message or review the list of archive parts in the folder.
- Identify which volume is missing (for example, part2.rar , .r02 , .001 , etc.).
- Go back to the website or source where you downloaded the archive.
- Locate and download the exact missing file using the same naming format as the others.
- Make sure the new file name matches the pattern of the rest. Example: If you have file.part1.rar and file.part3.rar , the missing one must be file.part2.rar .
- Move the downloaded missing volume into the same folder as the other archive parts.
- Confirm that all parts are in a single folder before extracting.
- Right-click the first file in the series (usually part1 or the main .rar file) and select Extract Here or Extract to Folder .
- WinRAR should now detect all volumes and continue extraction normally .
2. Manually Browse & Select the Next Volume
Use this method only if the next volume already exists , but WinRAR is failing to detect it automatically. This can happen due to incorrect naming , the file being in a different location , or a temporary file access issue. Manually browsing helps WinRAR locate the correct volume and resume extraction without interruption .
- Right-click the first file in the series (usually .rar or part1.rar ) and select Extract Here or Extract to Folder .
- When WinRAR cannot find the next volume, it will show the “ Next Volume Is Required ” message.
- A small window will appear, allowing you to manually select the next volume .
- Use the file explorer window to locate the folder where the other archive parts are saved.
- Select the next part based on the naming order (example: select file.part2.rar after file.part1.rar ).
- Make sure the selected file matches the naming format of the archive (no extra characters like (1) and no mismatched numbering).
- WinRAR will resume extraction using the selected volume .
- If additional volumes are missing or stored separately, WinRAR may prompt you again. Repeat the same process until extraction completes.
3. Rename the RAR files in Order
WinRAR relies on a proper naming sequence (such as file.part1.rar , file.part2.rar , file.part3.rar ) to extract multi-volume archives. If a file is named incorrectly, contains extra characters, or is out of order, WinRAR may fail to locate the next volume and show this error. Renaming the files correctly helps WinRAR follow the sequence and extract the archive without interruptions .
Note: Renaming only changes the file name , not the file contents. The goal is to restore the correct sequence so WinRAR can detect the next volume.
- Go to the folder where all the RAR files are saved.
- Make sure all parts of the archive are present and stored in the same folder .
- Check how the parts are currently named . Common patterns include:
file.part1.rar, file.part2.rar, file.part3.rar
file.rar, file.r01, file.r02, file.r03
- Look for files that don’t match the expected numbering pattern (for example, file.part01.rar , file.part1(1).rar , or unrelated names).
- Rename each file so it follows the same order without extra characters or mismatched numbering. Example:
Incorrect: file.part1.rar, file.part3.rar, file.part2(1).rar
Correct: file.part1.rar, file.part2.rar, file.part3.rar
- Make sure the text before the number is exactly the same for all files.
- Only the last part number should change.
- Right-click the first file in the series (usually part1.rar or the main .rar file) and select Extract Here .
- WinRAR should now recognize the sequence and continue extraction normally .
If you still get the same prompt: the archive set is likely incomplete (a part was never downloaded or was removed), or one of the volumes is corrupt and must be re-downloaded from the original source.
